简介
由于手机银行app项目的原因,需要详细了解一下 SSL Pinning 和 双向认证的全过程,所以需要对android 抓包做一个详细的总结,这里我将自己手撸一个android app,且申请受信任的服务器证书(非自签名证书)来对SSL 进行详细的总结
| key | Value |
|---|---|
| Android 版本 | Android 10 |
| Android 手机型号 | Pixel3 |
| 证书机构 | Let's Encrypt |
| Android SDK | SDK 34 |
SSL/TLS中间人攻击
HTTPS
https是基于http协议和TCP之间添加一个TLS/SSL层来加密传输的数据,以确保传输过程中的隐私和安全。
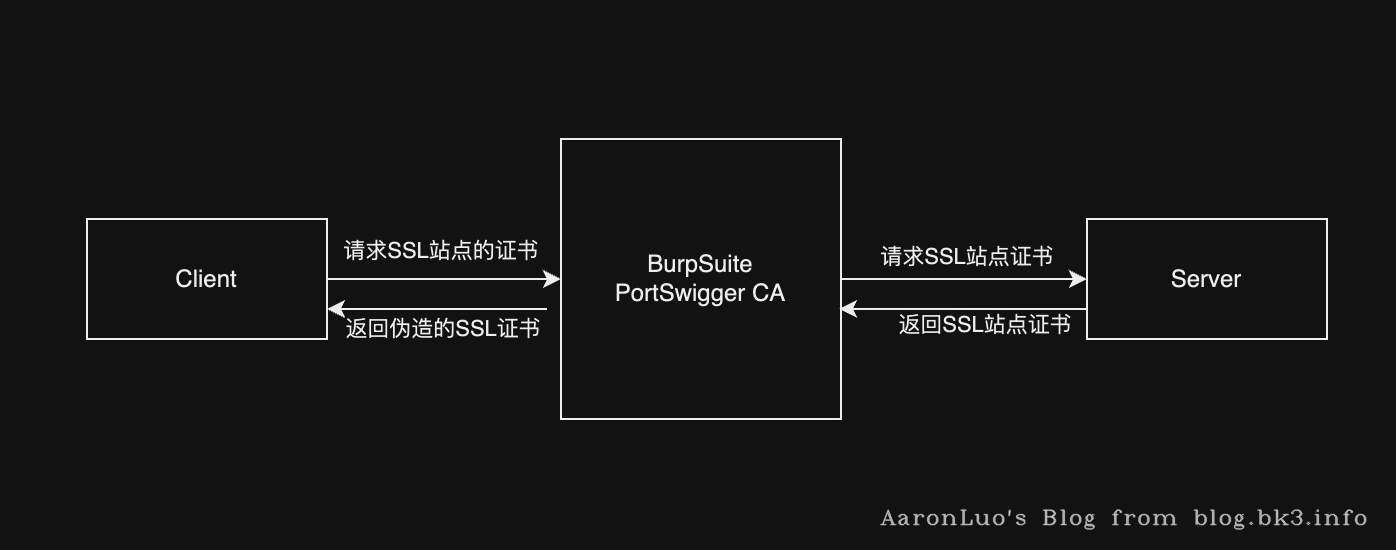
BurpSuite 抓包过程
BurpSuite不光是一个代理的功能,它还是一个自签名的私有CA,当Client请求SSL站点时,burpsuite会返回PortSwigger CA颁发的伪造的证书给Client,Client前期由于导入了信任CA的根证书,因此就信任了这个伪造的证书,从而实现了Client与burp之间的SSL加密通信。然后,BrupSuite再与真实web Server 进行正常https通讯,把client的请求直接转发给服务器,从而实现burpsuite和Web Server之前的SSL加密通信。在中间形成一个基于https的代理,从而获取client与Web Server之间通信的解密报文
APP抓包
在PC上可以将BurpSuite(此类抓包工具)的自签名CA证书导入到受信任的根证书CA中,所以我们在PC上抓包就可以直接SSL的包,其实根据上图中可以看到BurpSuite其实是利用客户端默认信任自签名的CA证书,所以在抓包过程中做了一层SSL加解密处理,所以才能抓到request明文包,然后再用自己的身份和Server 通信,转发Client的包,用Server的证书来加解密,所以我们能看到response明文包,当理解了之后再来看android抓包
在这里我先使用nodejs 快速搭建了一个Web服务器
const express = require('express')
const https = require('https')
const fs = require('fs')
const app = new express()
var index = 0
var options = {
key: fs.readFileSync('./privkey.pem'),
cert: fs.readFileSync('./fullchain.pem')
}
const httpsServer = https.createServer(options, app)
app.get('/', (req, res) => {
res.send('its working')
})
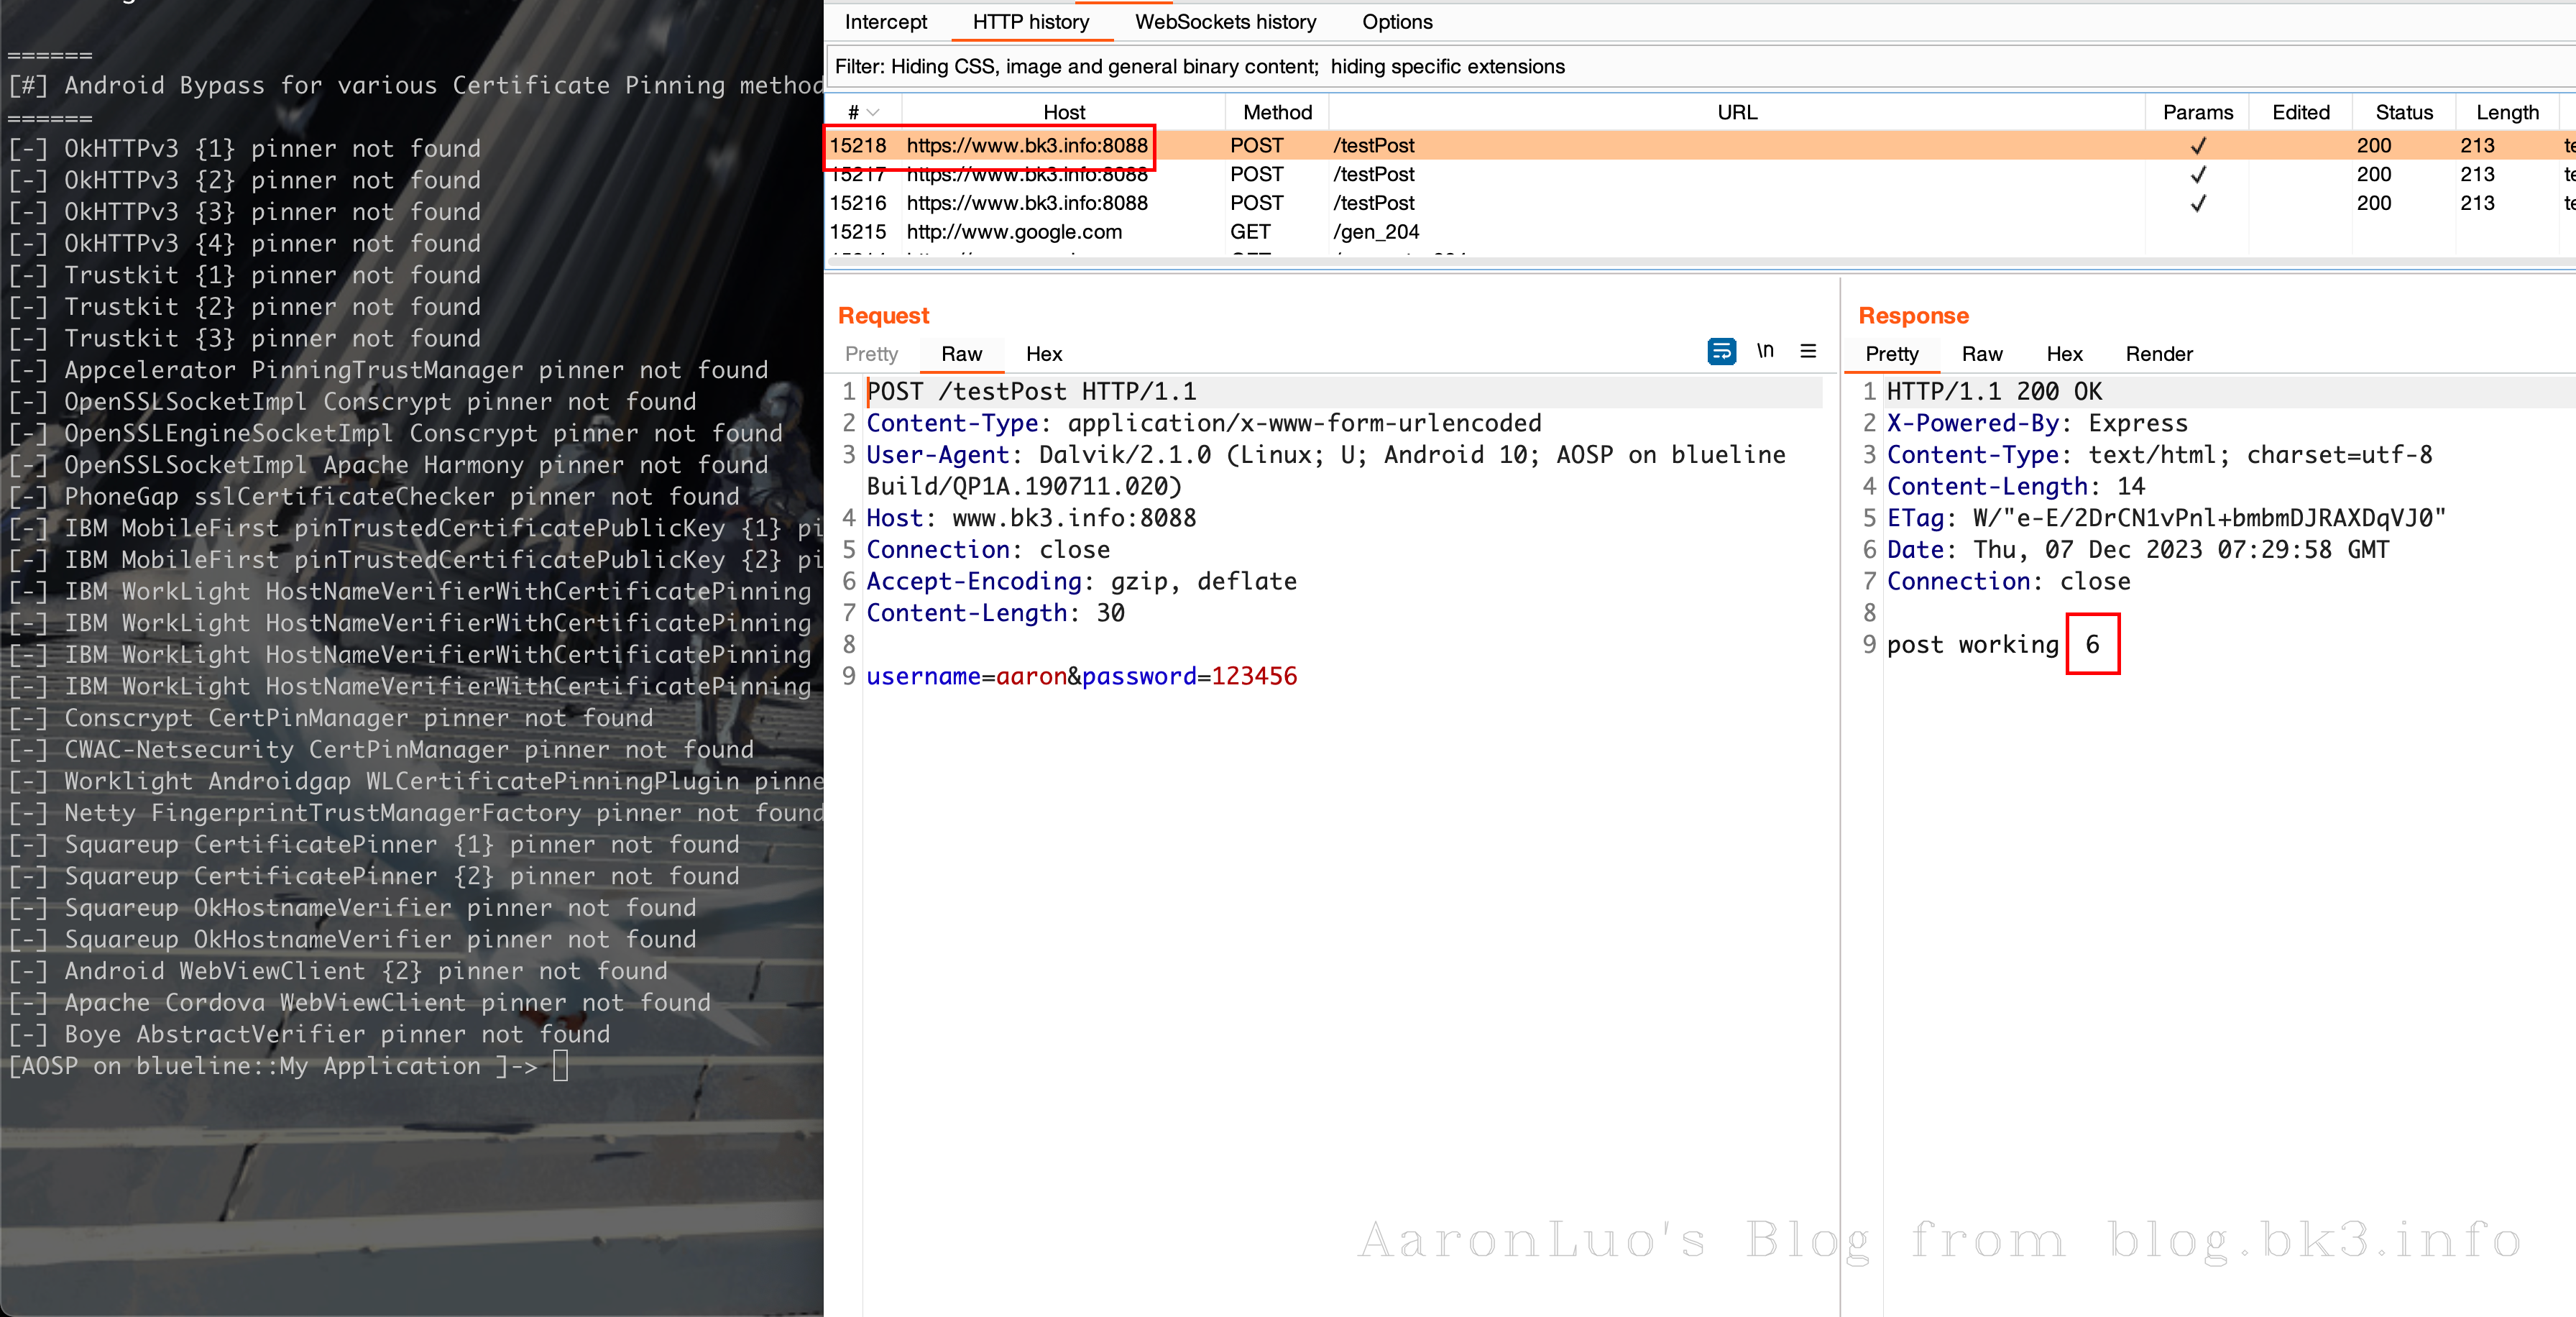
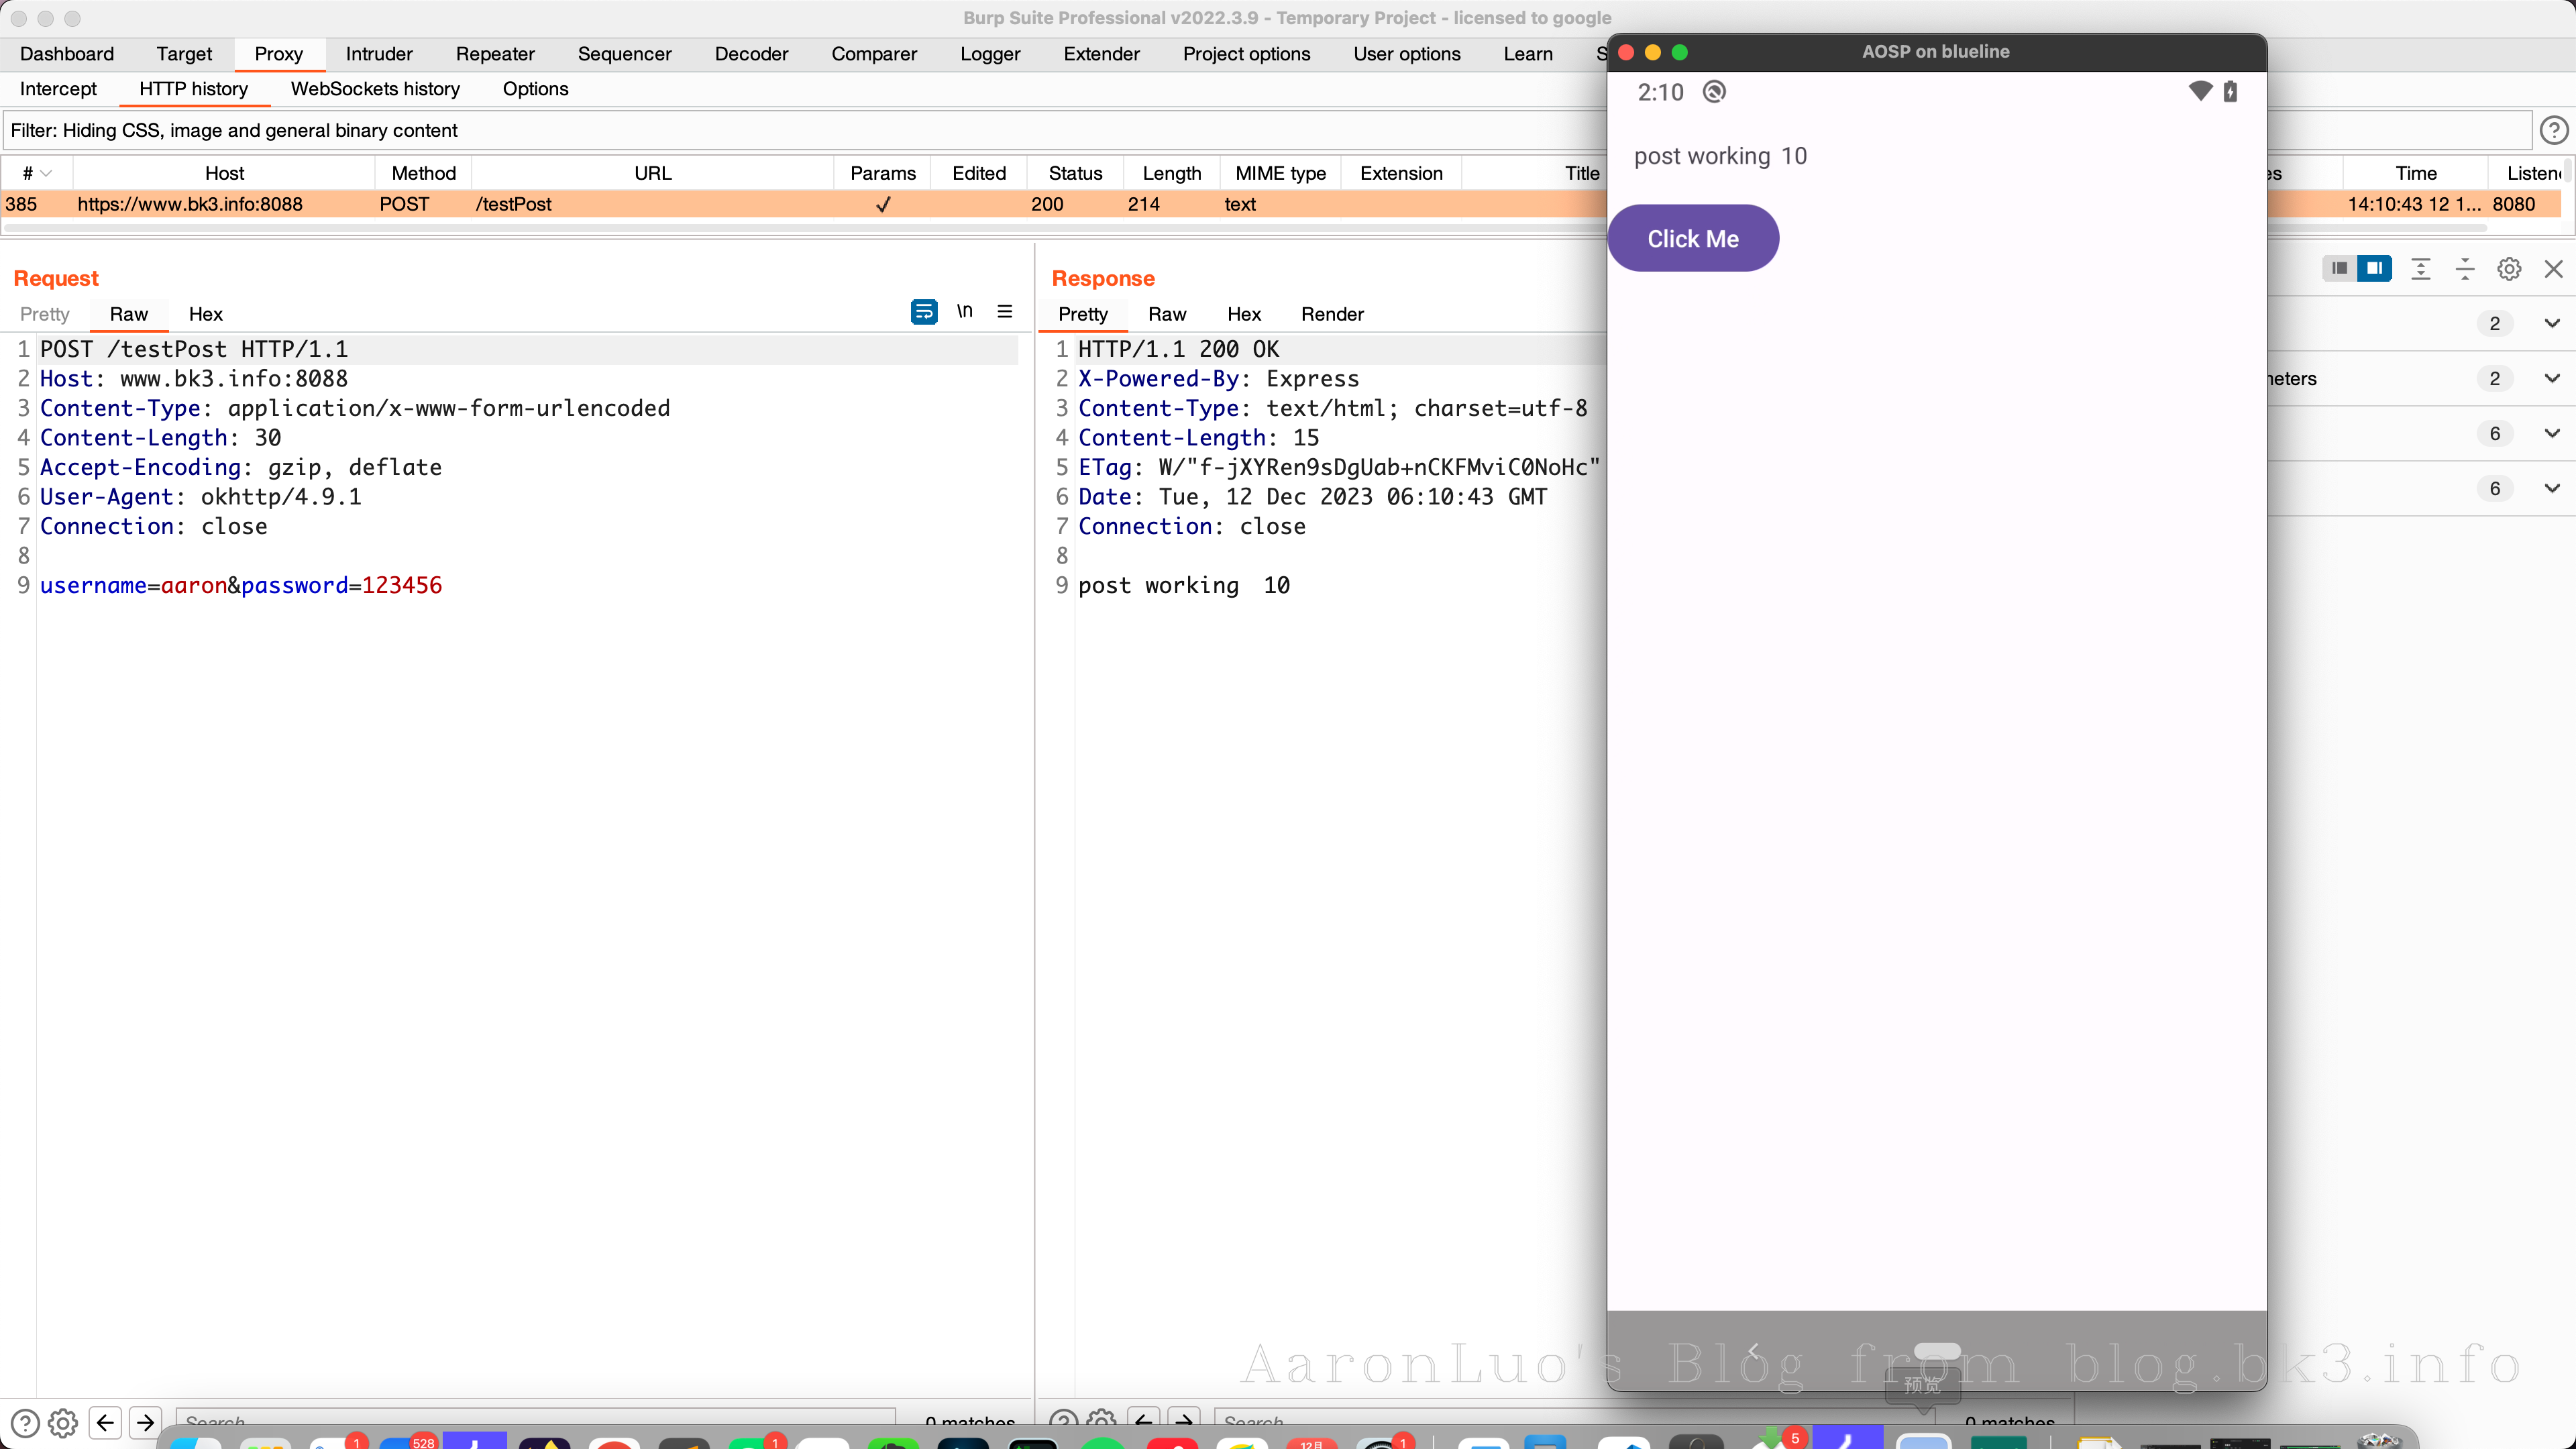
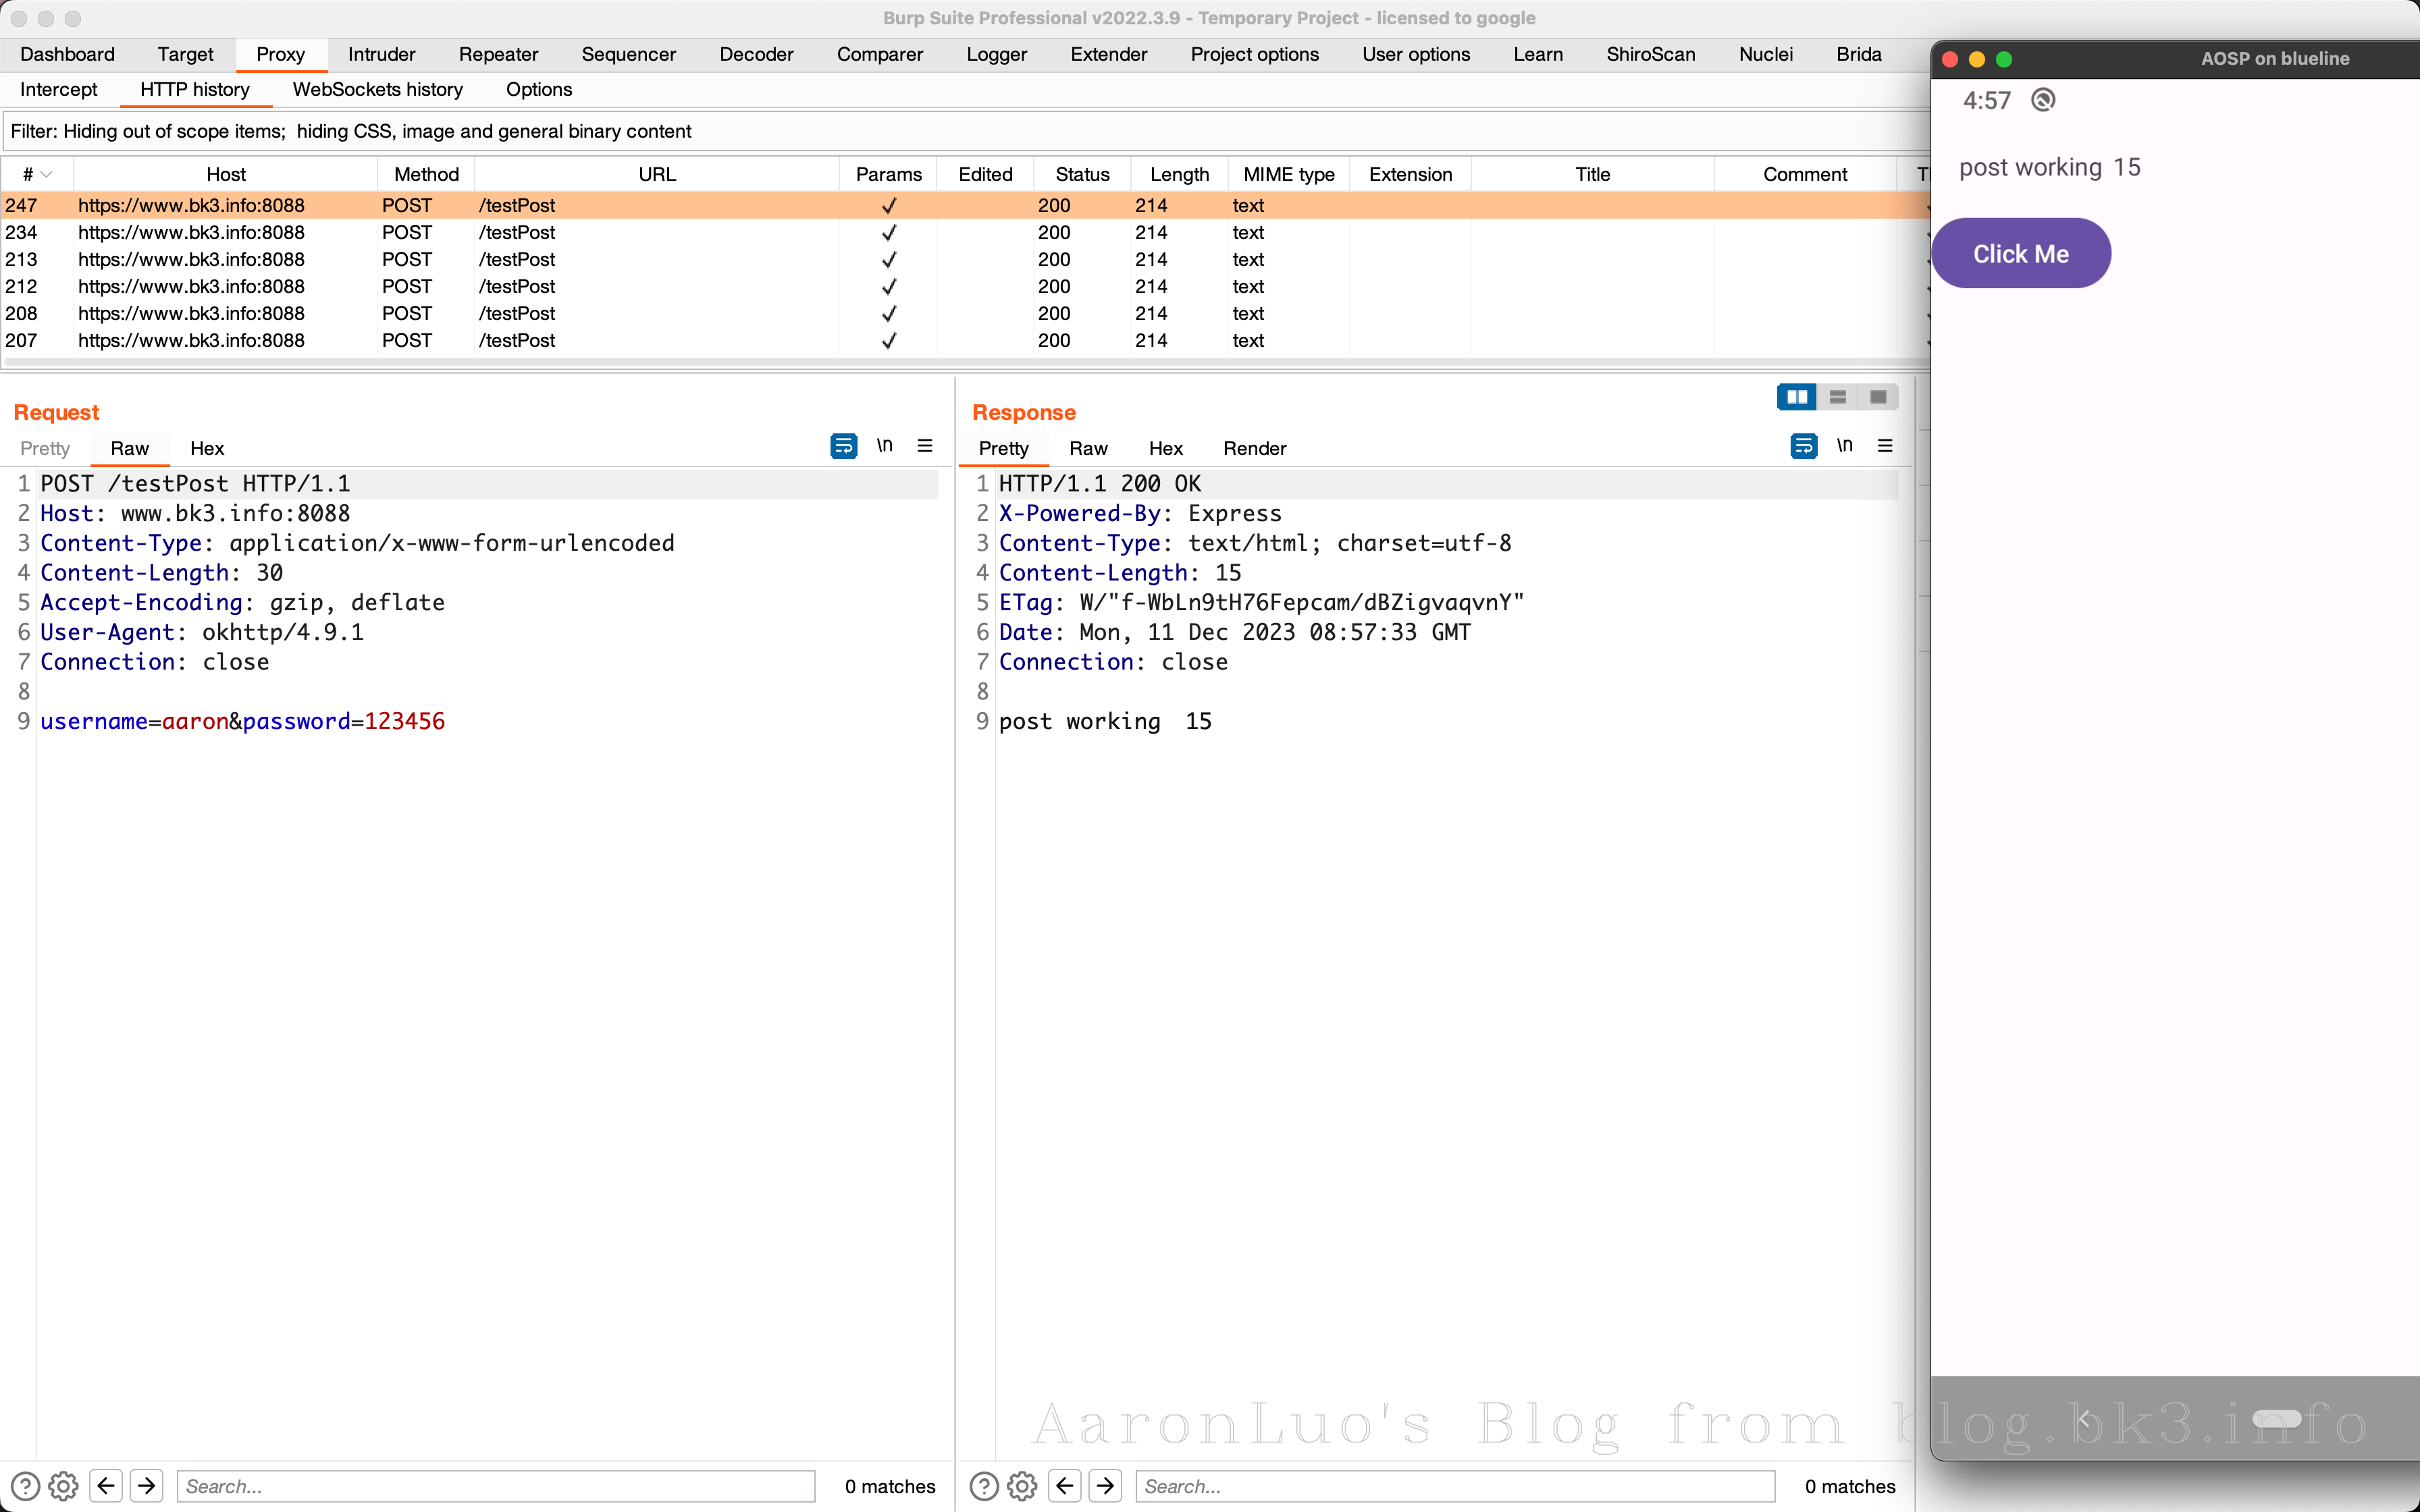
app.post('/testPost', (req, res) => {
index++
res.send('post working\t' + index)
})
httpsServer.listen(8088, () => {
console.log('https running!')
})
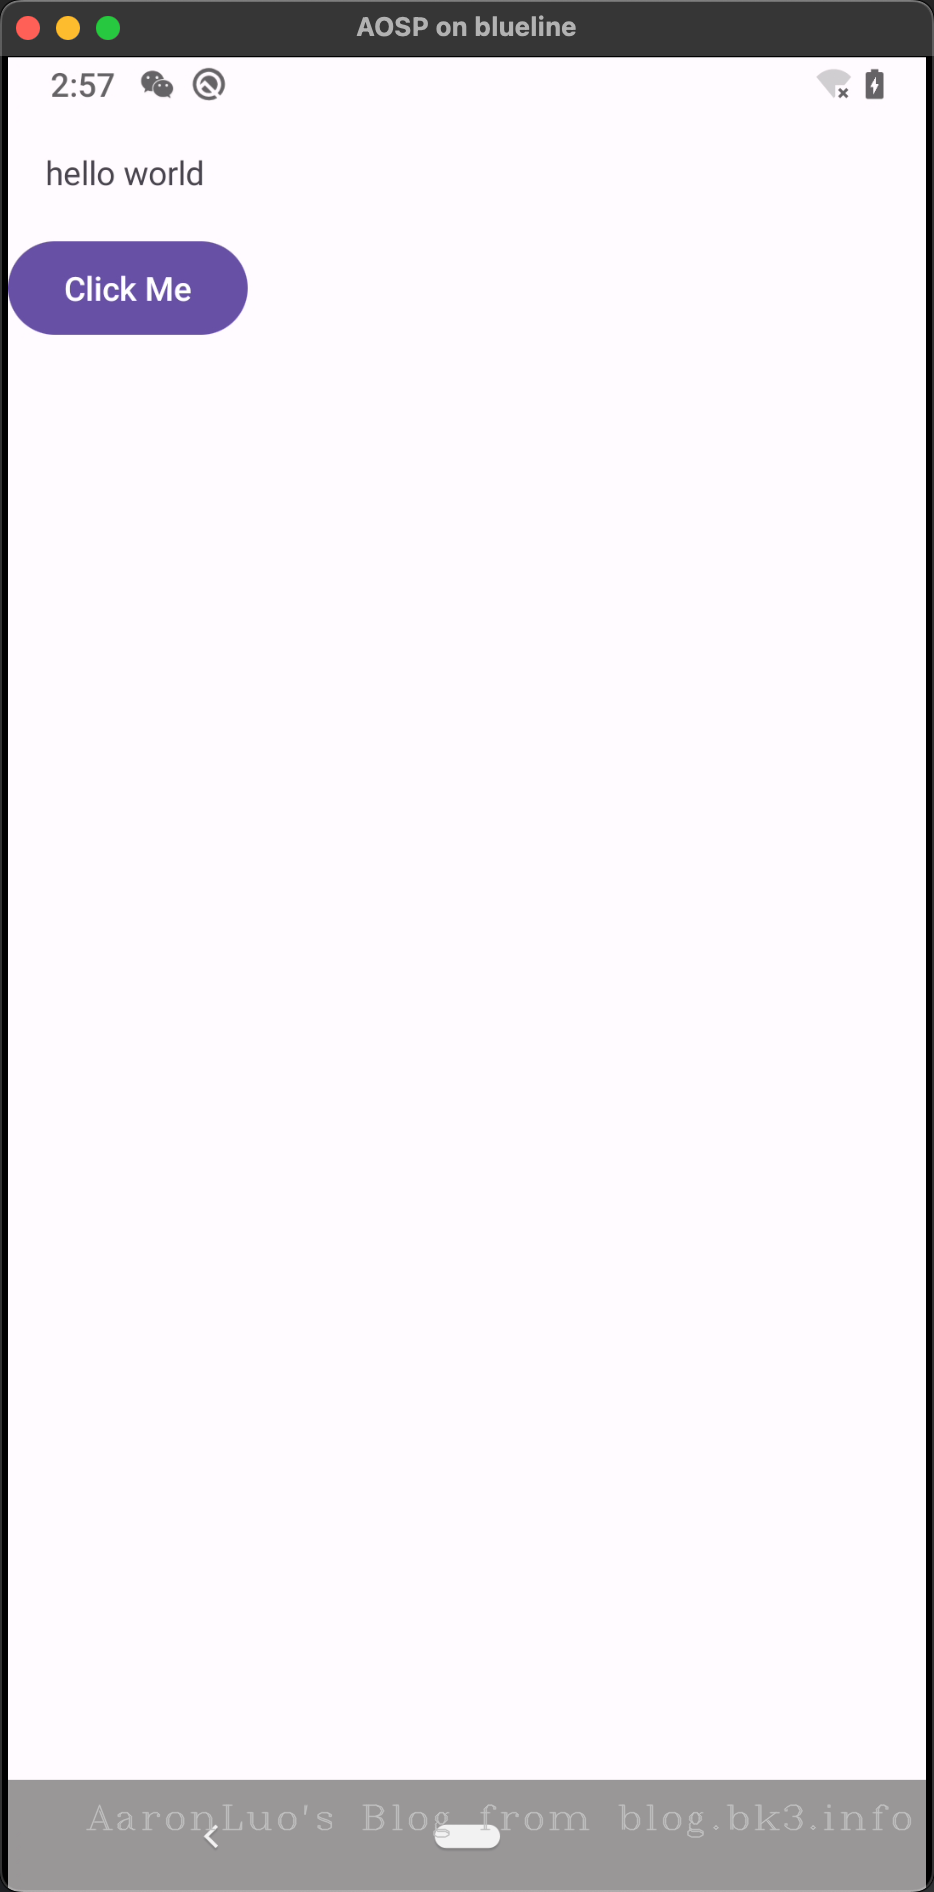
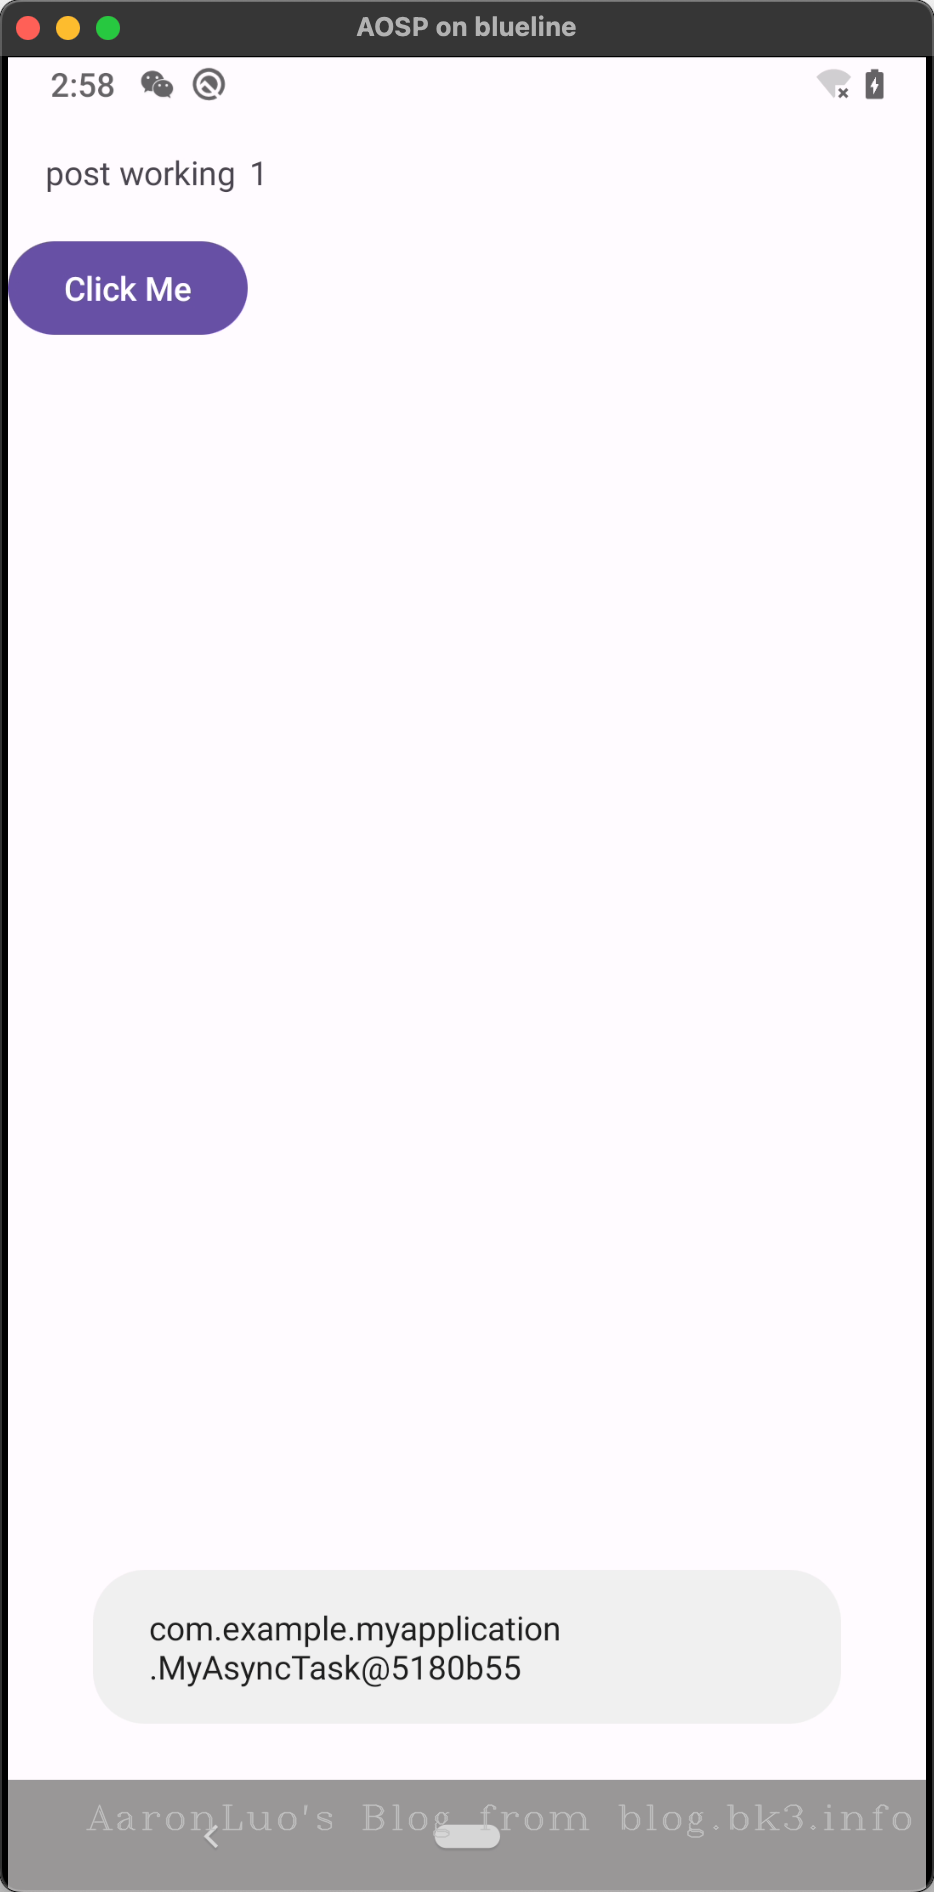
在这里我新建了一个app项目
// MainActivity
package com.example.myapplication;

import android.os.Bundle;
import androidx.appcompat.app.AppCompatActivity;

import android.view.Menu;
import android.view.View;
import android.widget.Button;
import android.widget.Toast;

import com.google.android.material.snackbar.Snackbar;

public class MainActivity extends AppCompatActivity {

    @Override
    protected void onCreate(Bundle savedInstanceState) {
        super.onCreate(savedInstanceState);
        setContentView(R.layout.activity_main);

        Button myButton = findViewById(R.id.myTestButton);
        myButton.setOnClickListener(v -> {
            try{
                MyAsyncTask myAsyncTask = new MyAsyncTask(MainActivity.this);
                User user = new User();
                user.setUsername("aaron");
                user.setPassword("123456");
                String news = String.valueOf(myAsyncTask.execute("https://www.bk3.info:8088/testPost",user.toString()));
                if(news != null){
                    Toast.makeText(MainActivity.this, news, Toast.LENGTH_SHORT).show();
                }
                System.out.println(news);
            }catch (Exception e){
                e.printStackTrace();
            }
        });
    }


    @Override
    public boolean onCreateOptionsMenu(Menu menu) {
        // Inflate the menu; this adds items to the action bar if it is present.
        getMenuInflater().inflate(R.menu.menu_main, menu);
        return true;
    }

}
// MyAsyncTask
package com.example.myapplication;
import android.app.Activity;
import android.content.Context;
import android.os.AsyncTask;
import android.widget.Button;
import android.widget.TextView;
import android.view.View;
import java.io.BufferedReader;
import java.io.InputStreamReader;
import java.net.HttpURLConnection;
import java.io.DataOutputStream;
import java.net.URL;

public class MyAsyncTask extends AsyncTask<String, Void, String>{
    private Context mContext;
    public MyAsyncTask(Context mContext){
        this.mContext = mContext;
    }
    @Override
    protected String doInBackground(String...params) {
        String result = "";
        try {
            URL url = new URL(params[0]);
            HttpURLConnection connection = (HttpURLConnection) url.openConnection();
            connection.setRequestMethod("POST");
            connection.setDoOutput(true);
            DataOutputStream outputStream = new DataOutputStream(connection.getOutputStream());
            String postData = params[1]; // 替换为你的POST参数
            outputStream.writeBytes(postData);
            outputStream.flush();
            outputStream.close();

            BufferedReader reader = new BufferedReader(new InputStreamReader(connection.getInputStream()));
            String line;
            while ((line = reader.readLine()) != null) {
                result += line;
            }
            reader.close();
            connection.disconnect();
        } catch (Exception e) {
            e.printStackTrace();
        }
        System.out.println(result);
        return result;
    }

    @Override
    protected void onPostExecute(String result) {
        TextView textView = ((Activity)mContext).findViewById(R.id.MainTextView);
        textView.setText(result);
    }
}
具体功能表现为点击按钮,将response显示在TextView上
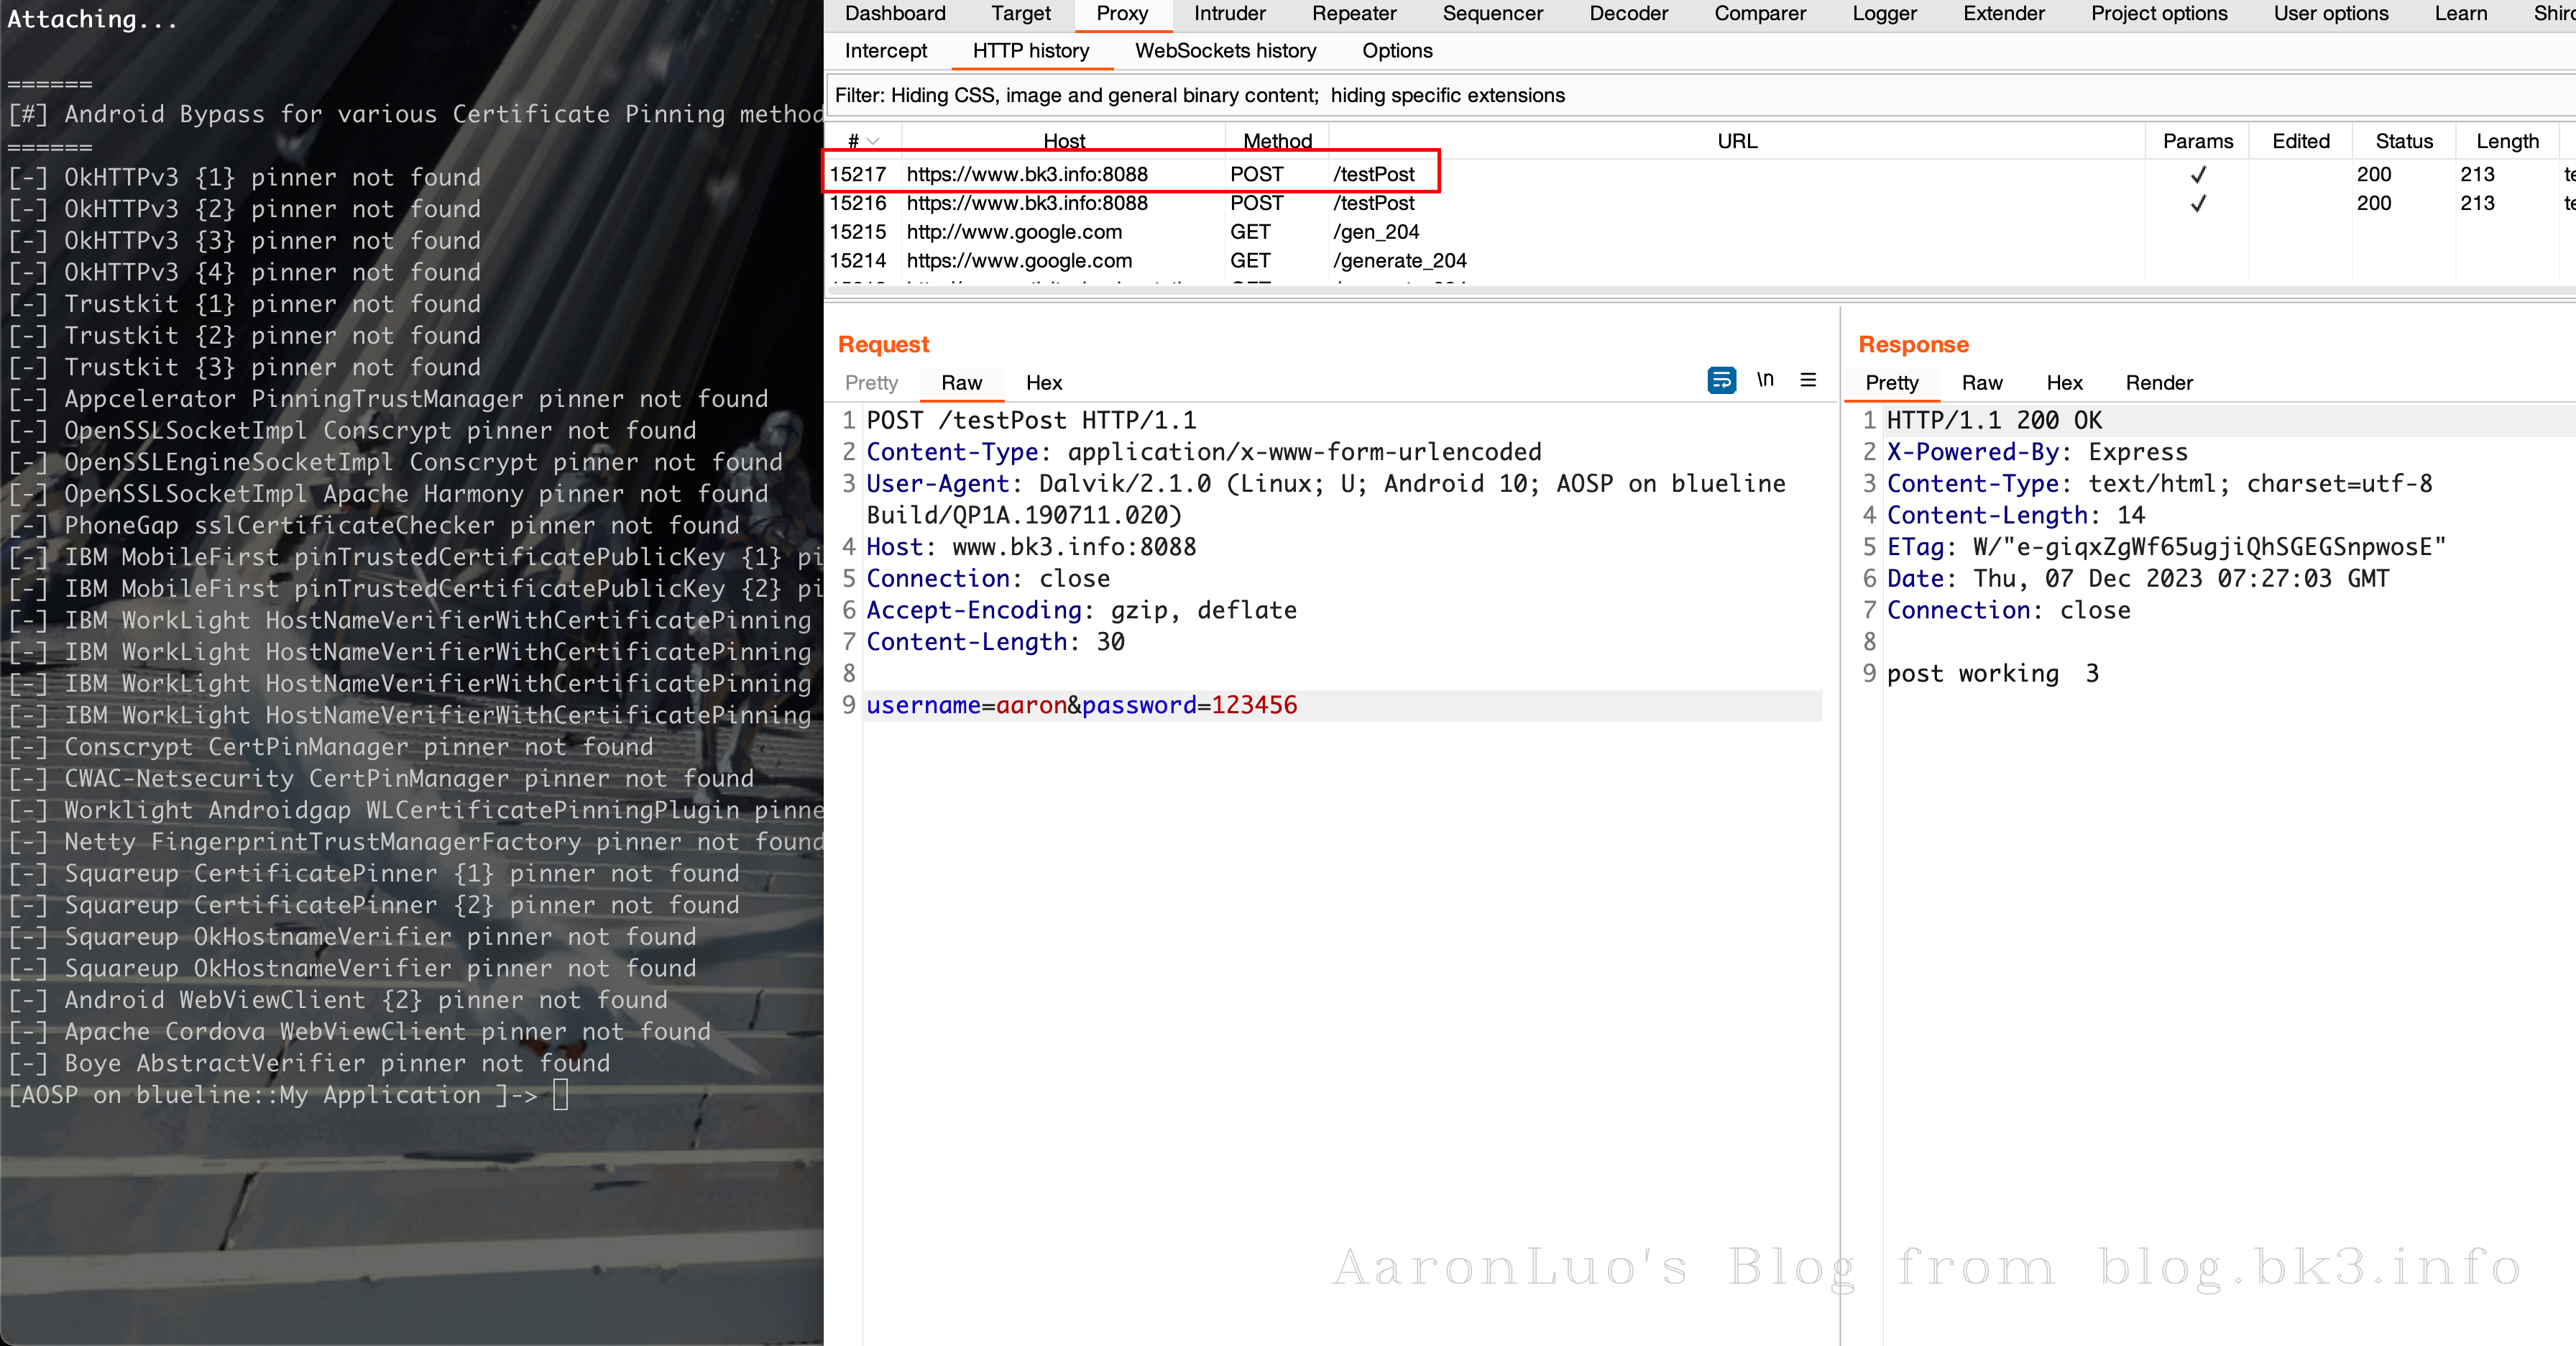
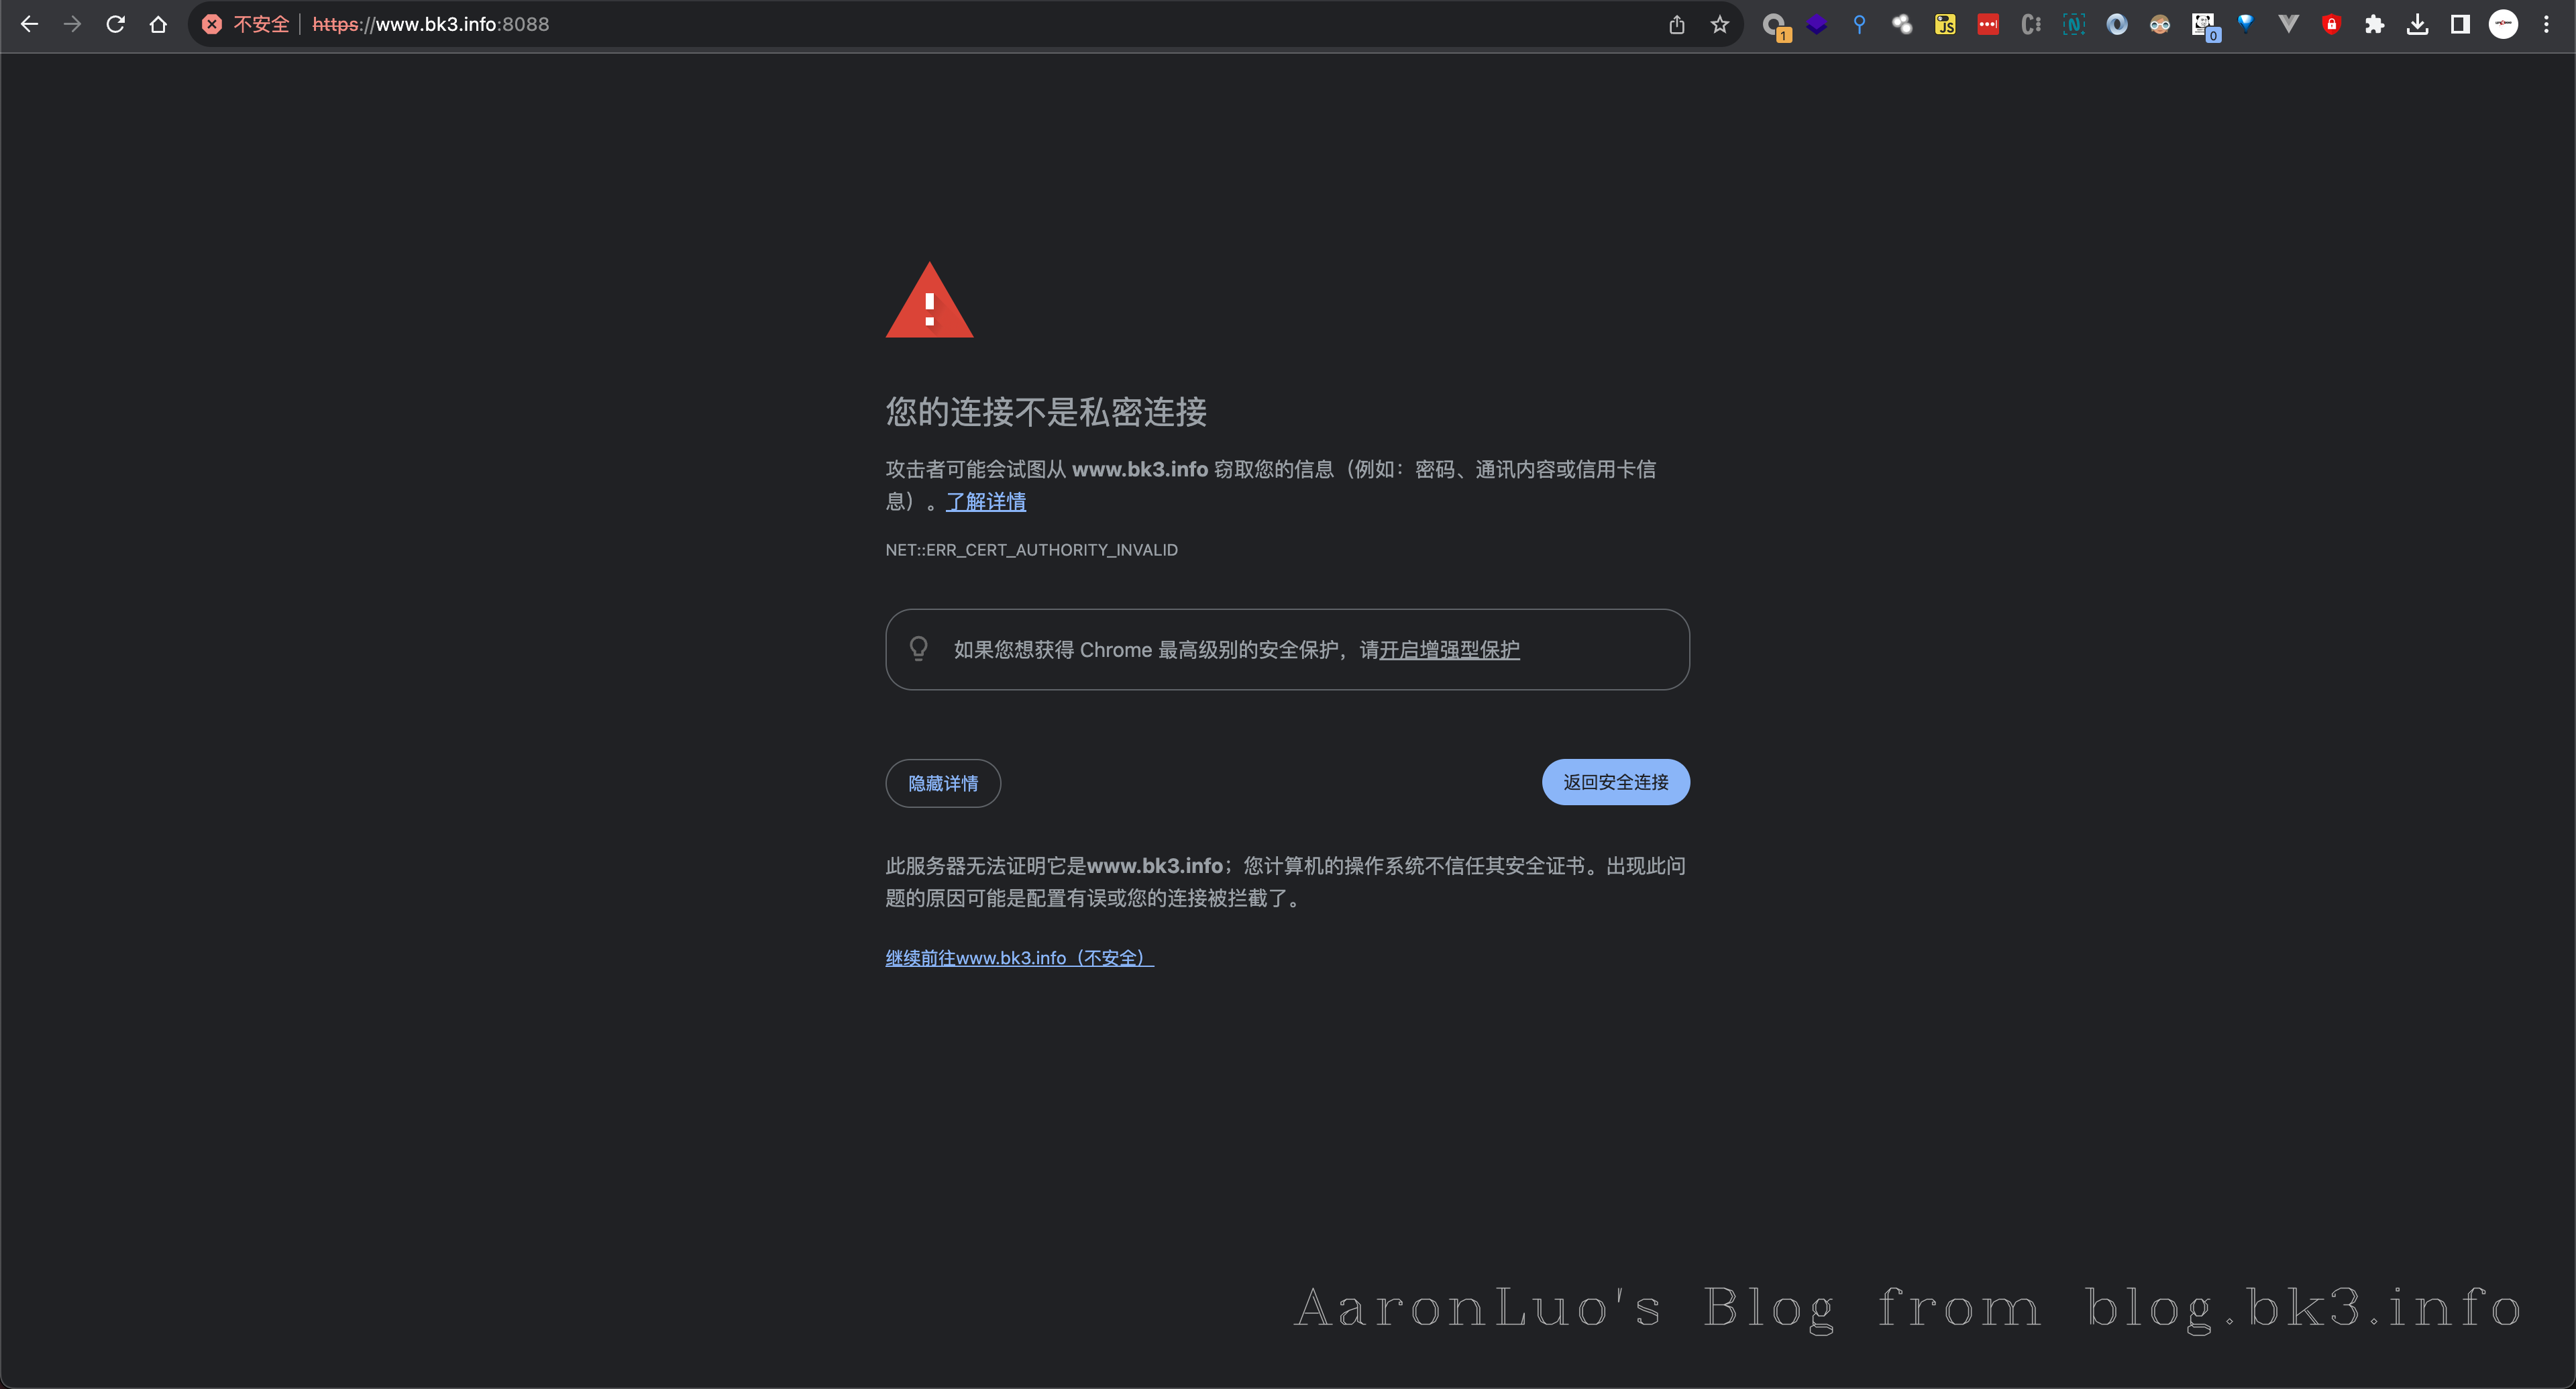
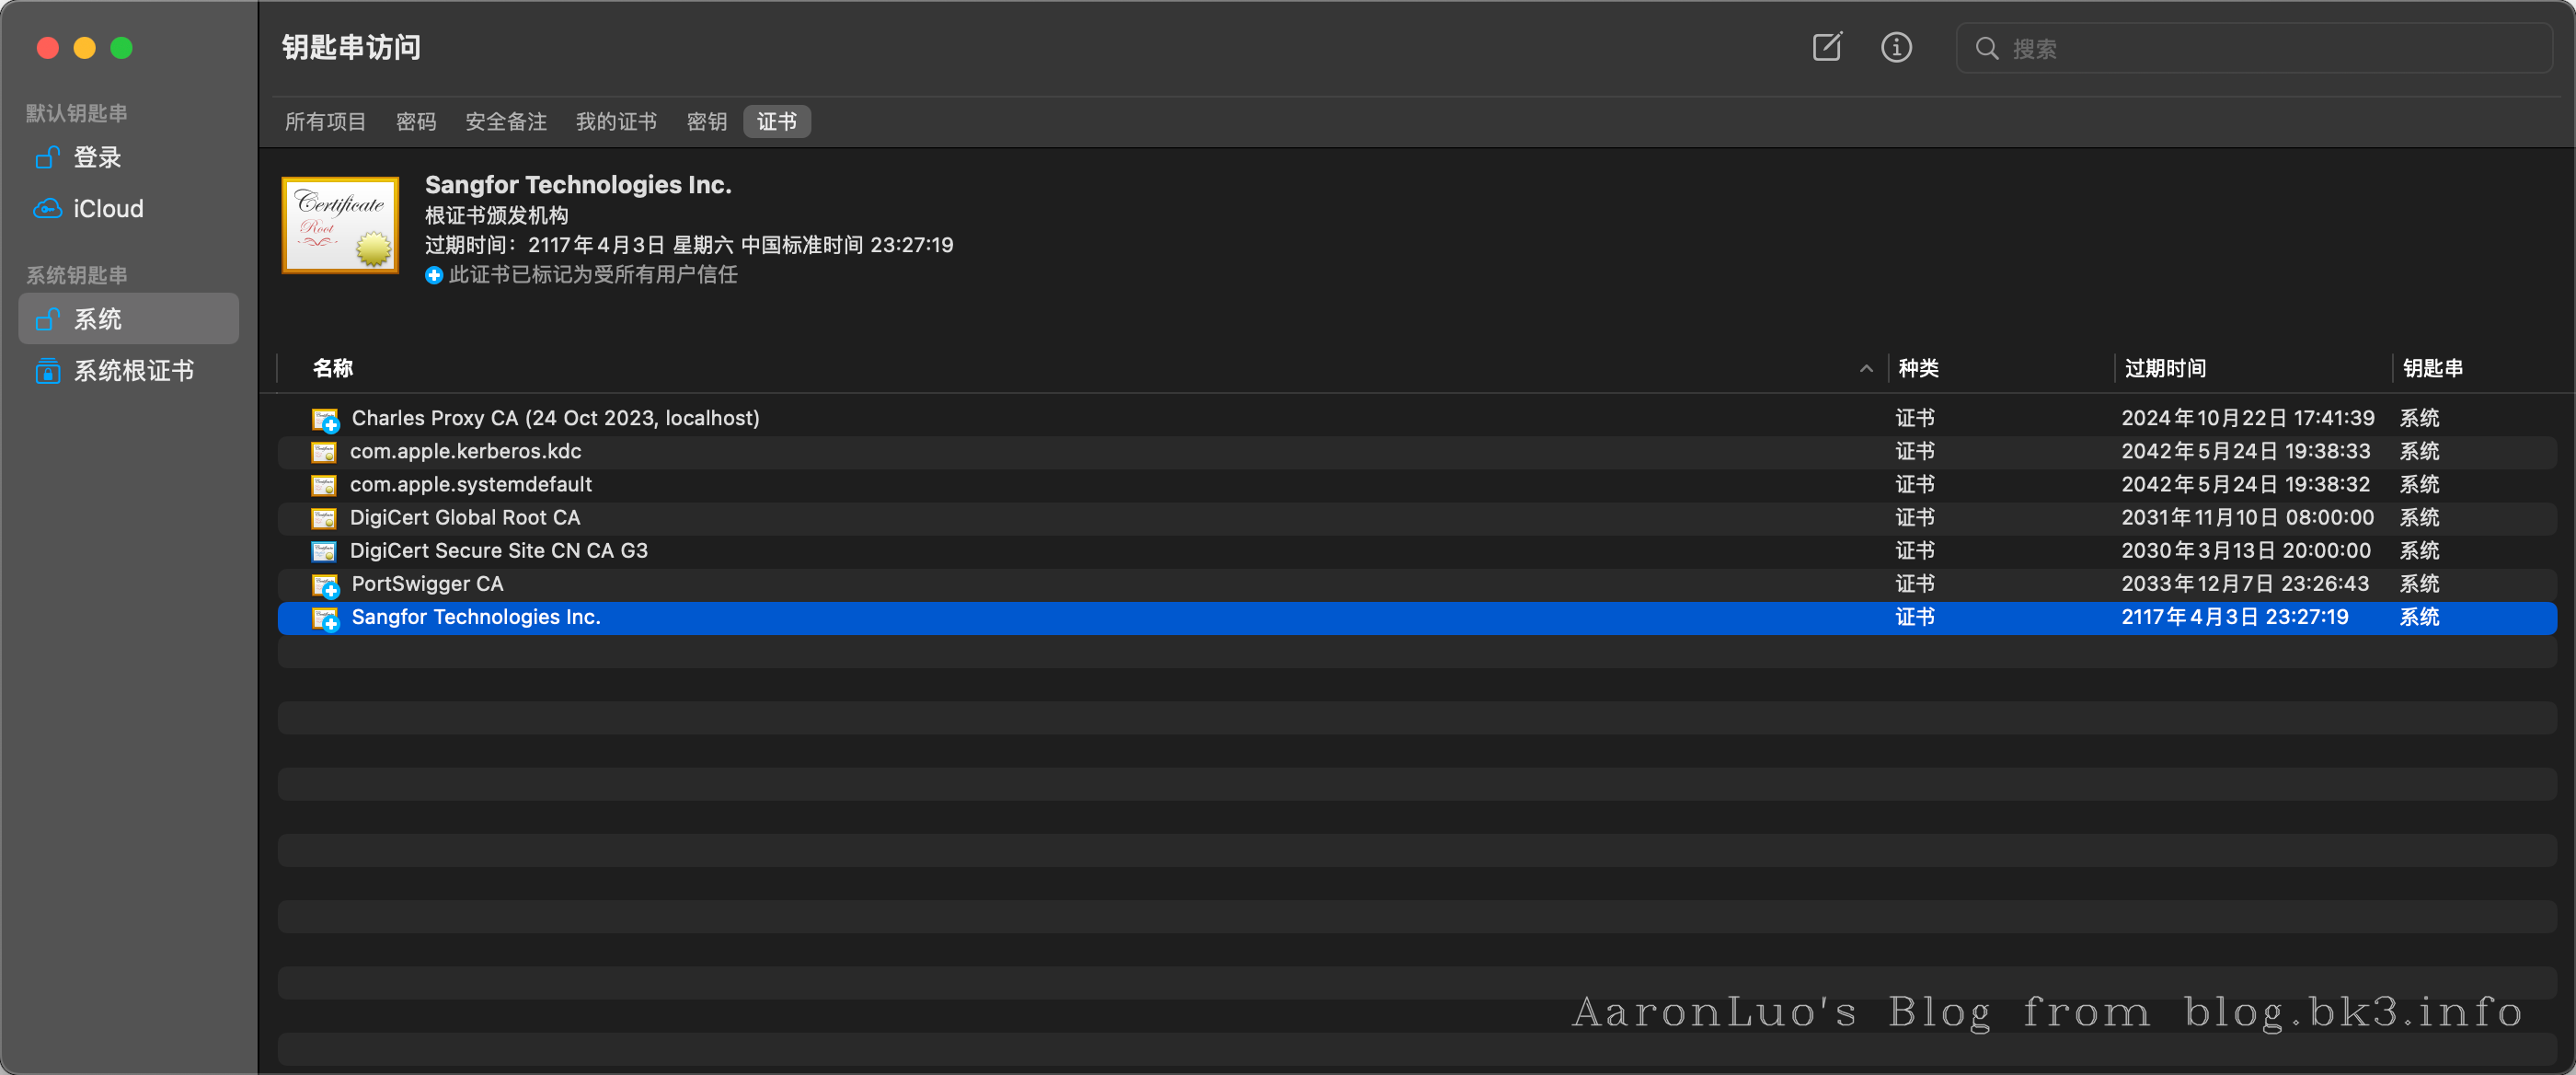
当将BurpSuite的CA证书导入到系统证书目录下,抓包的时候发现Burp无法抓包

且用frida hook的时候会显示使用了SSL Pinning(TrustManagerImpl)
Frida 脚本的关键代码如下
var TrustManagerImpl = Java.use('com.android.org.conscrypt.TrustManagerImpl');
TrustManagerImpl.verifyChain.implementation = function (untrustedChain, trustAnchorChain, host, clientAuth, ocspData, tlsSctData) {
  console.log('[+] Bypassing TrustManagerImpl (Android > 7): ' + host);
    return untrustedChain;
};

[!INFO]
我并没有添加SSL Pinning 专门来校验服务端的证书,但是直接抓包不成功,且在使用frida hook SSL Pinning 之后会发现存在TrustManagerImpl.verifyChain(untrustedChain, trustAnchorChain, host, clientAuth, ocspData, tlsSctData)这个函数的调用
证书问题
此时,我还未发现是证书问题,还以为是我在开发打包过程中莫名其妙添加了一些认证框架进来,当我询问Android开发大佬yksqn35919@gmail.com,他告诉我如果是使用了框架去看看依赖,如果存在的话,按照安卓网络安全配置将系统证书添加进去,我尝试过,还是不行
最后我想起我PC的Charles的证书已经过期了,且我重新申请之后,又需要将新证书导入到信任的系统证书中,这样我的PC才能抓到包
这时我手机里的BurpSuite证书还是@屈大佬的BurpSuite的CA证书(且未过期)
当我使用openssl重新计算CA证书,并重新添加到Android的系统证书中,发现可以抓包了

且Frida hook 不会有 Kill SSL Pinning 的操作
所以到这里可以看到其实是证书的问题
然后捋清楚了SSL/TLS的中间人攻击,我通过WireShark抓包查看SSL 握手包 终于发现了问题
由于我重新生成了BurpSuite的CA证书,但是我一直以为
openssl x509 -inform DER -subject_hash_old -in xxx.der
算出来的hash 是一样的,所以我没有更新我android手机里系统里的burp CA证书,导致app 与 burp 通信的时候,证书不被信任,就抓不到包,且使用frida去hook时发现存在ssl pinning,是因为新生成的证书和以前的证书签名没过,所以frida 其实hook到的是app 与 burp 通信的时候证书校验
# 生成android证书的正确步骤
# .cer格式证书
openssl x509 -inform DER -subject_hash_old -in 证书文件.cer
# .pem格式证书
openssl x509 -inform PEM -subject_hash_old -in 证书文件.pem

# cer格式
openssl x509 -inform DER -text -in xxx.cer > 43340bc0.0
# pem格式
openssl x509 -inform PEM -text -in xxx.pem > 43340bc0.0
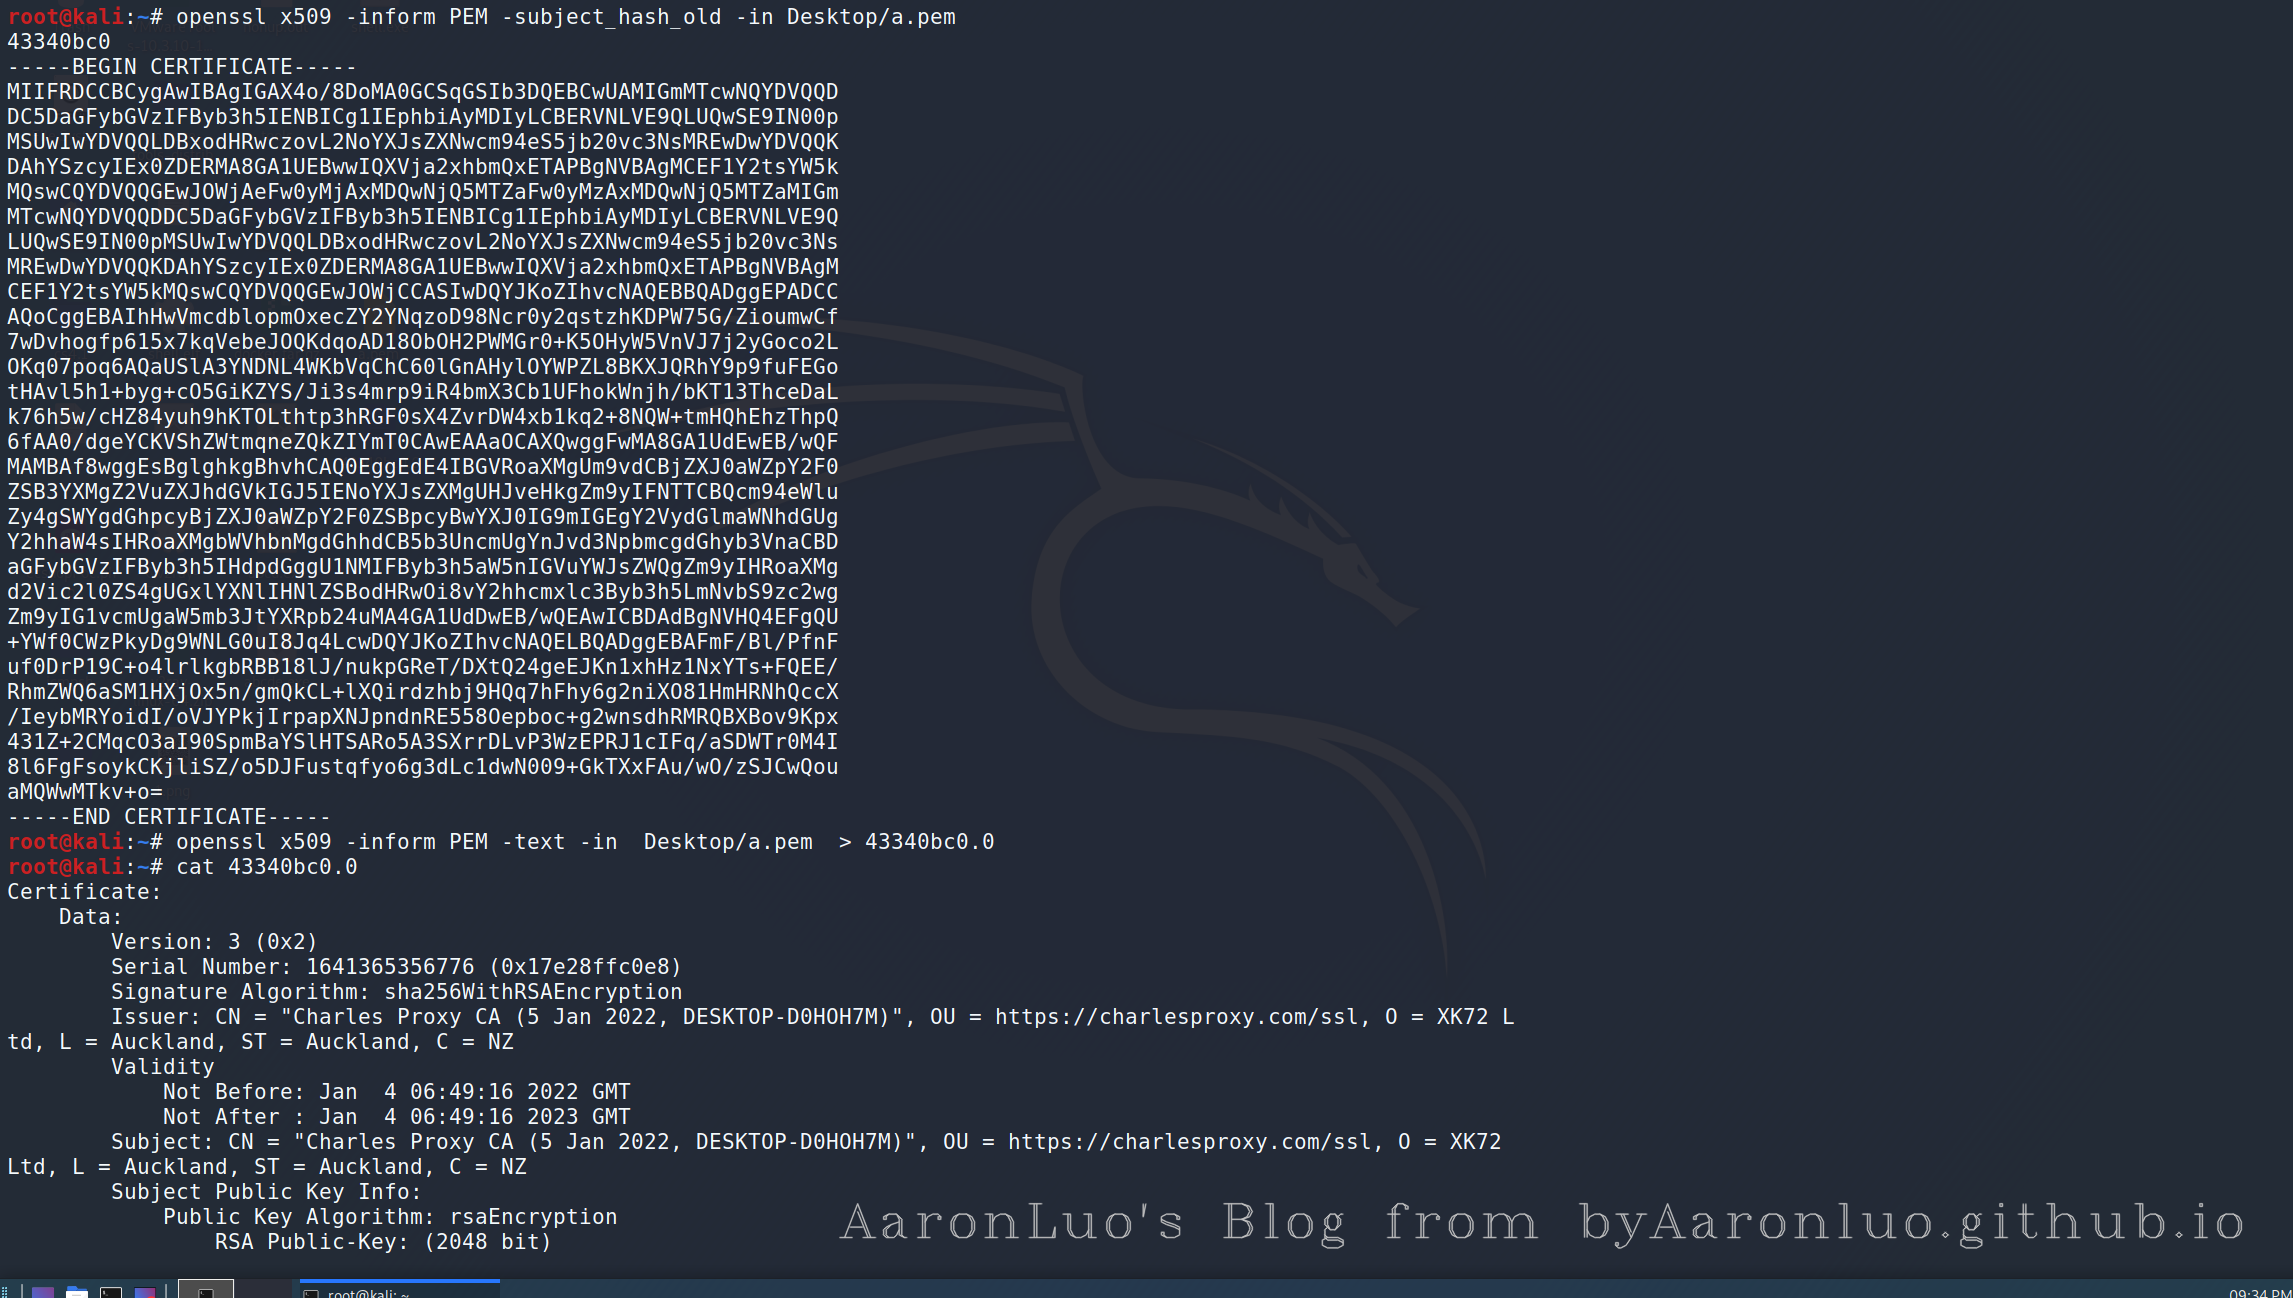
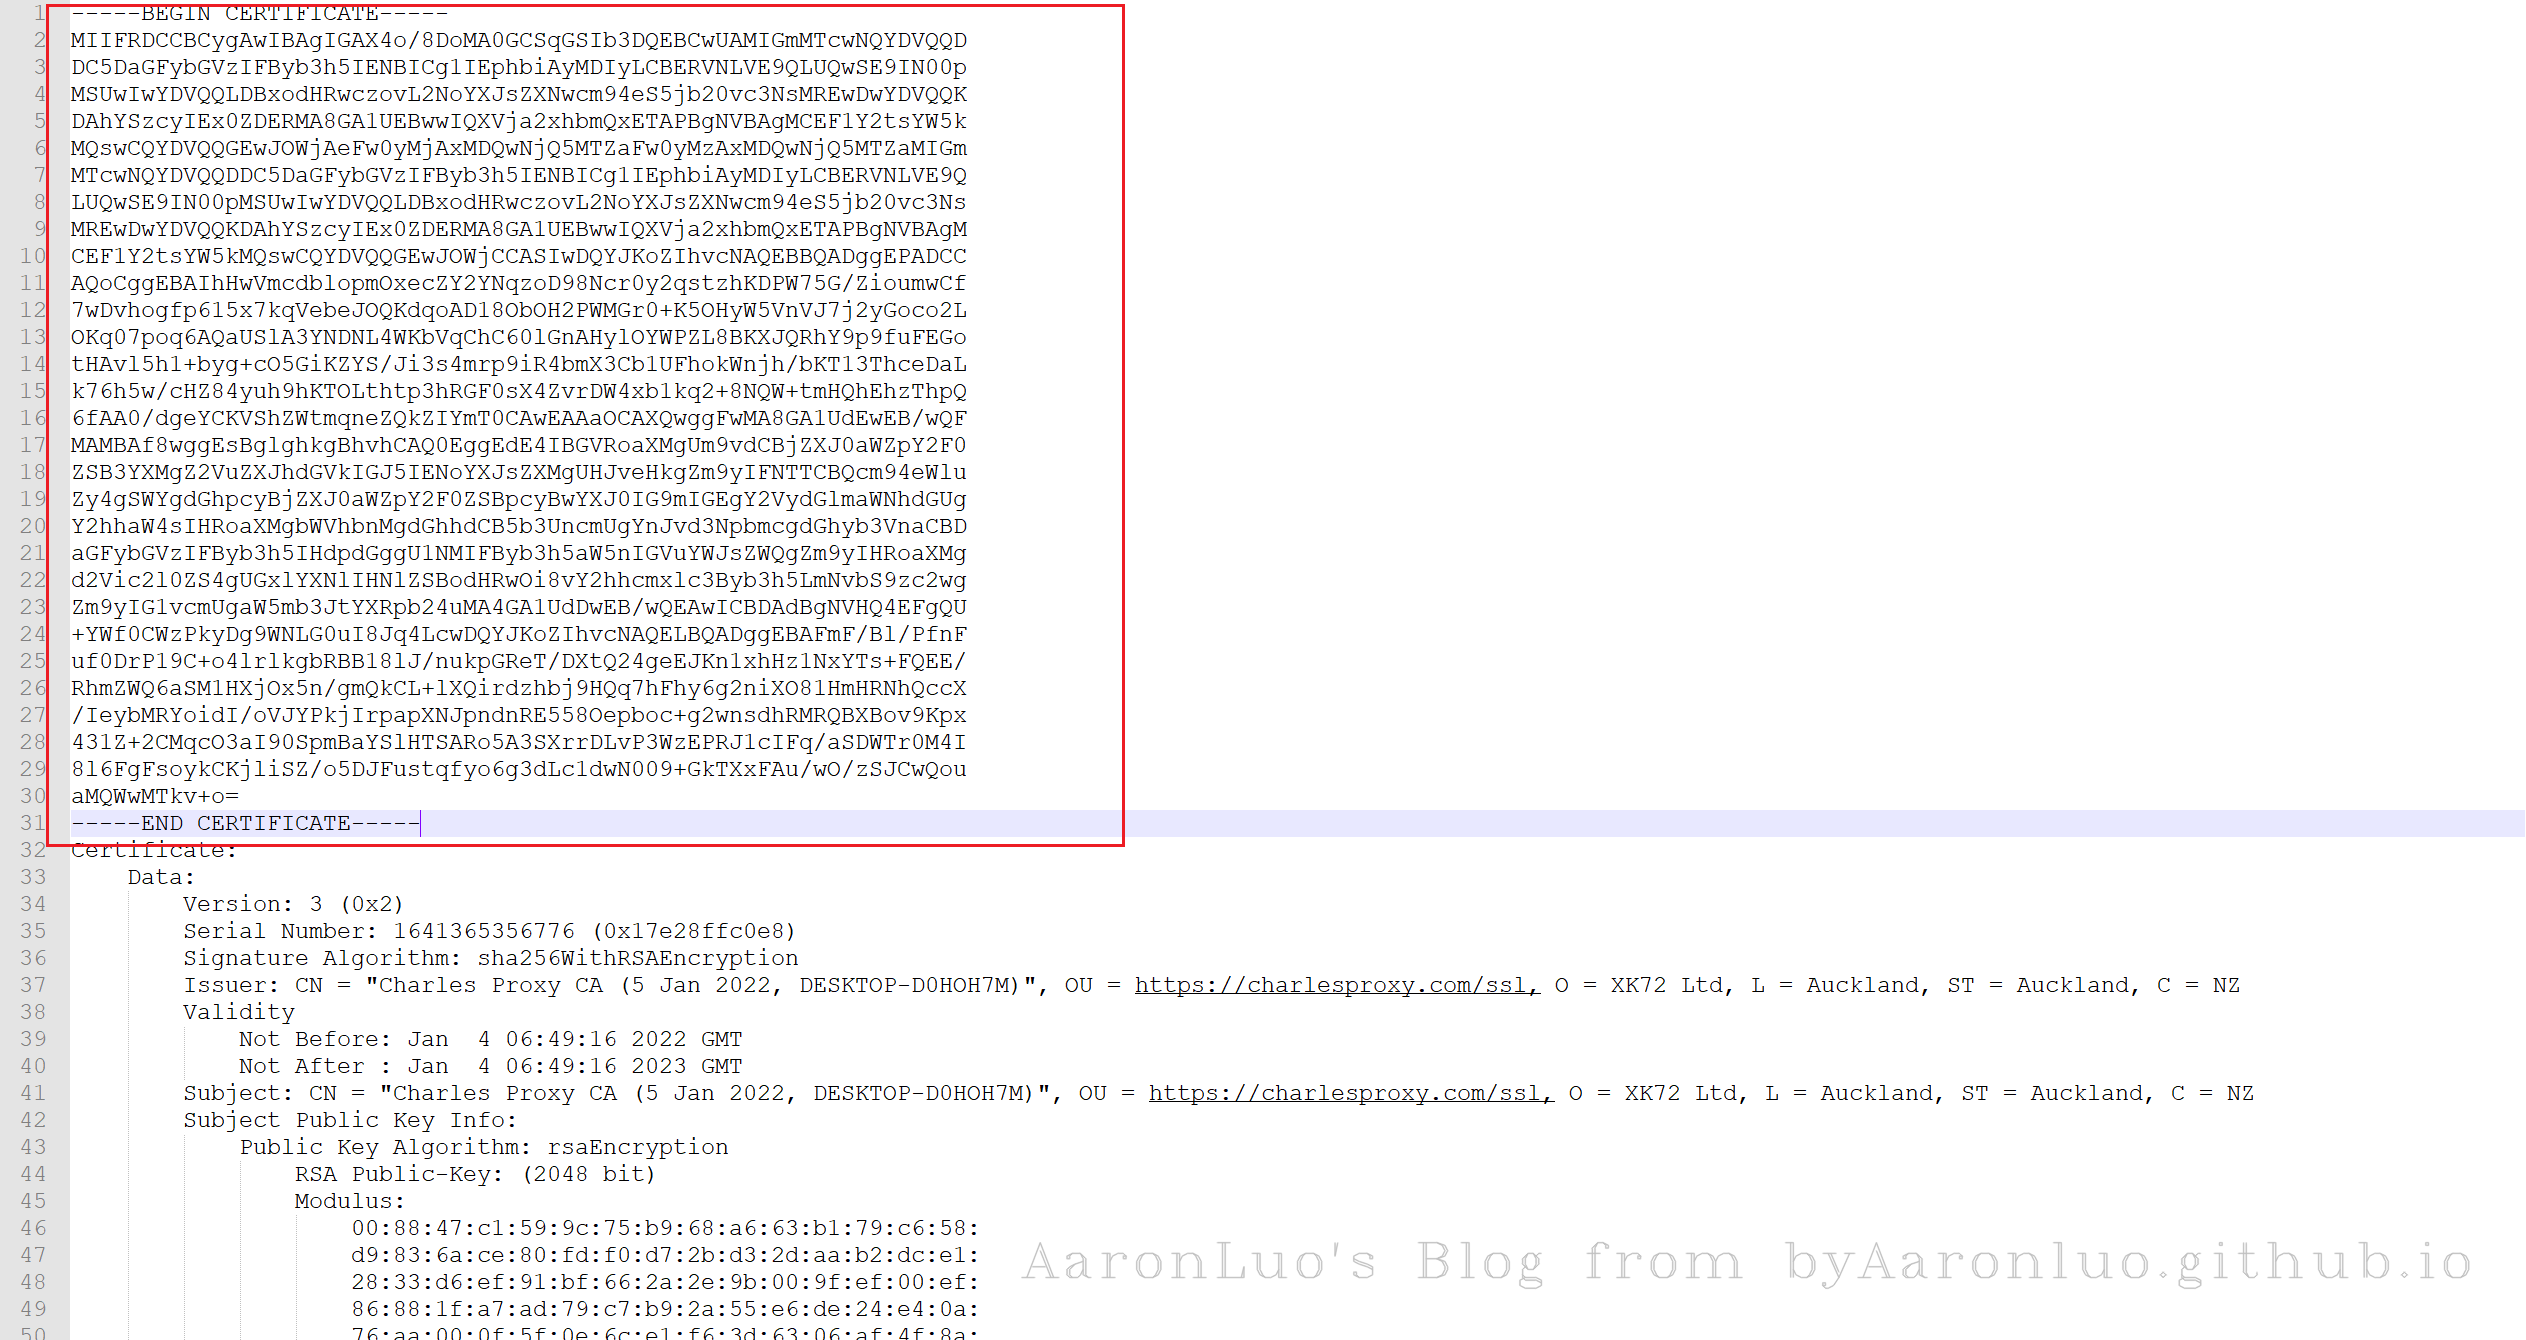
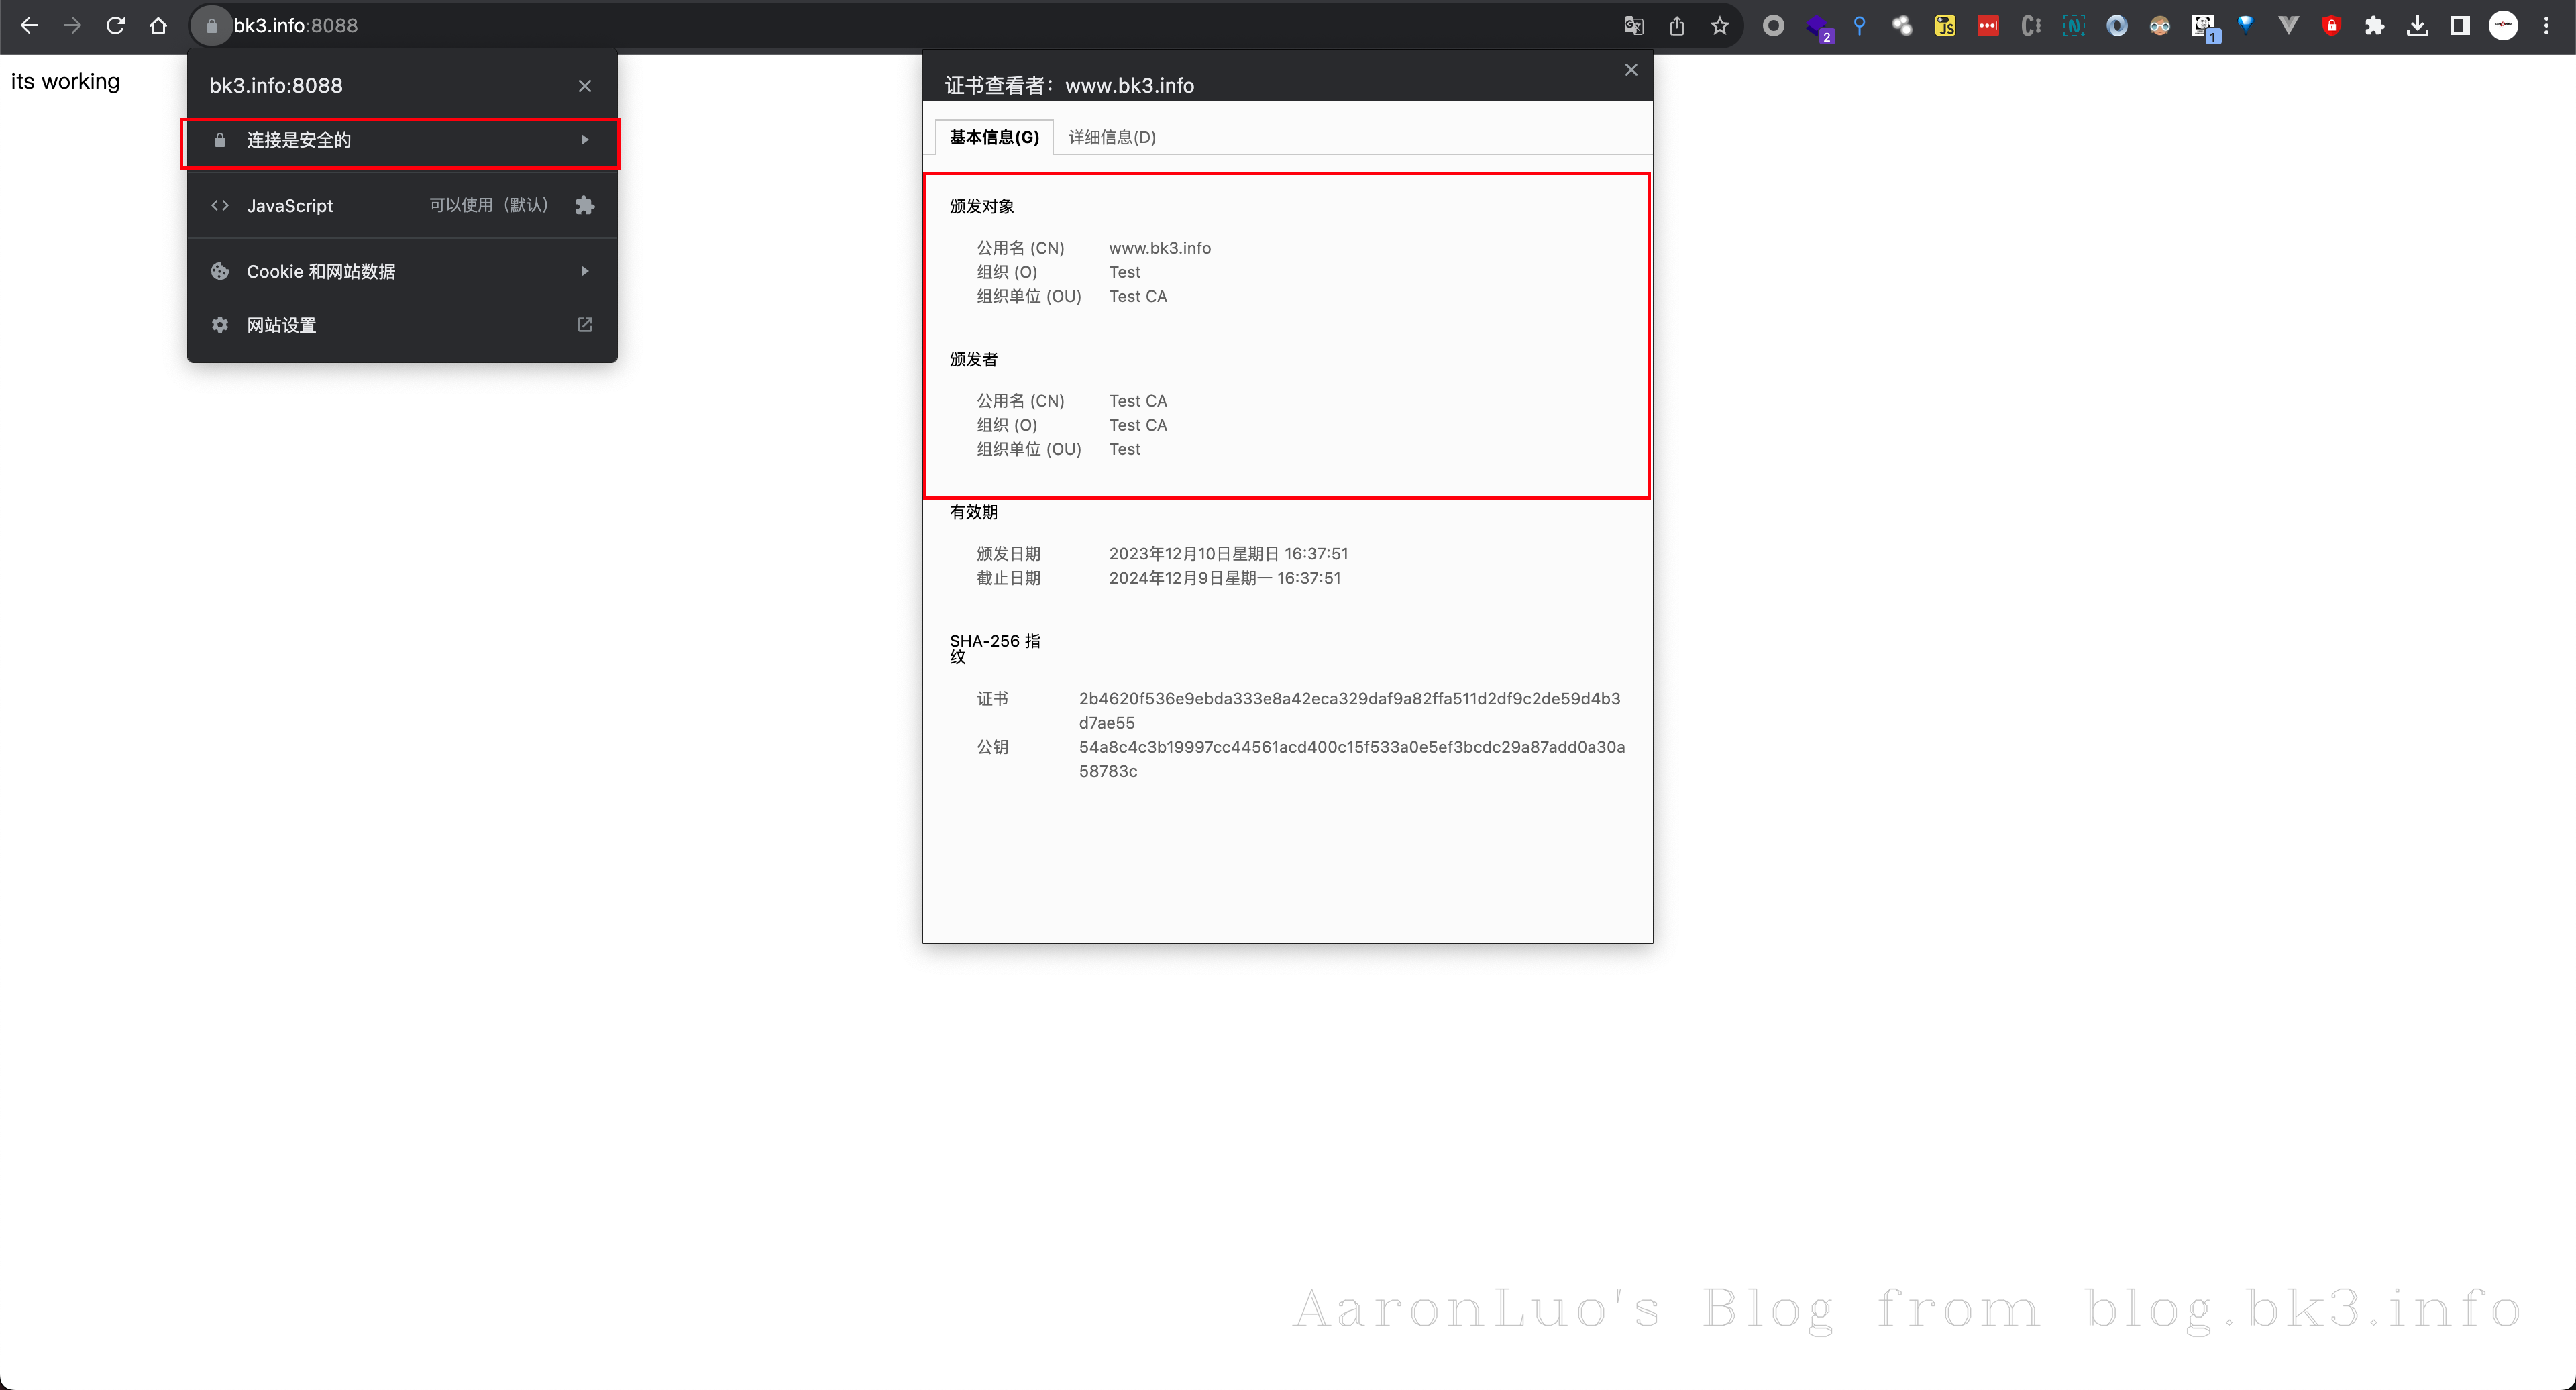
最后编辑一下输出的文件,把 -----BEGIN CERTIFICATE----- 到最后的这部分移动到开头。结果如下
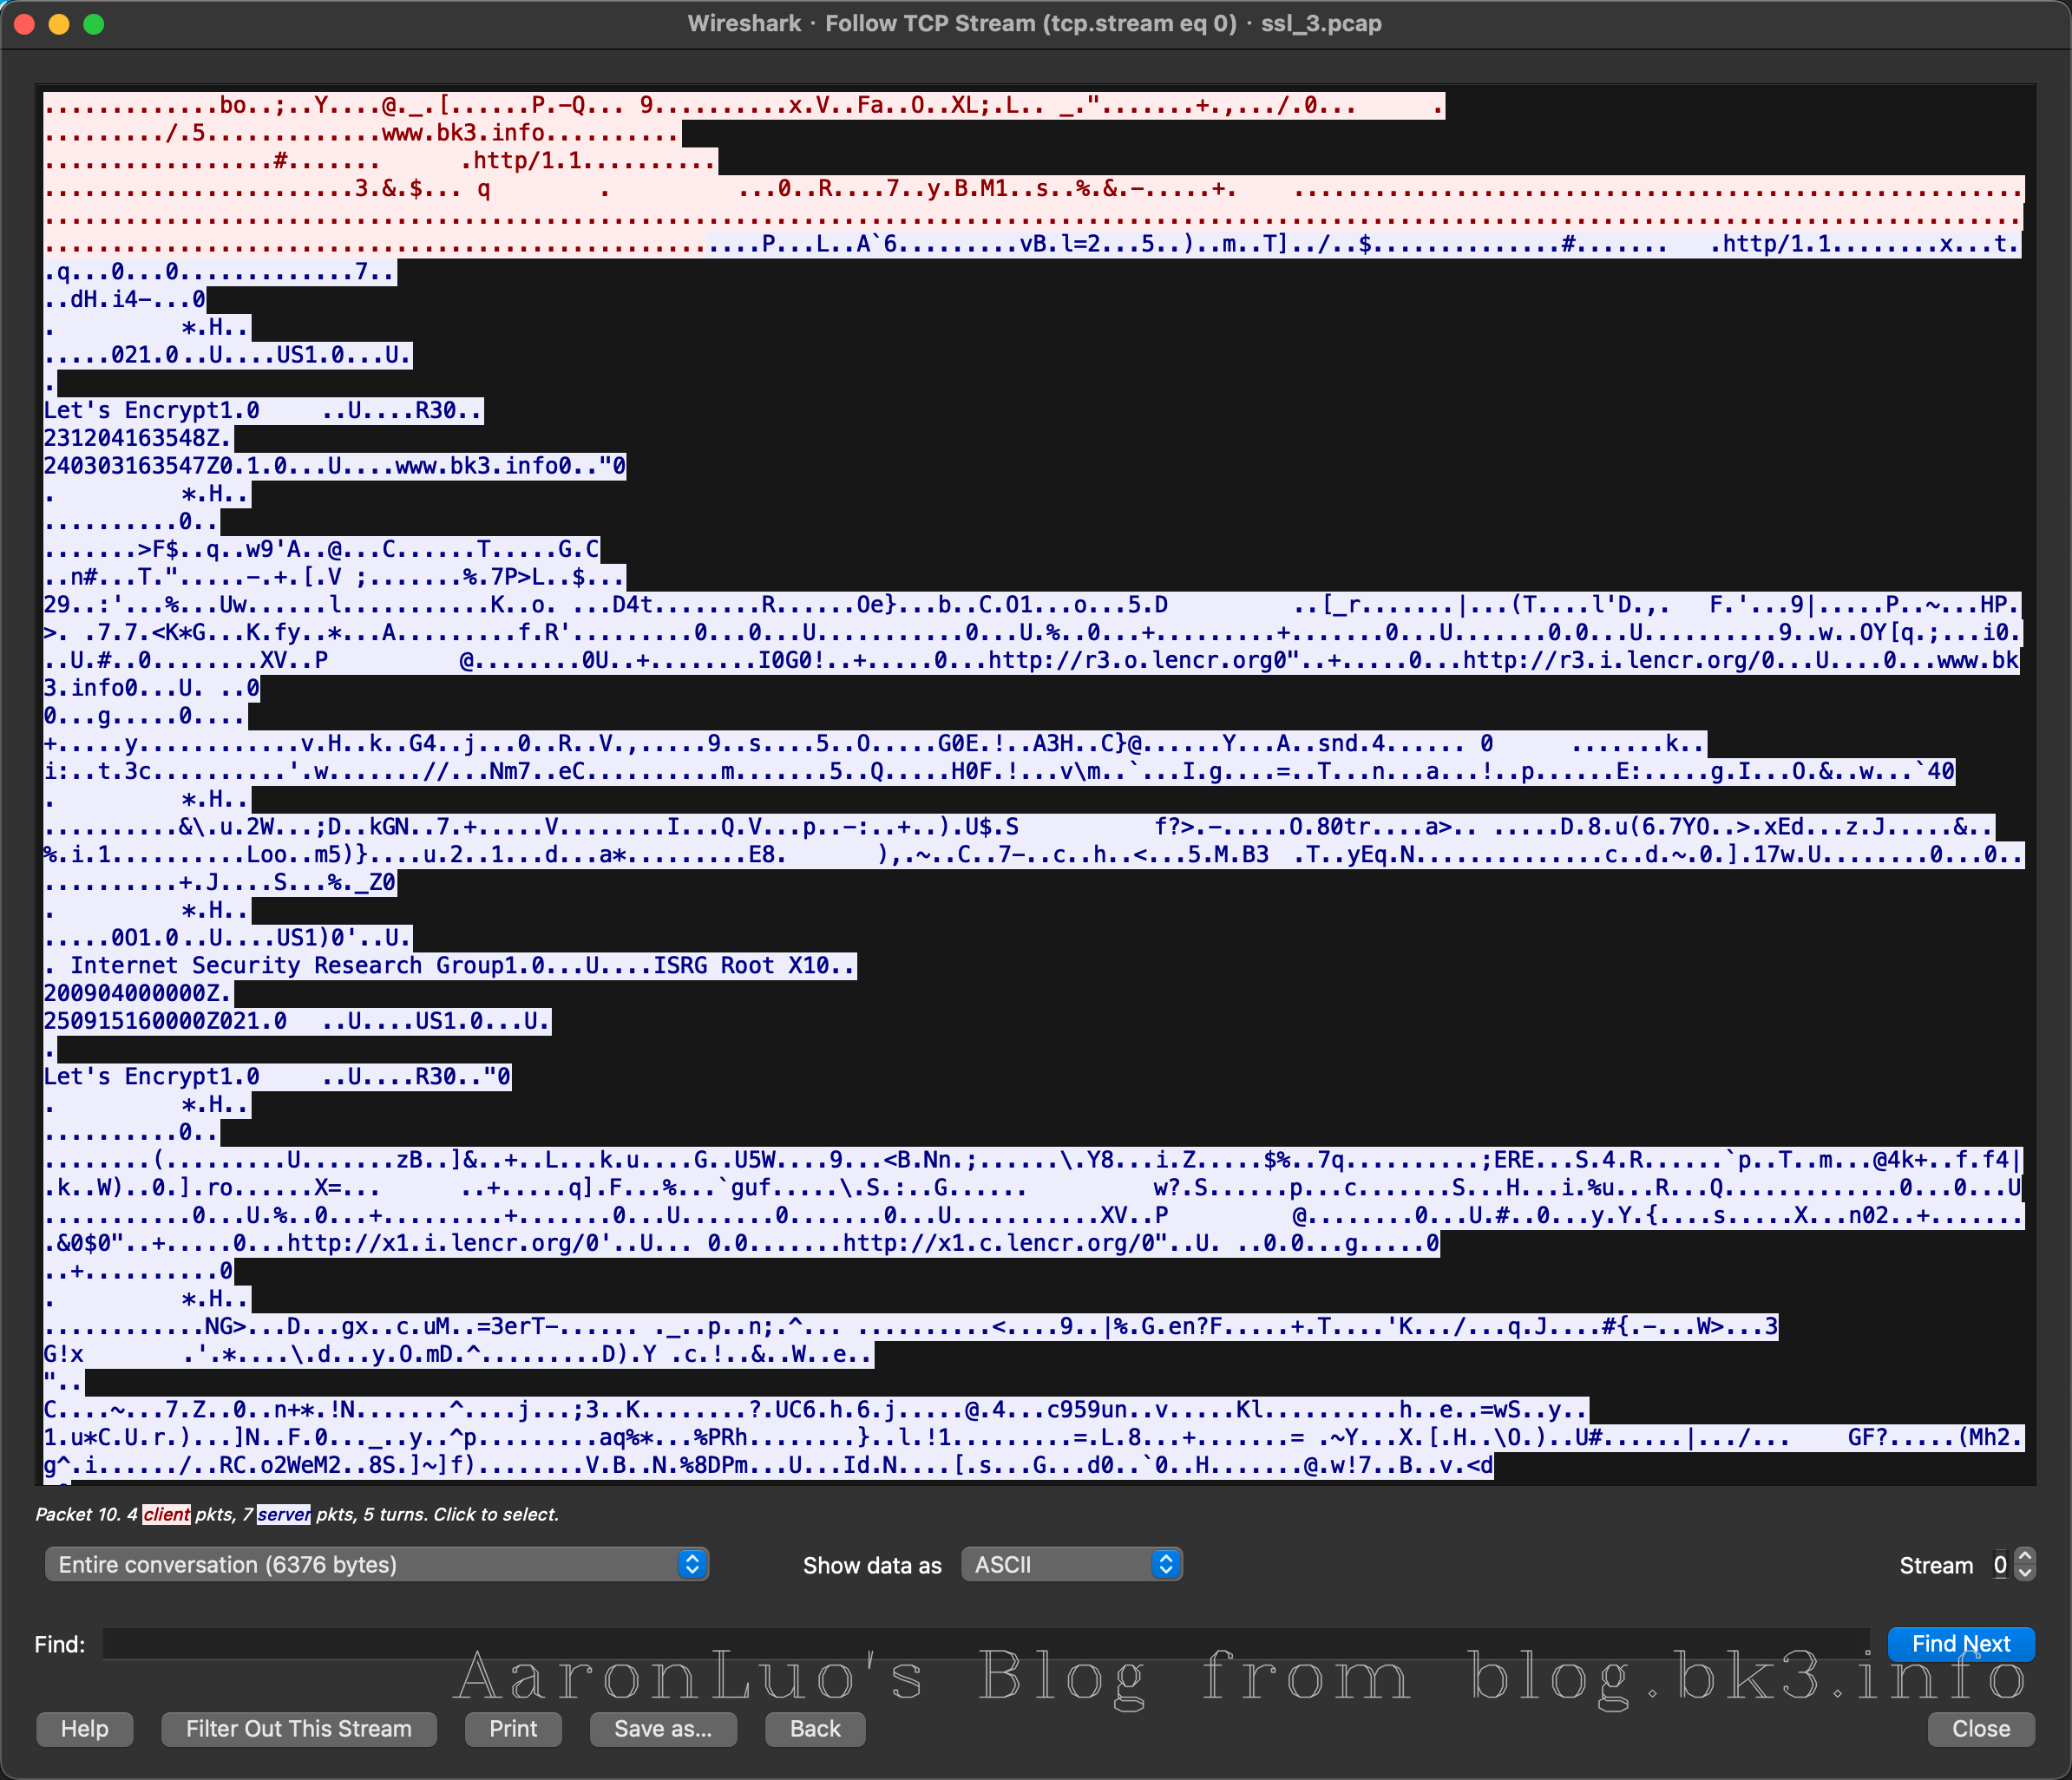
通过WireShark可以看到,首先是和BurpSuite建立连接,然后有SSL/TLS握手的包(但是这个包我之前抓到过,但是现在与BurpSuite建立长连接之后抓不到了)就将就看与BurpSuite的HTTPS的连接
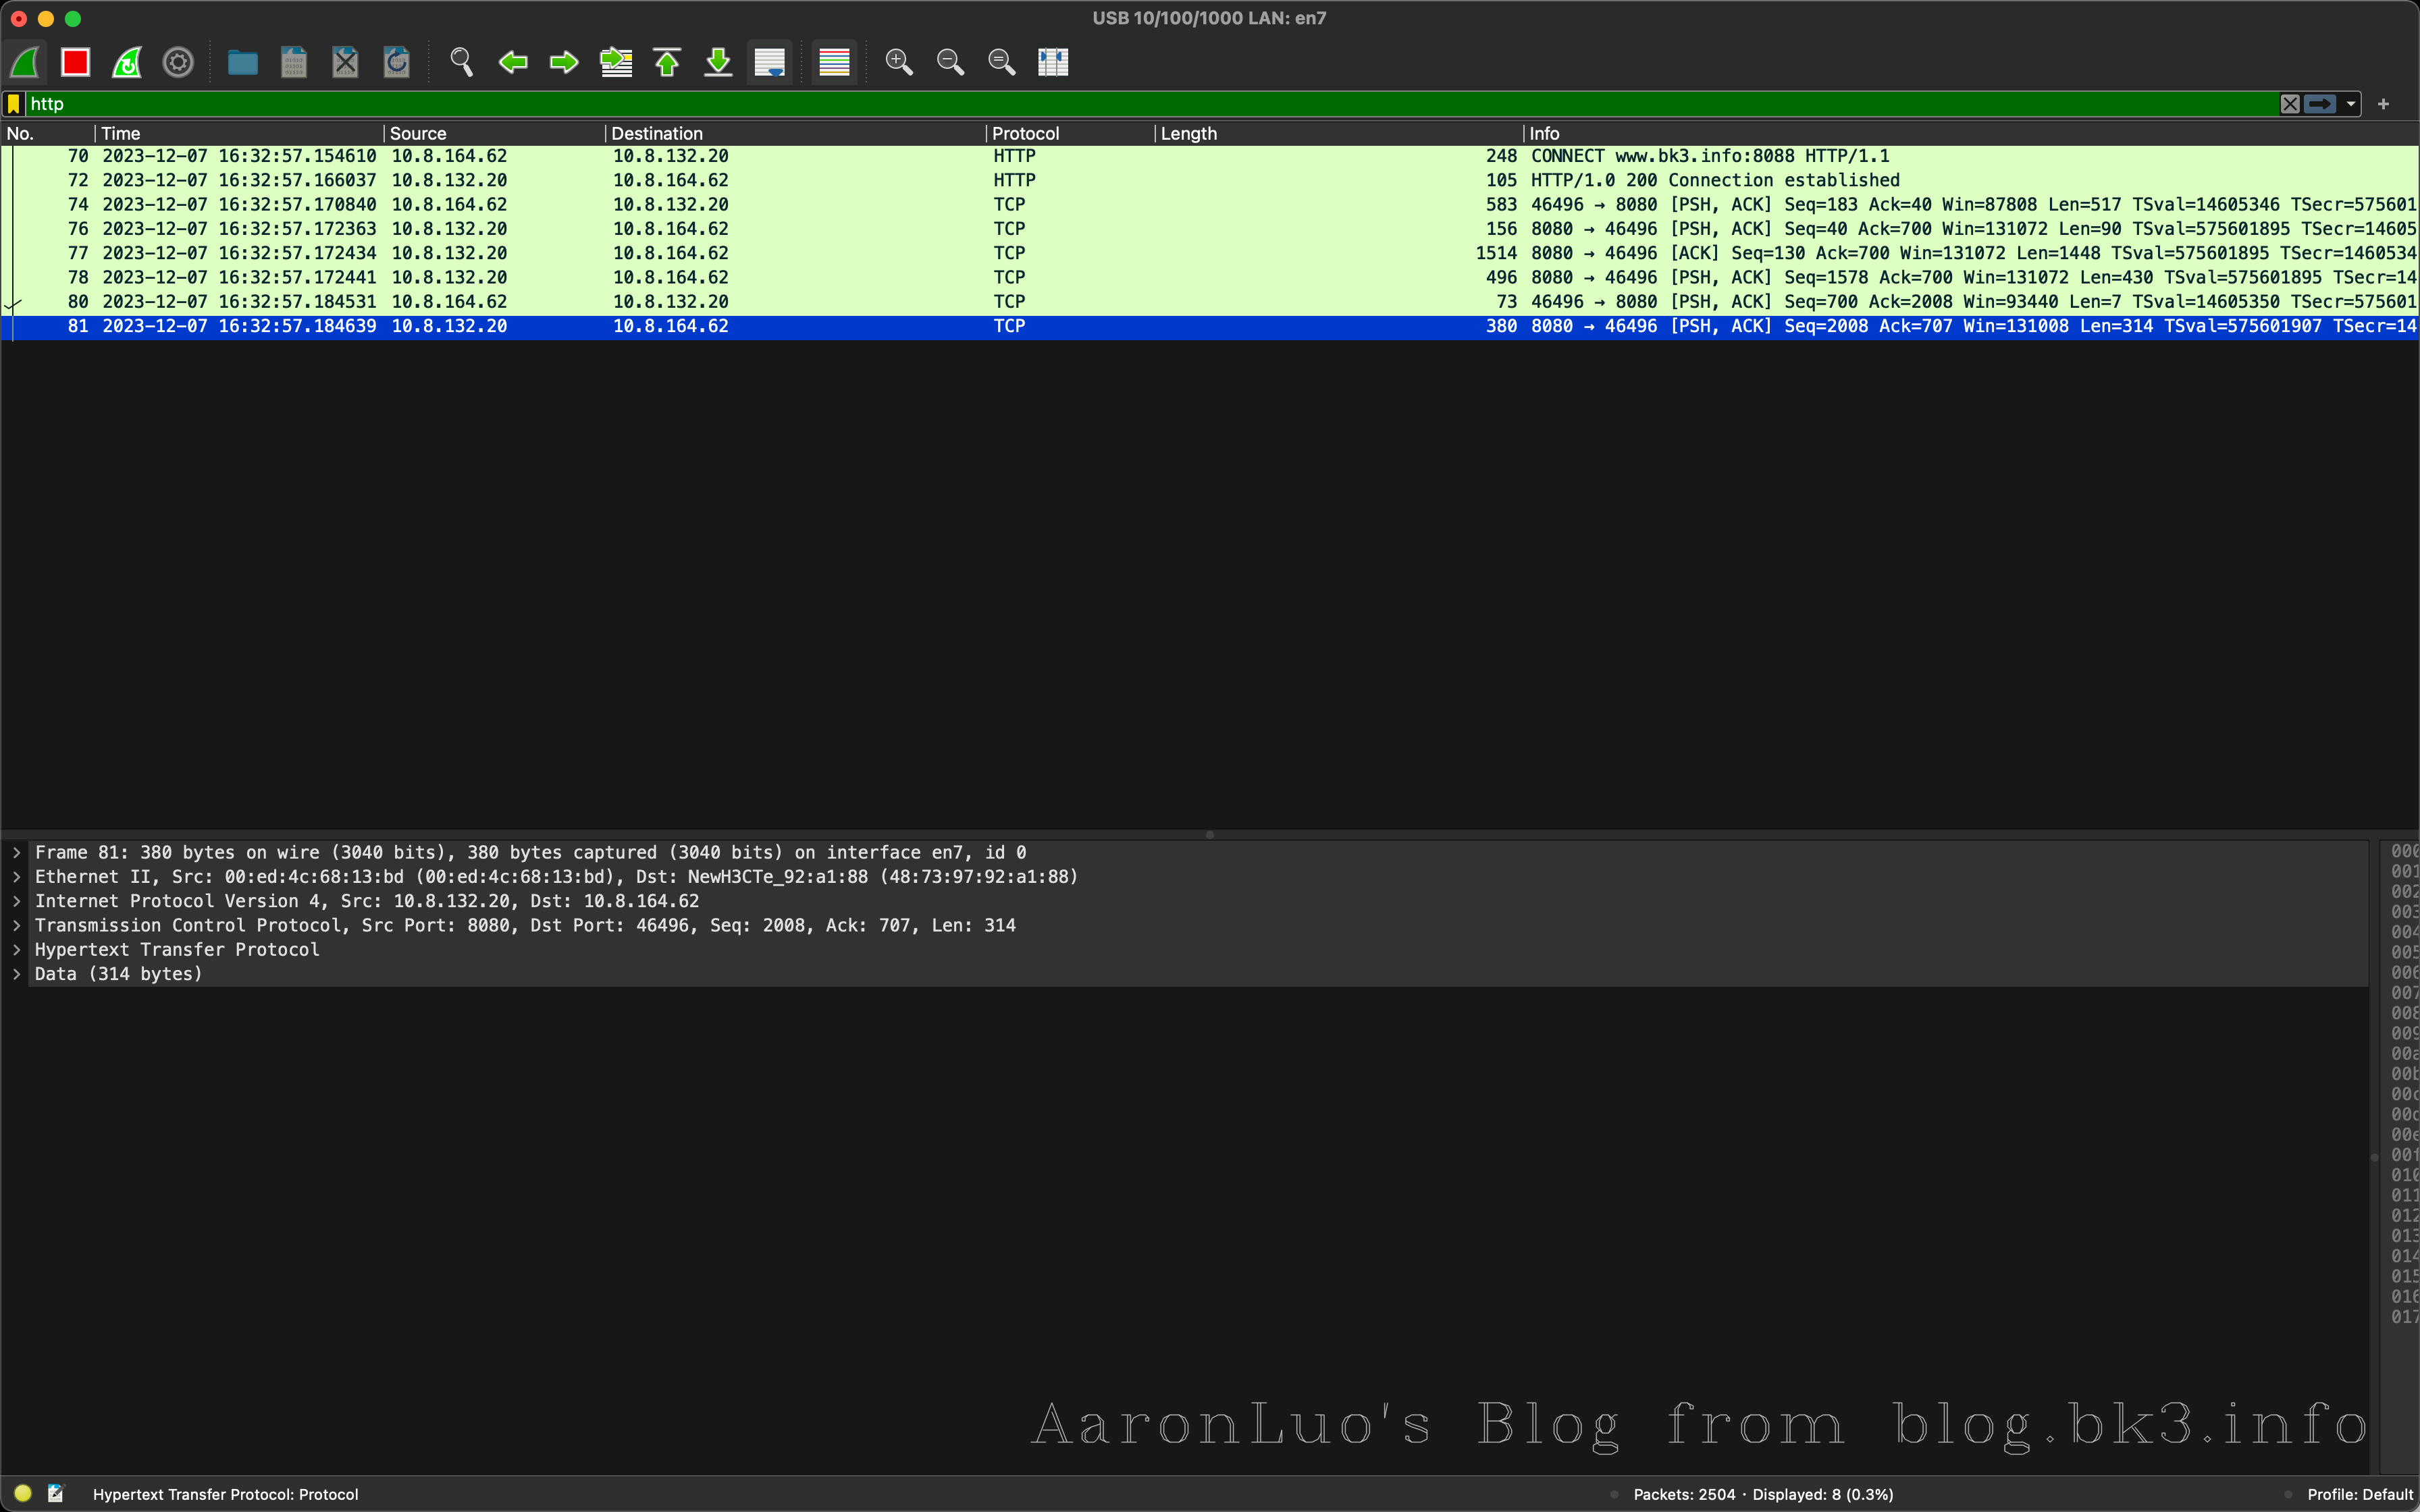
可以看到第二个图中在建立连接之后,明显包的数量比第一个图的数量多,就可以推导在SSL/TLS握手之后成功之后就会有下一步操作(中间人攻击,burp拿到数据之后再发送给app)
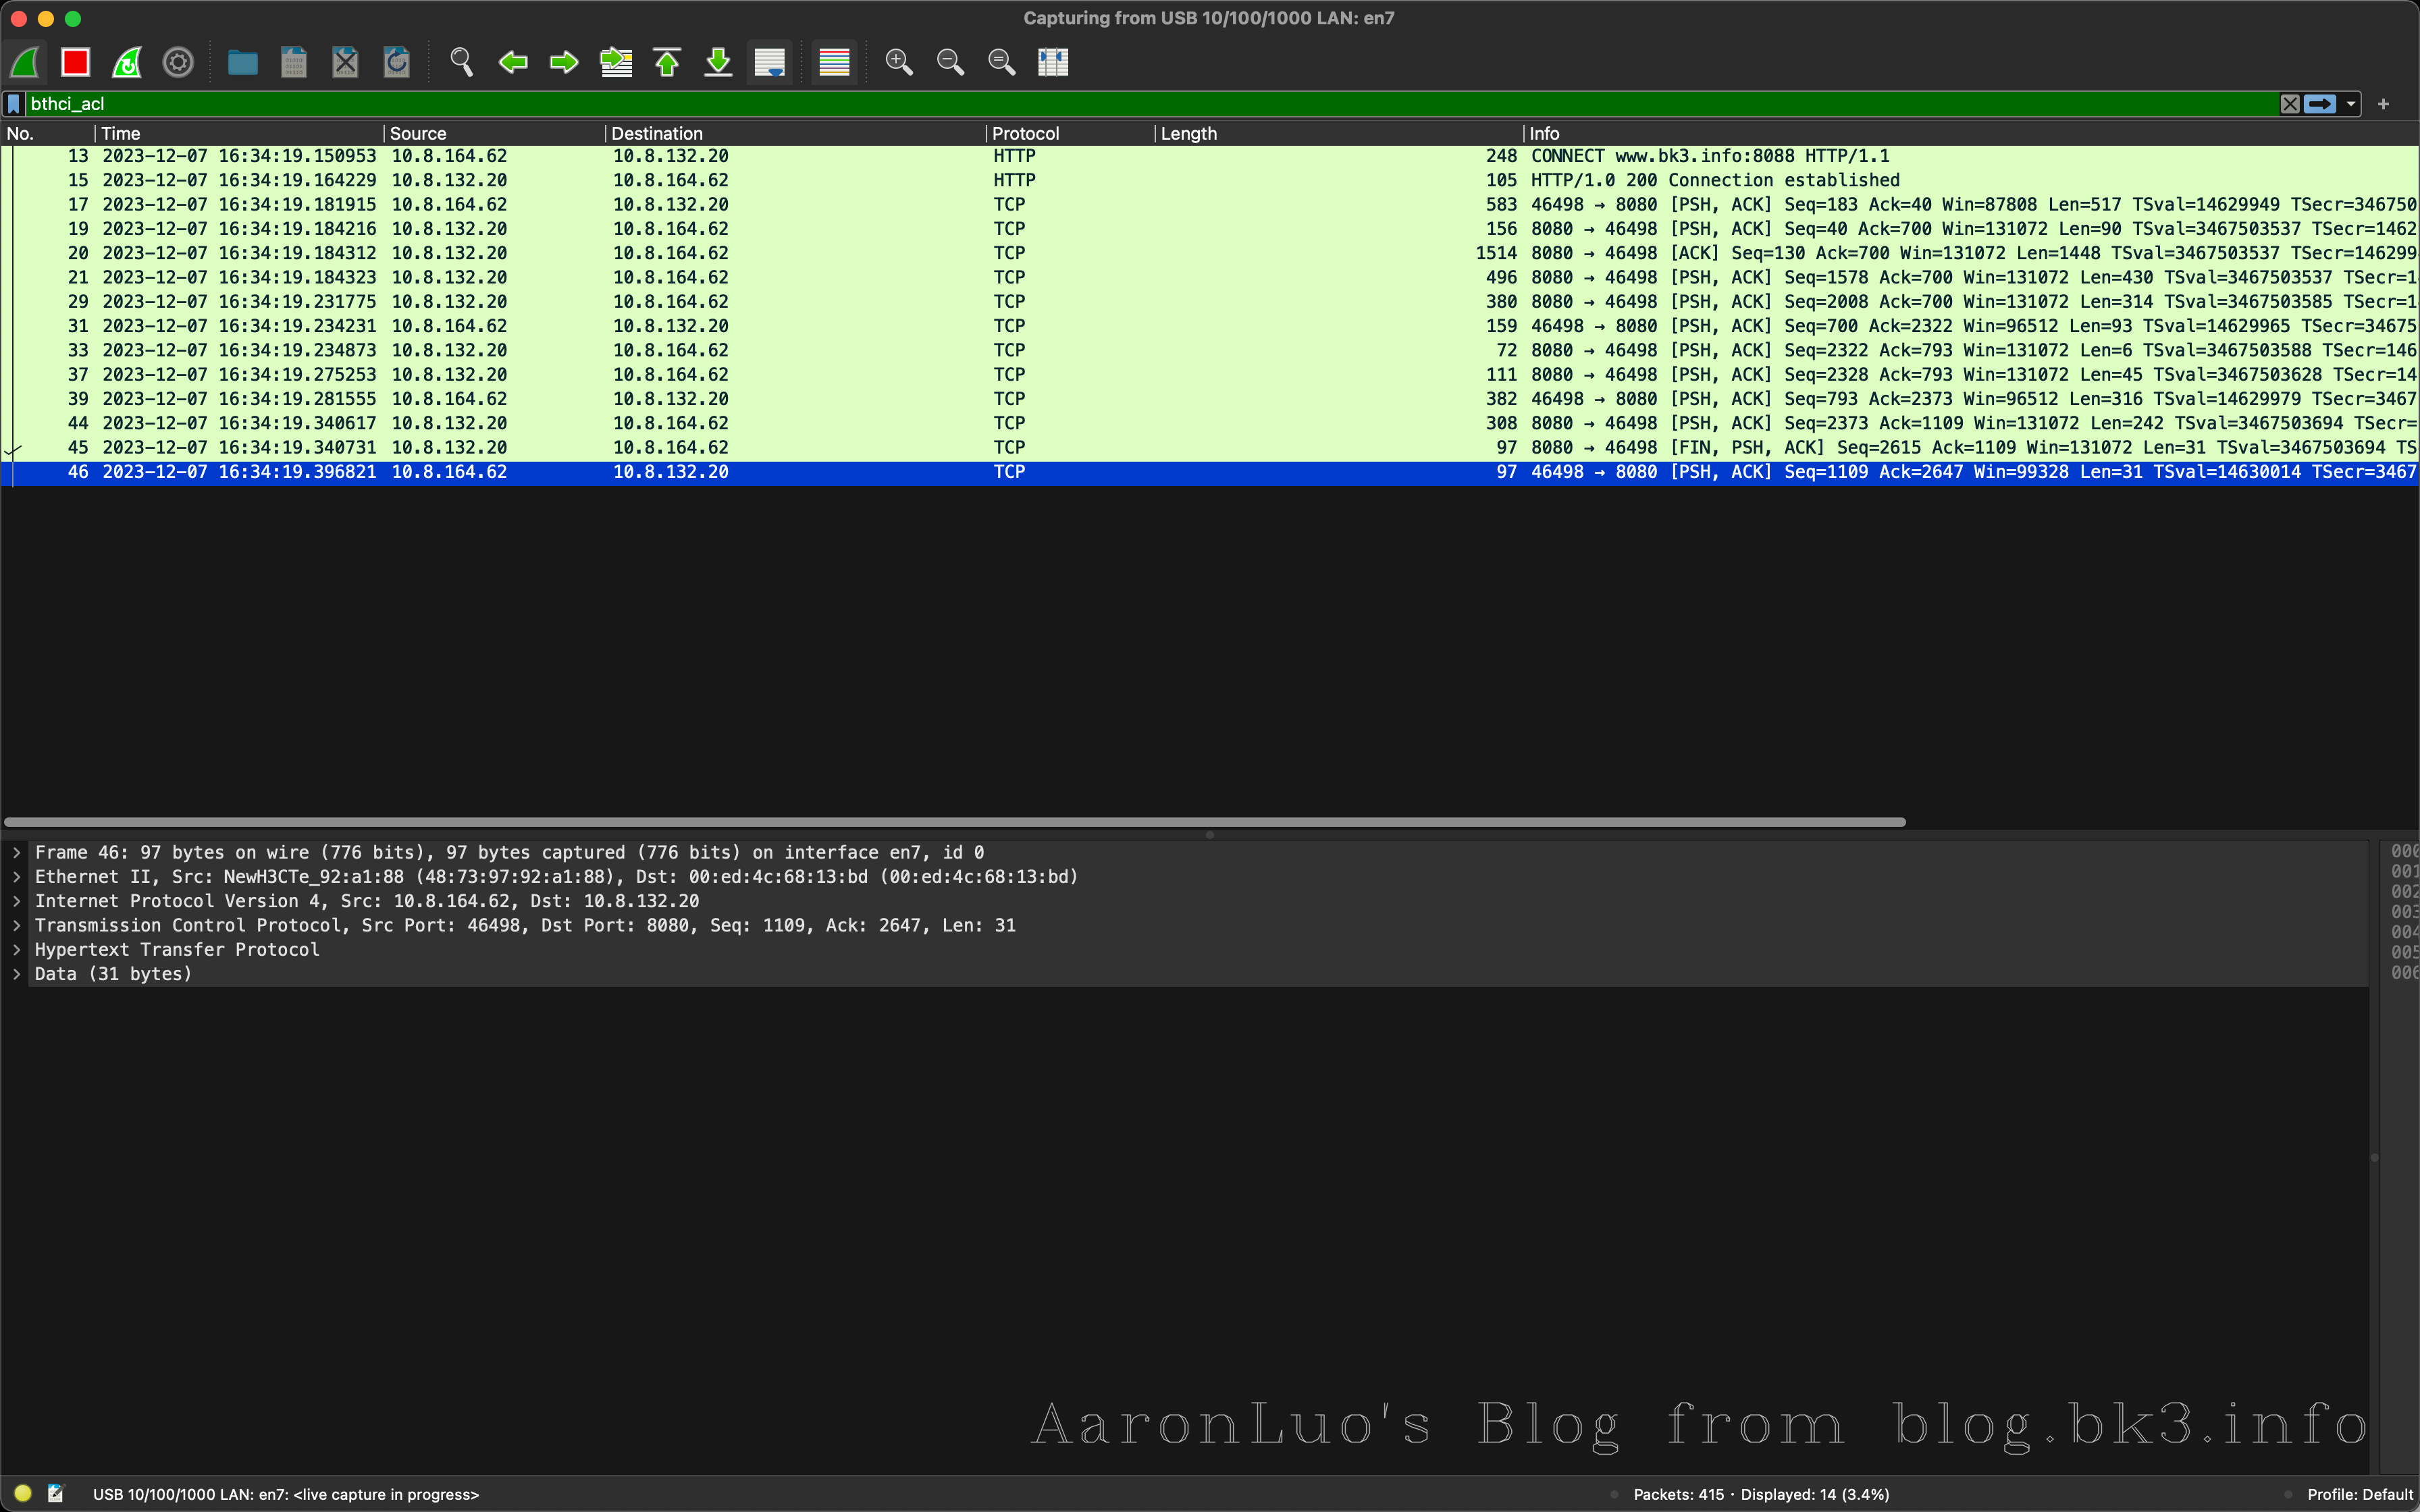
我们可以看一下SSL/TLS握手的数据包(这个是在android中使用tcpdump抓取到的SSL/TLS握手)这里我就将我的域名指向了我公网的老毛子服务器,流程如下:
- 客户端向服务器发送Client Hello,告诉服务器,我支持的协议版本,加密套件等信息。
服务器收到响应,选择双方都支持的协议,套件,向客户端发送Server Hello。同时服务器也将自己的证书发送到客户端(Certificate)。
客户端自己生产预主密钥,通过公钥加密预主秘钥,将加密后的预主秘钥发送给服务器 (Client Exchange)。
服务器用自己的私钥解密加密的预主密钥。
之后,客户端与服务器用相同的算法根据客户端随机数,服务器随机数,预主秘钥生产主密钥,之后的通信将都用主密钥加密解密。

在了解了SSL/TLS握手的全过程之后,那么可以推导出以下结论:
在只有SSL/TLS中,只要BurpSuite的证书被信任,那么就一定是可以抓包
如果BurpSuite的证书没有被信任,那么只要可以Hook到app与burpsuite的SSL/TLS握手,让其信任burpsuite的CA就可以抓包
- root过的机器,可以使用Xposed+JustTrustMe或frida hook ssl无视app与burpsuite的证书信任问题
- 非root的机器,可以使用VirtualXposed+JustTrustMe无视app与burpsuite的证书问题
- 如果存在受信任的CA证书和私钥,可以将其导入到BurpSuite中,无视app与BurpSuite的证书信任问题
SSL Pinning(校验服务端证书)
在build.gradle中引入okhttp框架
plugins {
    id("com.android.application")
}

android {
    namespace = "com.example.myapplication"
    compileSdk = 34

    defaultConfig {
        applicationId = "com.example.myapplication"
        minSdk = 29
        targetSdk = 33
        versionCode = 1
        versionName = "1.0"

        testInstrumentationRunner = "androidx.test.runner.AndroidJUnitRunner"
    }

    buildTypes {
        release {
            isMinifyEnabled = false
            proguardFiles(
                getDefaultProguardFile("proguard-android-optimize.txt"),
                "proguard-rules.pro"
            )
        }
    }
    compileOptions {
        sourceCompatibility = JavaVersion.VERSION_1_8
        targetCompatibility = JavaVersion.VERSION_1_8
    }
    buildFeatures {
        viewBinding = true
    }
}

dependencies {

    implementation("androidx.appcompat:appcompat:1.6.1")
    implementation("com.google.android.material:material:1.10.0")
    implementation("androidx.constraintlayout:constraintlayout:2.1.4")
    implementation("androidx.navigation:navigation-fragment:2.7.5")
    implementation("androidx.navigation:navigation-ui:2.7.5")
    testImplementation("junit:junit:4.13.2")
    androidTestImplementation("androidx.test.ext:junit:1.1.5")
    androidTestImplementation("androidx.test.espresso:espresso-core:3.5.1")
  // 引入oklhttp框架
    implementation("com.squareup.okhttp3:okhttp:4.9.1")
}
创建OkHttpAsyncTask继承AsyncTask如下所示:
package com.example.myapplication;

import android.app.Activity;
import android.content.Context;
import android.os.AsyncTask;
import android.widget.TextView;

import java.io.InputStream;
import java.security.cert.Certificate;
import java.security.cert.CertificateFactory;
import java.security.KeyStore;

import javax.net.ssl.SSLContext;
import javax.net.ssl.TrustManagerFactory;
import javax.net.ssl.X509TrustManager;

import okhttp3.*;

public class OkHttpAsyncTask extends AsyncTask<String, Void, String> {
    private Context mContext;
    public OkHttpAsyncTask(Context mContext){
        this.mContext = mContext;
    }
    @Override
    protected String doInBackground(String... params) {
        OkHttpClient client = getOkHttpClient();
        RequestBody formBody = new FormBody.Builder().add("username",params[1]).add("password",params[2]).build();
        Request request = new Request.Builder()
                .url(params[0]) // 使用一个示例API
                .post(formBody)
                .build();
        try{
            Response response = client.newCall(request).execute();
            if (response.isSuccessful()) {
                return response.body().string();
            } else {
                return "Error: " + response.code() + " " + response.message();
            }
        }catch (Exception e){
            e.printStackTrace();
            return "Error: " + e.getMessage();
        }
    }
    @Override
    protected void onPostExecute(String result) {
        TextView textView = ((Activity)mContext).findViewById(R.id.MainTextView);
        textView.setText(result);
    }
  // 添加SSL Pinning 代码 并且添加服务器证书(也就是验证服务端证书)
    private OkHttpClient getOkHttpClient(){
        try{
            // 从res/raw目录中读取证书
            InputStream inputStream = ((Activity)mContext).getResources().openRawResource(R.raw.fullchain);

            // 创建 Certificate 对象
            CertificateFactory certificateFactory = CertificateFactory.getInstance("X.509");
            Certificate certificate = certificateFactory.generateCertificate(inputStream);
            // 创建 KeyStore 并将证书添加进去
            KeyStore keyStore = KeyStore.getInstance(KeyStore.getDefaultType());
            keyStore.load(null, null);
            keyStore.setCertificateEntry("certificate", certificate);
            // 创建TrustManagerFactory,并将KeyStore初始化到TrustManagerFactory中
            TrustManagerFactory trustManagerFactory = TrustManagerFactory.getInstance(
                    TrustManagerFactory.getDefaultAlgorithm());
            trustManagerFactory.init(keyStore);

            // 创建SSLContext,使用TrustManagerFactory初始化
            SSLContext sslContext = SSLContext.getInstance("TLS");
            sslContext.init(null, trustManagerFactory.getTrustManagers(), null);
            // 构建OkHttpClient,设置SSL Socket Factory
            return new OkHttpClient.Builder()
                    .sslSocketFactory(sslContext.getSocketFactory(), (X509TrustManager) trustManagerFactory.getTrustManagers()[0])
                    .build();
        }catch (Exception e){
            e.printStackTrace();
            return null;
        }
    }
}
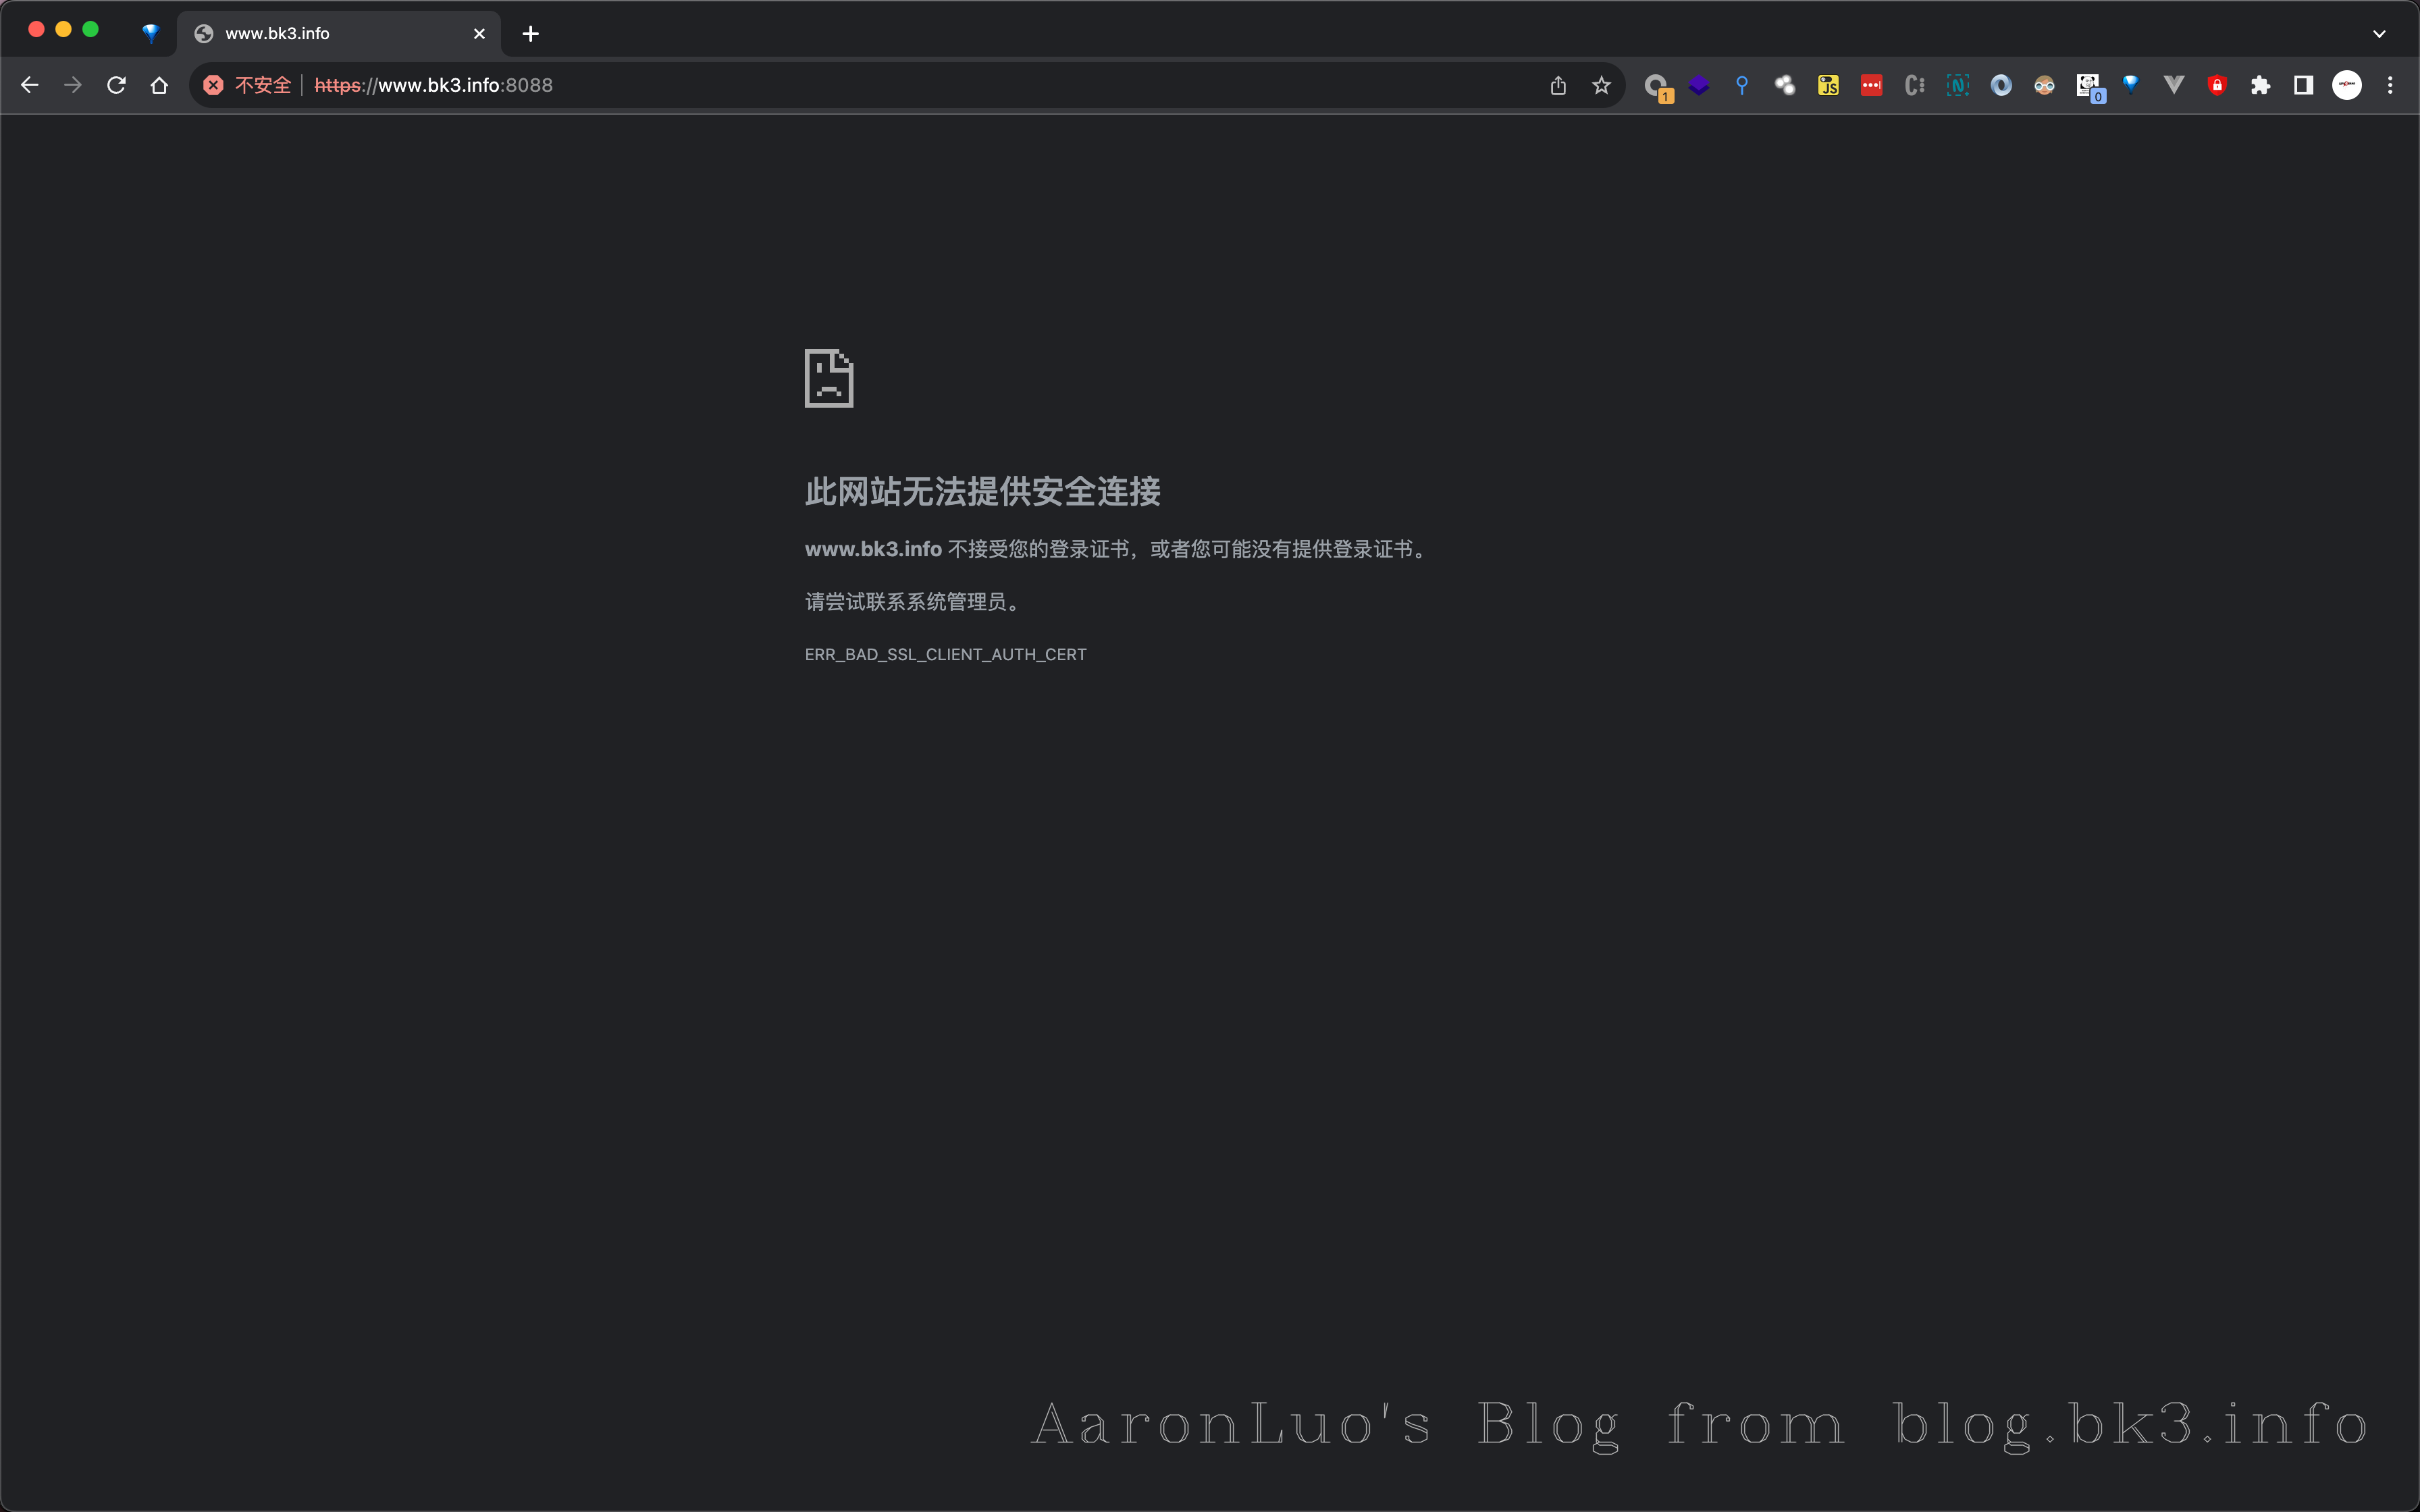
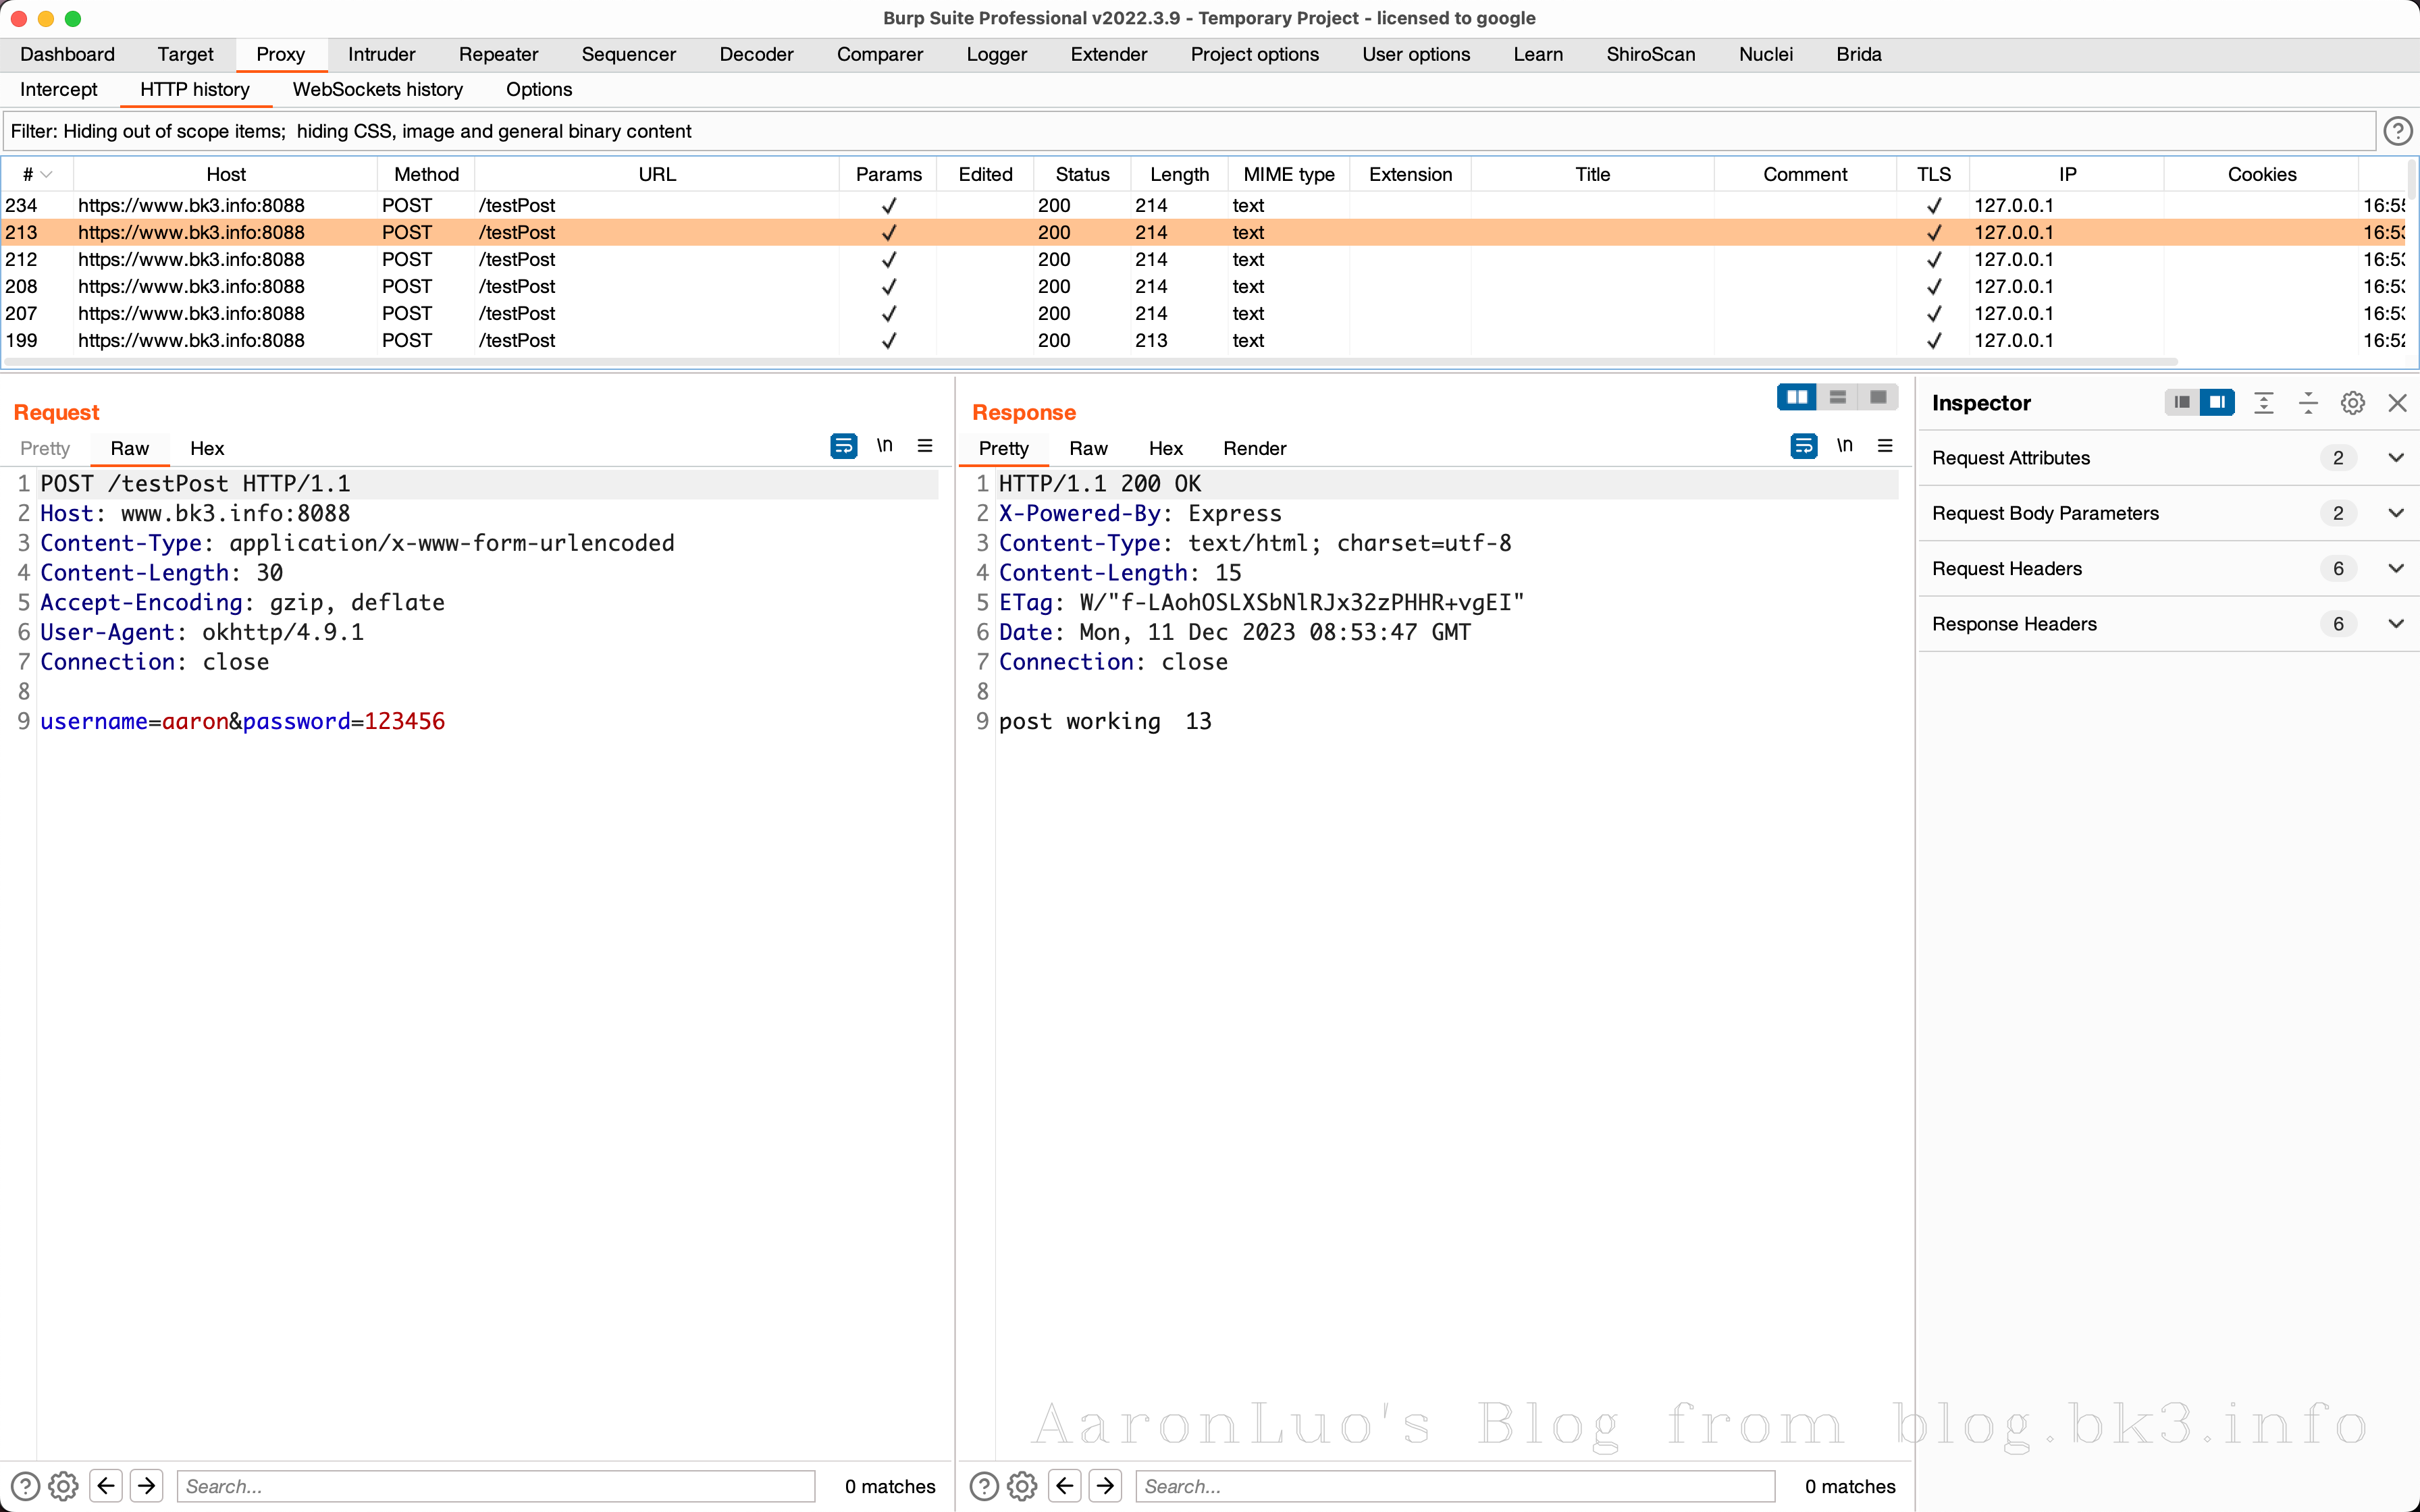
使用BurpSuite抓包可以看到由于Burp的证书没有被信任,导致抓包可以看到response的响应体告知证书不被信任
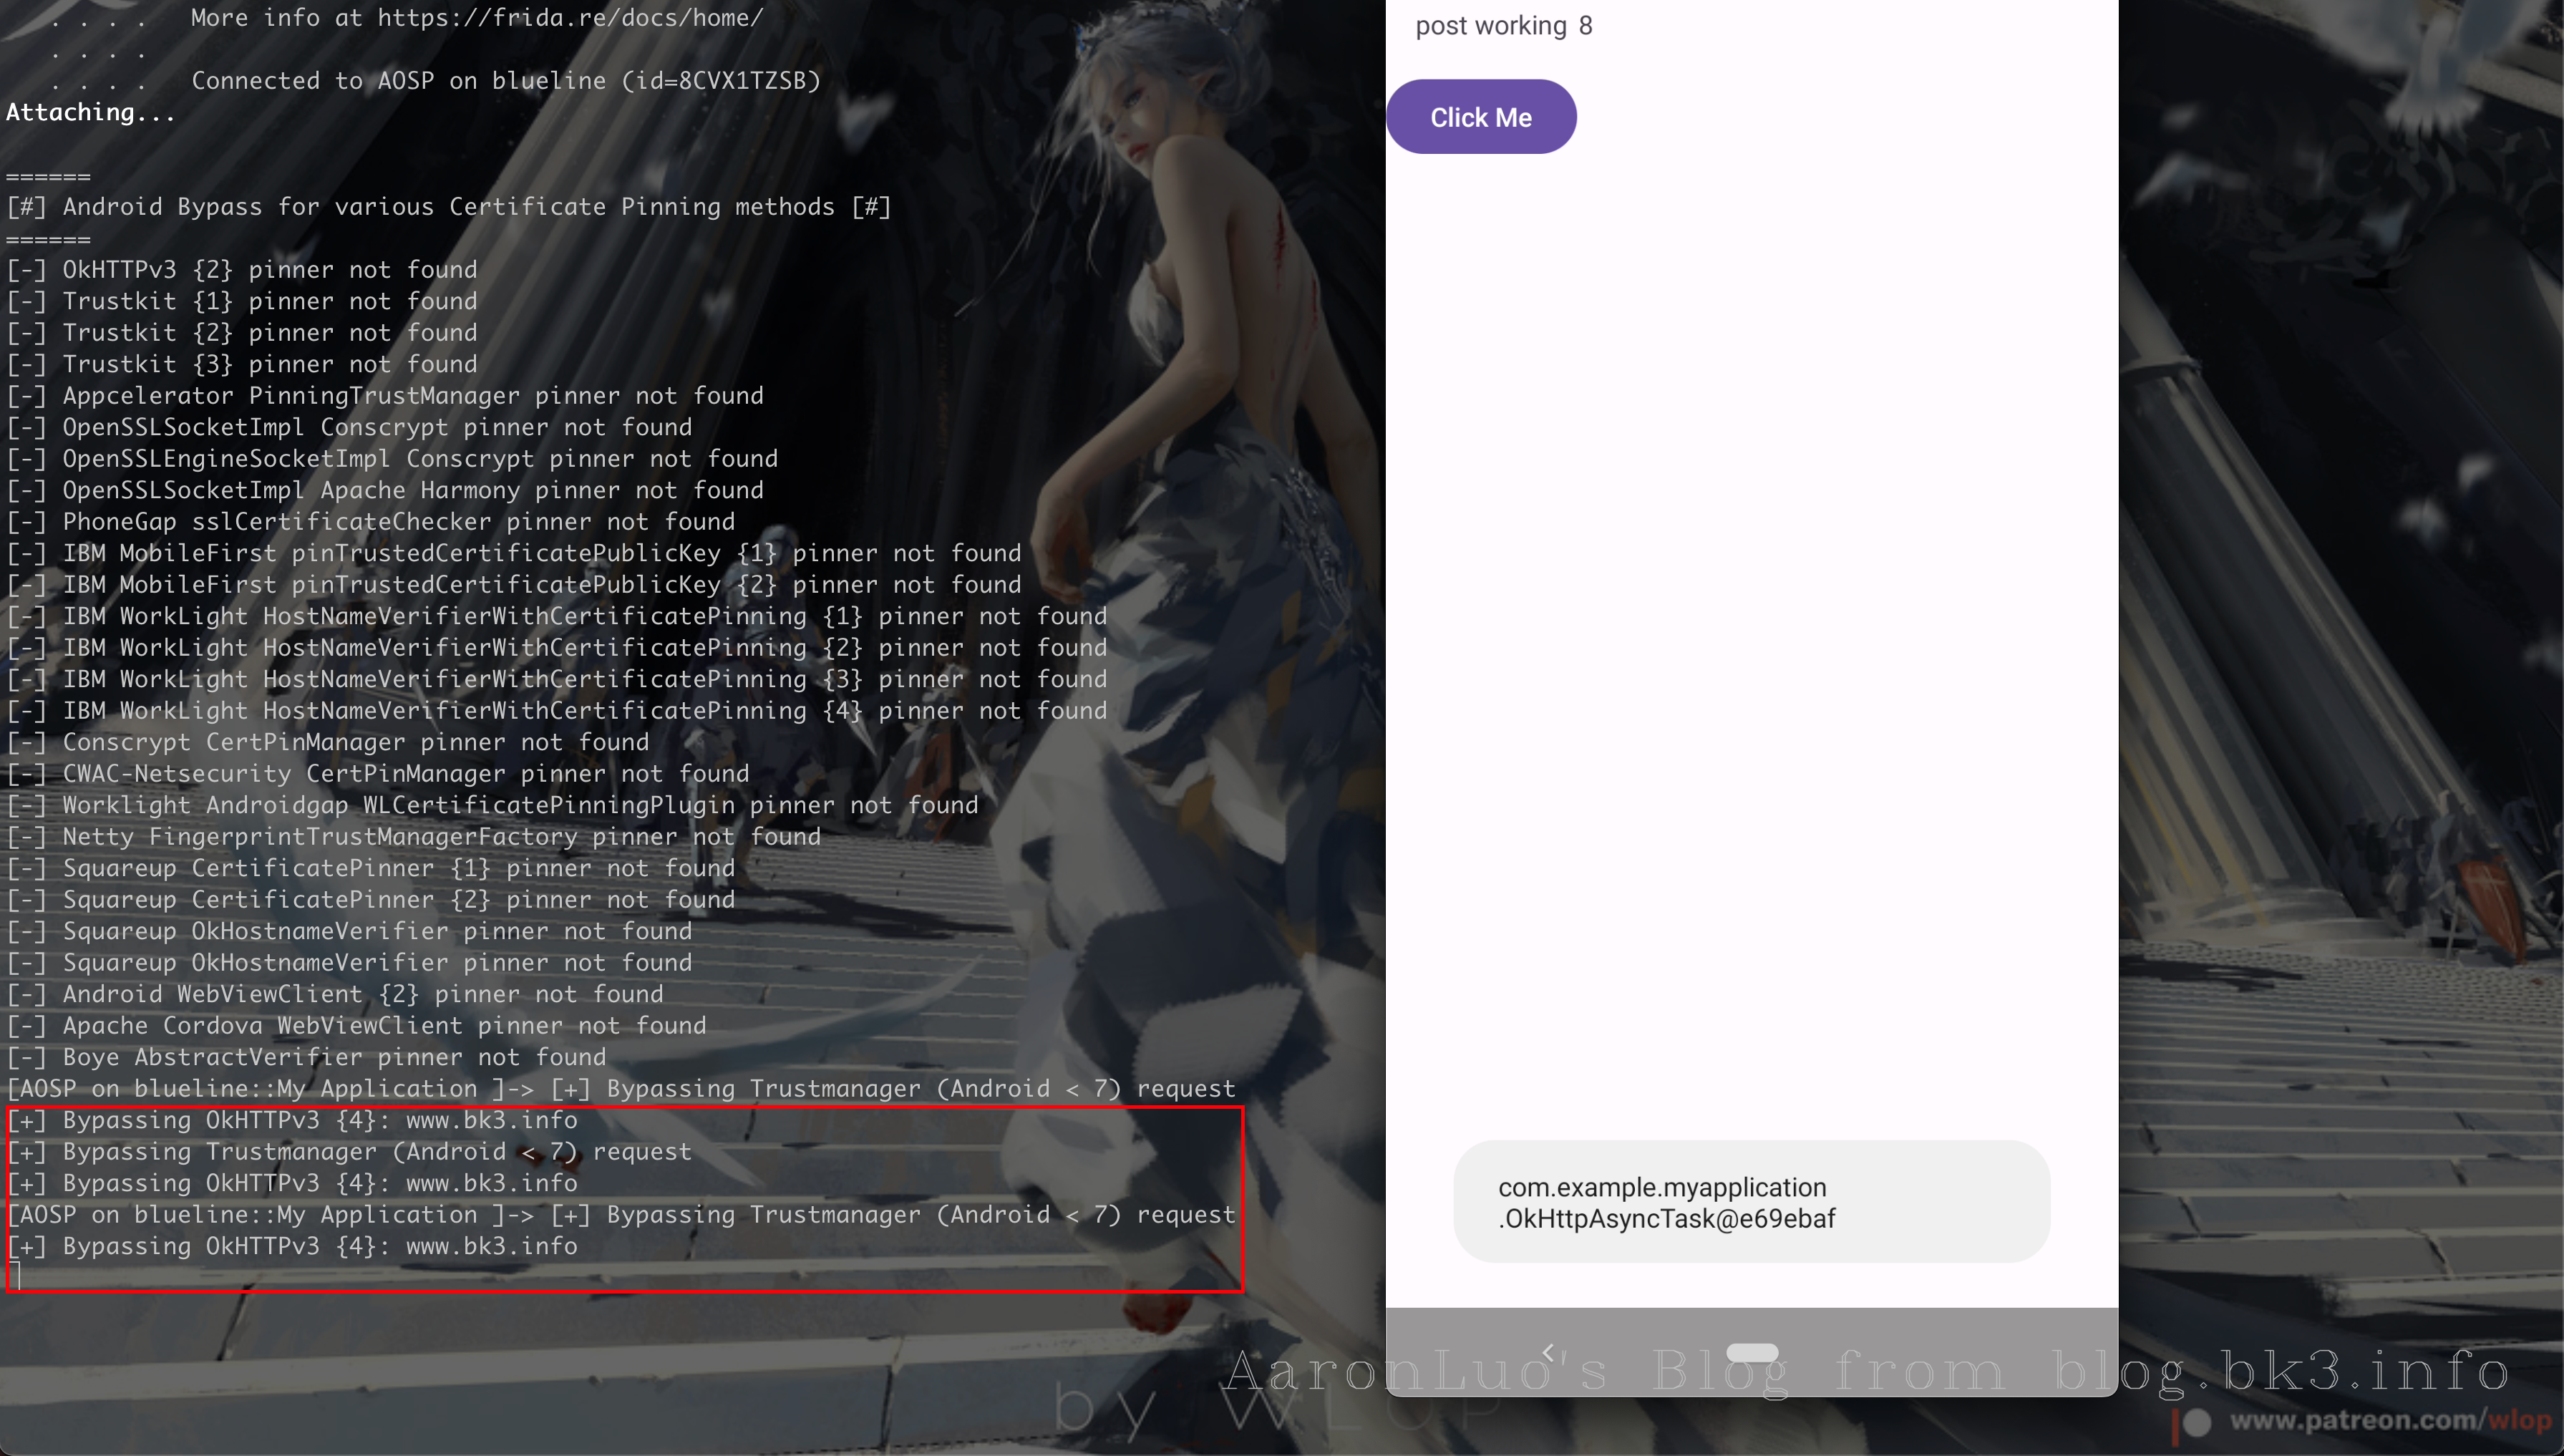
通过frida hook 可以看到使用的是okhttp框架的SSL Pinning
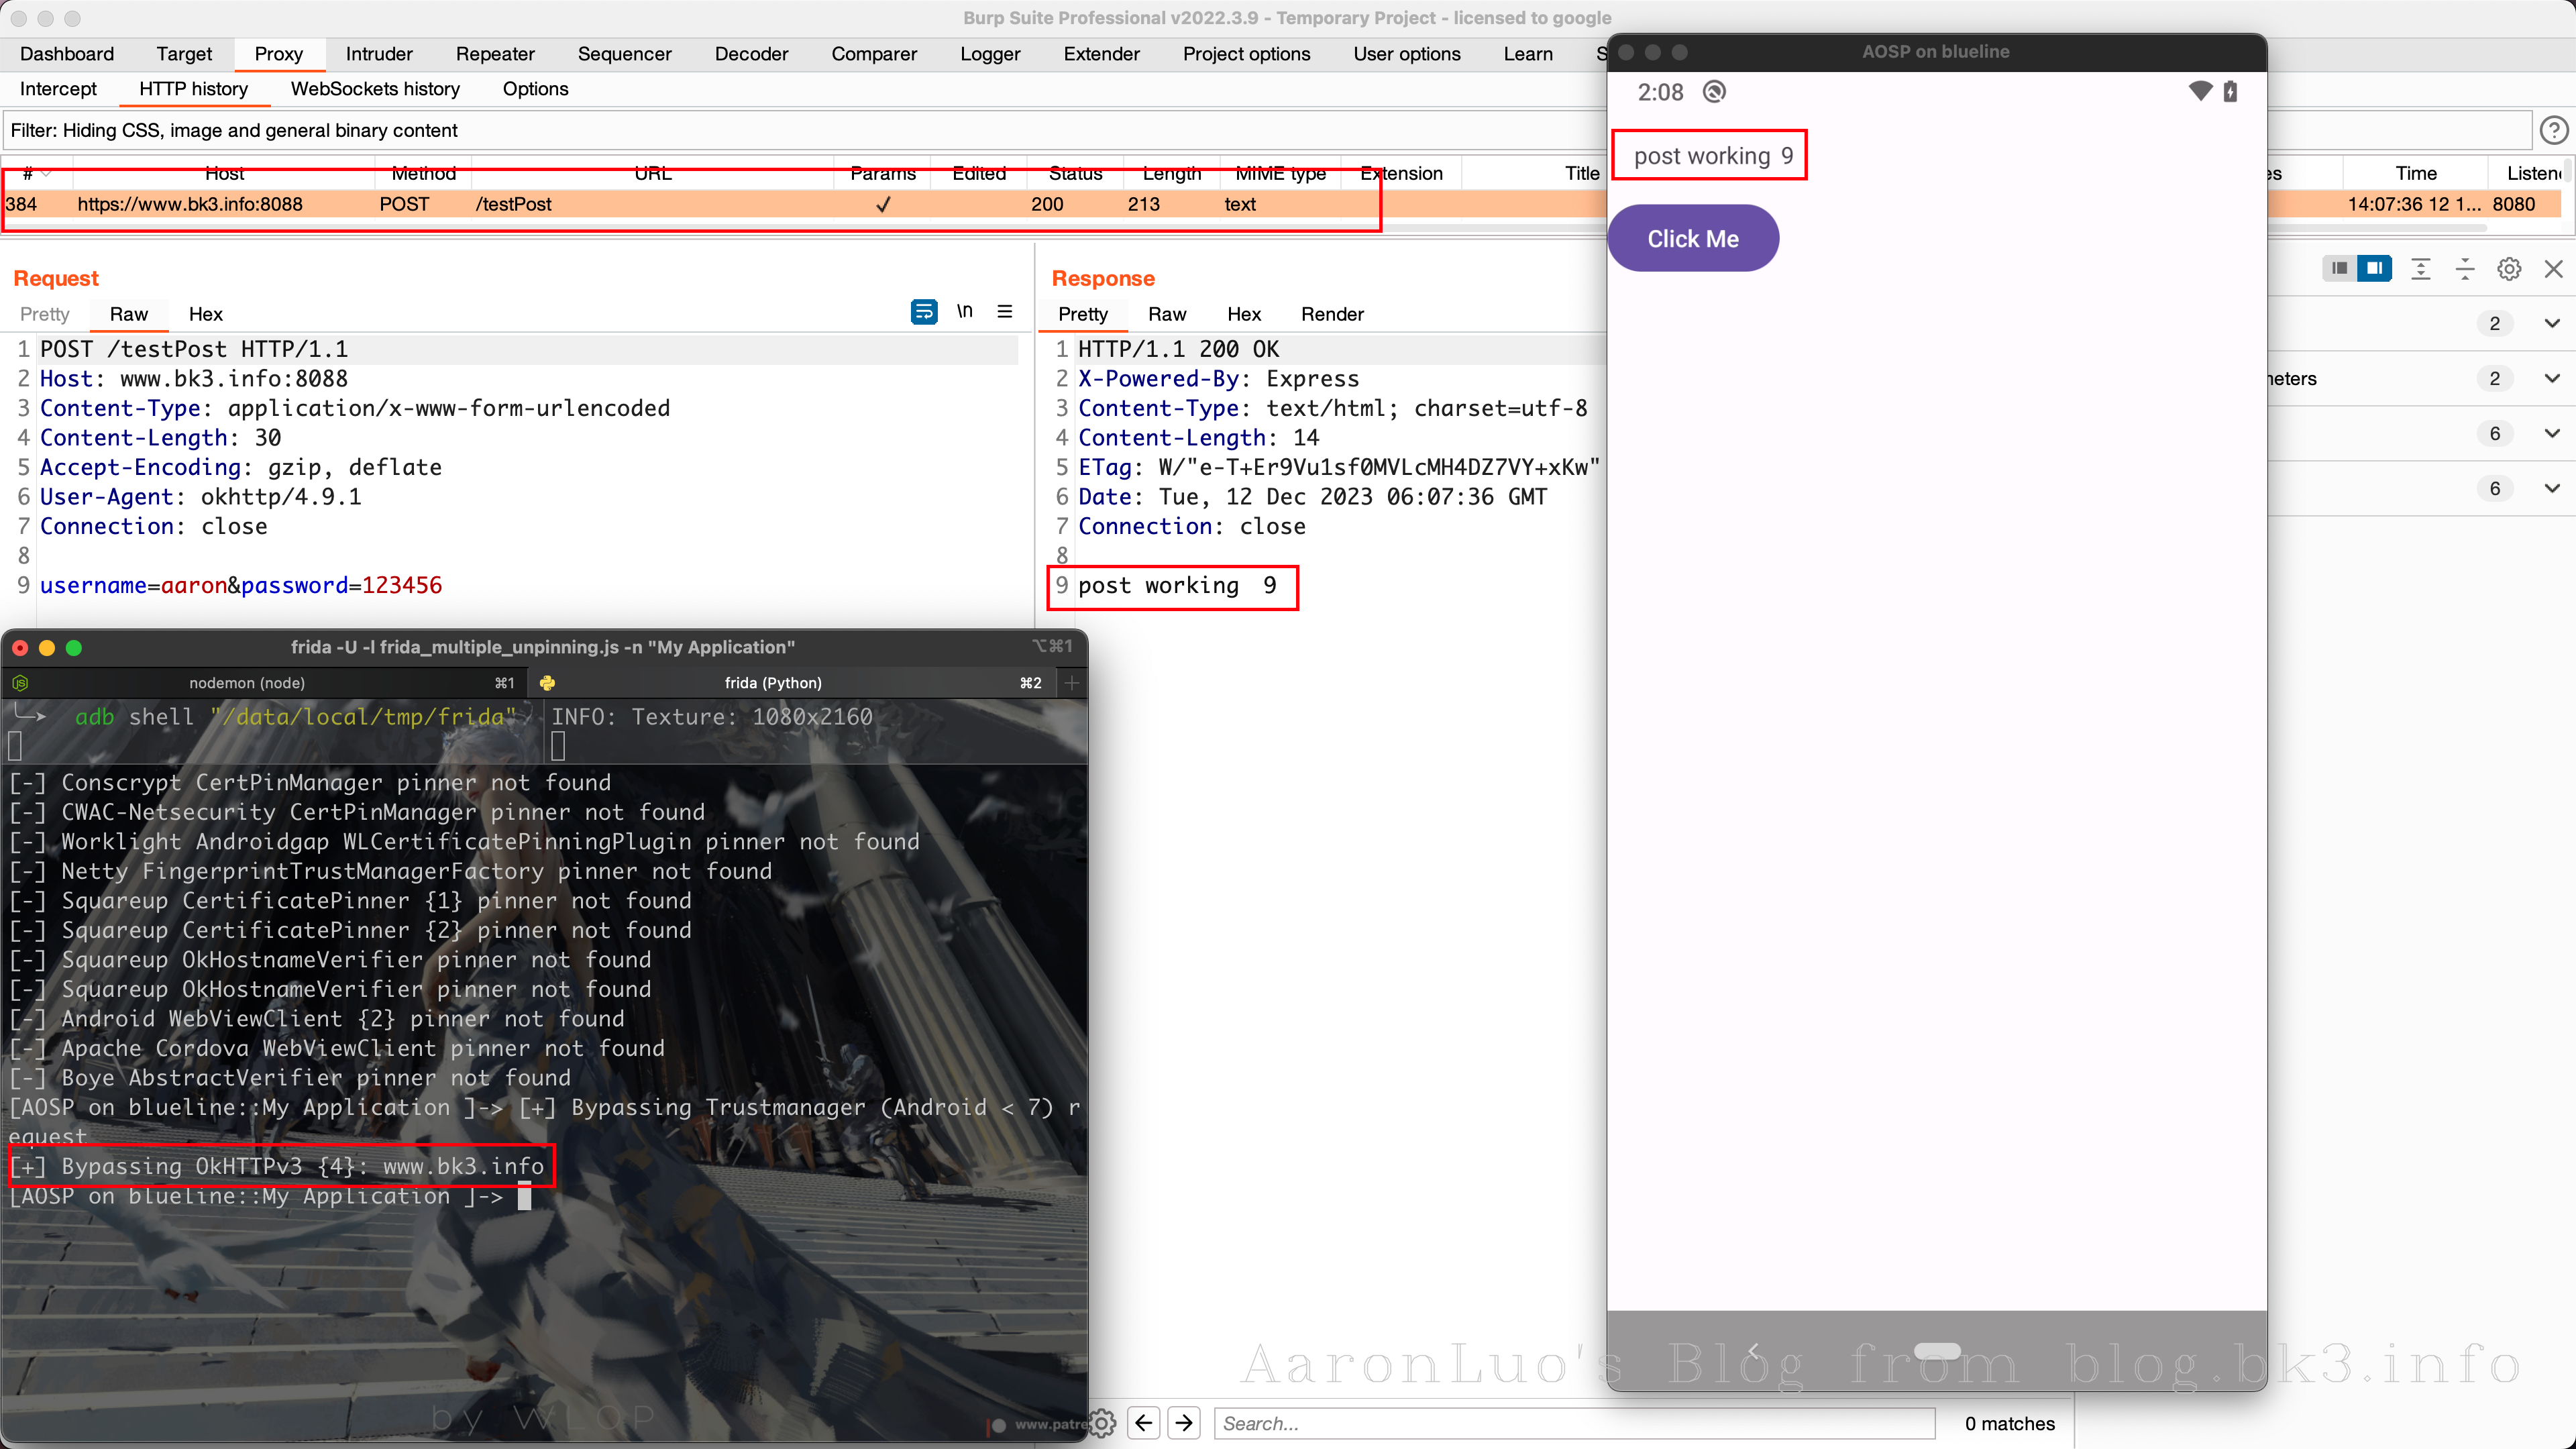
当存在SSL Pinning 的时候只要能hook到对服务端证书的校验,就可以直接抓包,所以只需要使用frida的脚本或者JustTrustMe包含足够多的框架对服务端的校验,就能完成正常抓包工作
在了解了SSL Pining的认证过程之后,可以看到其实是客户端强行校验了服务端证书,所以在中间人攻击的流程中,在SSL握手的时候,由于会校验后端证书,导致Burp的证书在进行证书校验的时候证书校验不通过就会出现SSL连接错误,正常的app就会出现网络连接失败的错误(logcat中可以看见)
- root过的机器,通过frida hook 可以直接绕过SSL Pinning 检测,直接抓包
- root过的机器,通过Xposed + JustTruestMe(足够强的hook 脚本 ),可以绕过SSL Pinning检测,直接抓包
- 非root的机器,通过VirtualXposed + JustTrustMe,可以绕过SSL Pinning检测,直接抓包
- 自签证书,get shell之后拿到服务器Server.key,Server.crt,生成PK12格式证书,导入到BurpSuite,此时在中间人攻击的时候app与burp通信的时候就是app对自签服务端证书进行校验,通过之后,burp在与服务端进行通信最后再转发至app
针对第4点进行阐述如下:
生成自签名CA私钥,CA证书、Server.key、Server.crt
openssl genpkey -algorithm RSA -out ca.key
openssl req -new -key ca.key -out ca.csr
openssl x509 -req -in ca.csr -signkey ca.key -out ca.crt

# 生成服务端证书私钥
openssl genpkey -algorithm RSA -out server.key
# 生成服务器证书请求,这里需要将CN改变成我们的域名
openssl req -new -key server.key -out server.csr
# 生成服务器证书文件,因为要生成包含 SAN 信息的证书,为了不去更改/etc/ssl/openssl.cnf的配置文件,所以手动添加subjectAltName=DNS:www.bk3.info
openssl x509 -req -in server.csr -out server.crt -CA ca.crt -CAkey ca.key -CAcreateserial -days 365 -sha256 -extfile <(printf "subjectAltName=DNS:www.bk3.info")
在web浏览器中查看自签的域名
此时我们可以将CA证书导入到系统证书中,就不会再报SSL错误

在okhttp框架校验服务器证书中添加自签的Server证书
private OkHttpClient getOkHttpClient(){
        try{
            // 从res/raw目录中读取证书
            InputStream inputStream = ((Activity)mContext).getResources().openRawResource(R.raw.server);

            // 创建 Certificate 对象
            CertificateFactory certificateFactory = CertificateFactory.getInstance("X.509");
            Certificate certificate = certificateFactory.generateCertificate(inputStream);
            // 创建 KeyStore 并将证书添加进去
            KeyStore keyStore = KeyStore.getInstance(KeyStore.getDefaultType());
            keyStore.load(null, null);
            keyStore.setCertificateEntry("certificate", certificate);
            // 创建TrustManagerFactory,并将KeyStore初始化到TrustManagerFactory中
            TrustManagerFactory trustManagerFactory = TrustManagerFactory.getInstance(
                    TrustManagerFactory.getDefaultAlgorithm());
            trustManagerFactory.init(keyStore);

            // 创建SSLContext,使用TrustManagerFactory初始化
            SSLContext sslContext = SSLContext.getInstance("TLS");
            sslContext.init(null, trustManagerFactory.getTrustManagers(), null);
            // 构建OkHttpClient,设置SSL Socket Factory
            return new OkHttpClient.Builder()
                    .sslSocketFactory(sslContext.getSocketFactory(), (X509TrustManager) trustManagerFactory.getTrustManagers()[0])
                    .build();
        }catch (Exception e){
            e.printStackTrace();
            return null;
        }
    }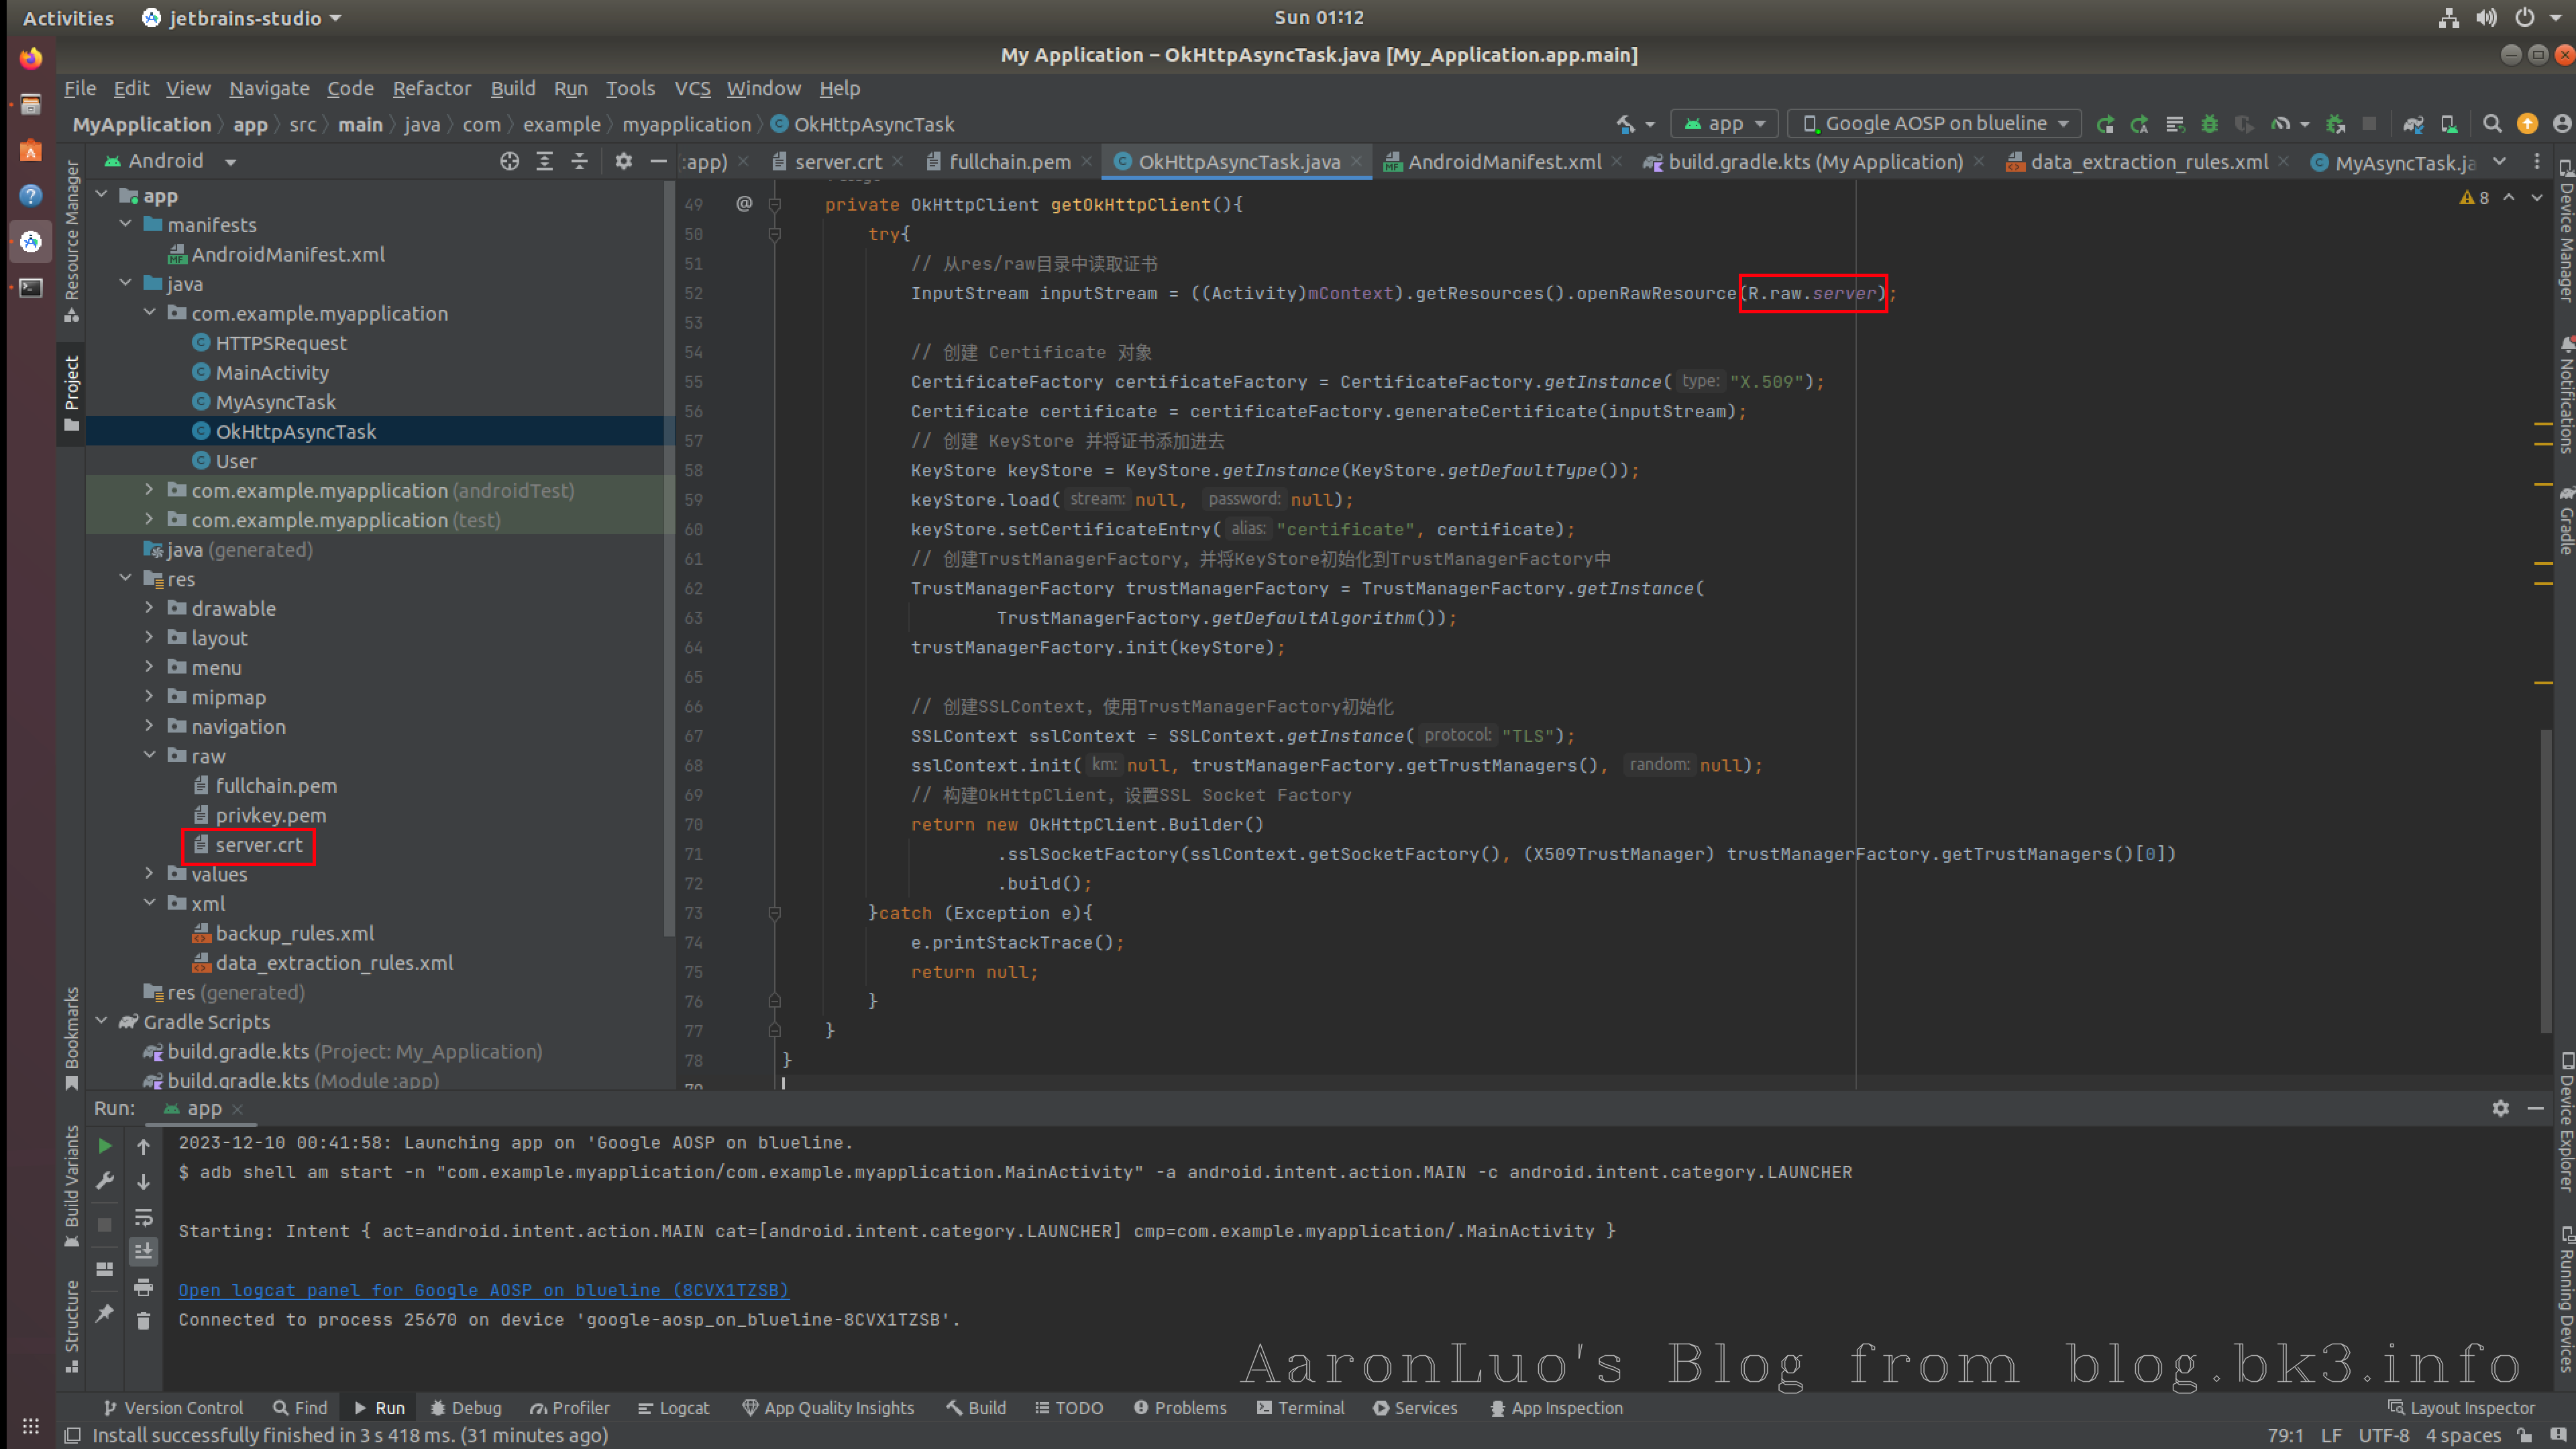
服务端证书为自签证书

当burp的CA证书还是portSwigger的时候,会报SSL连接错误

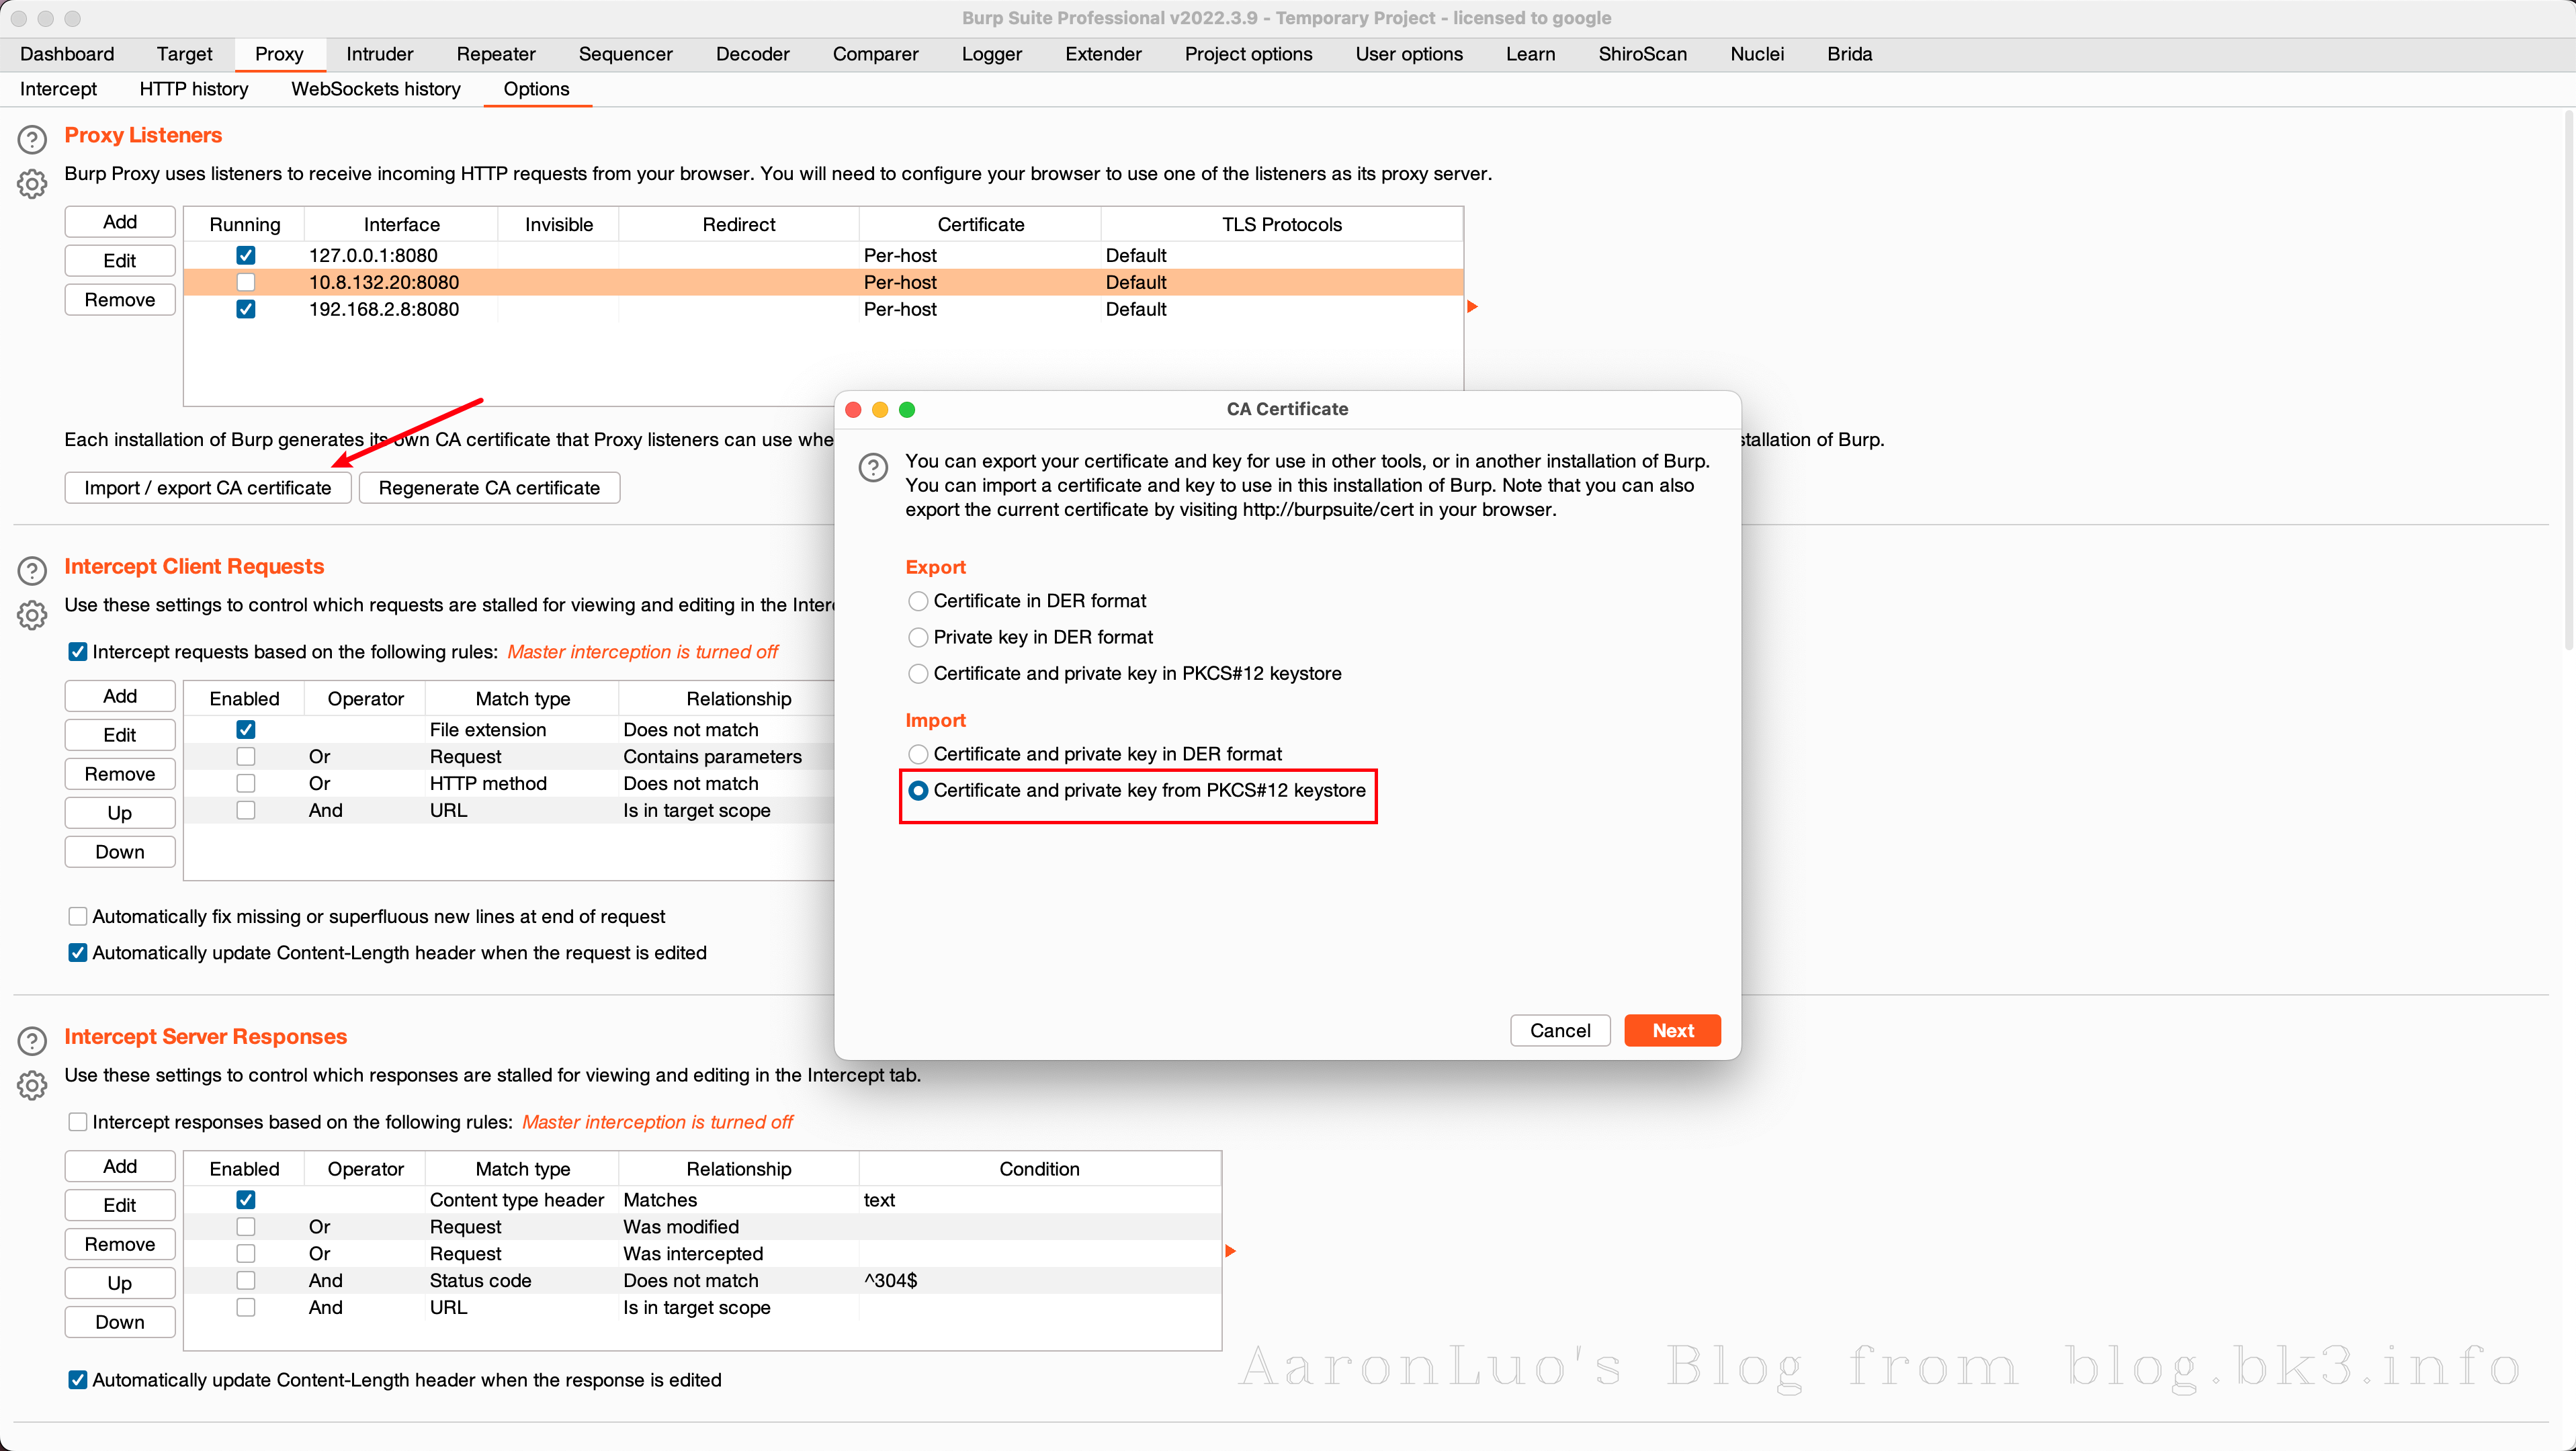
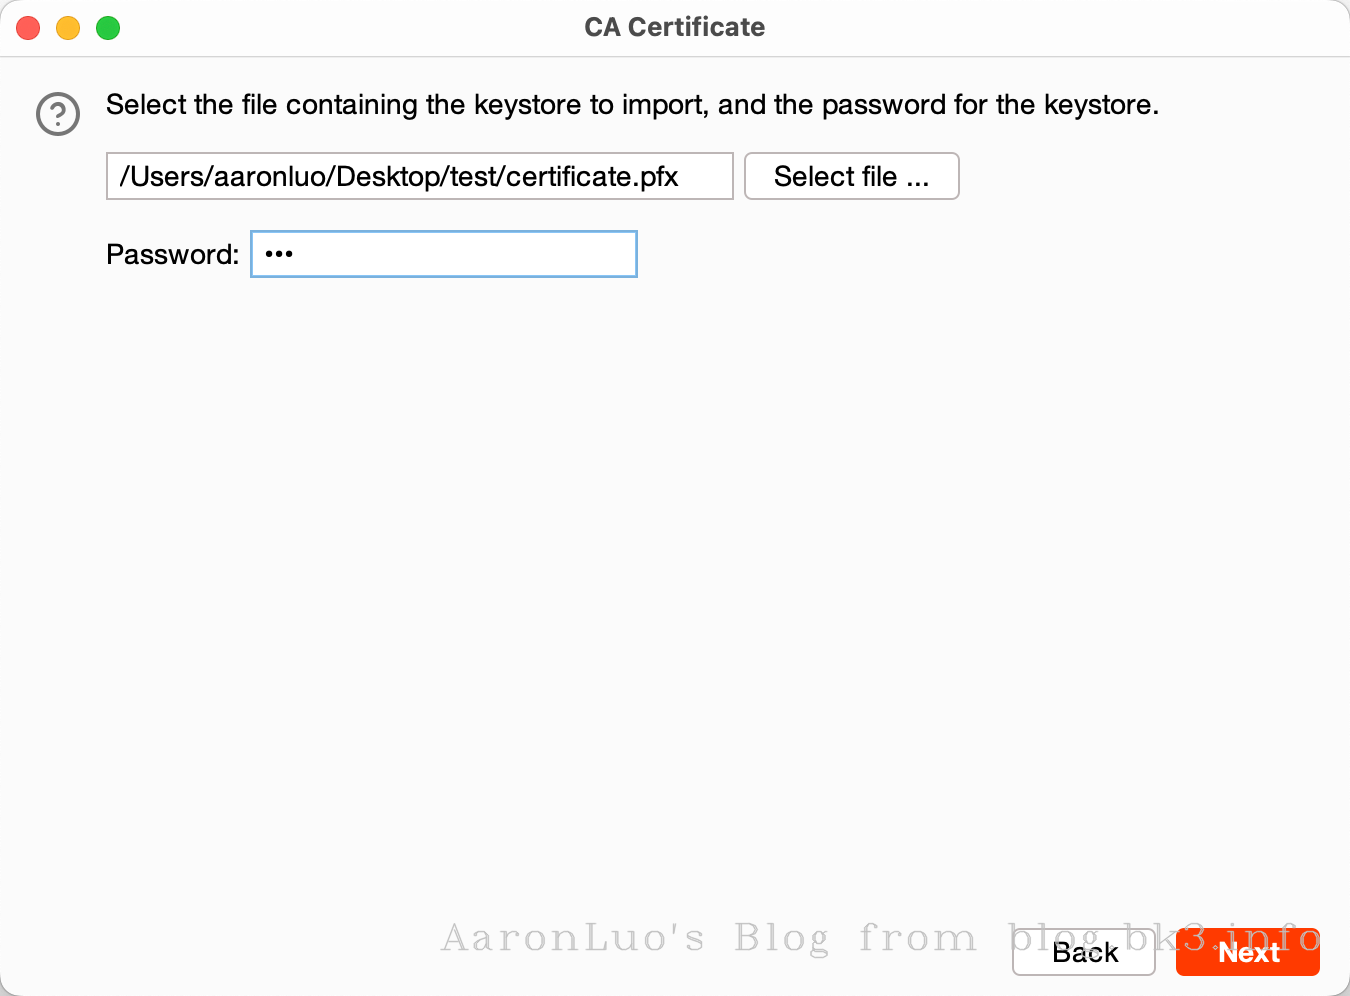
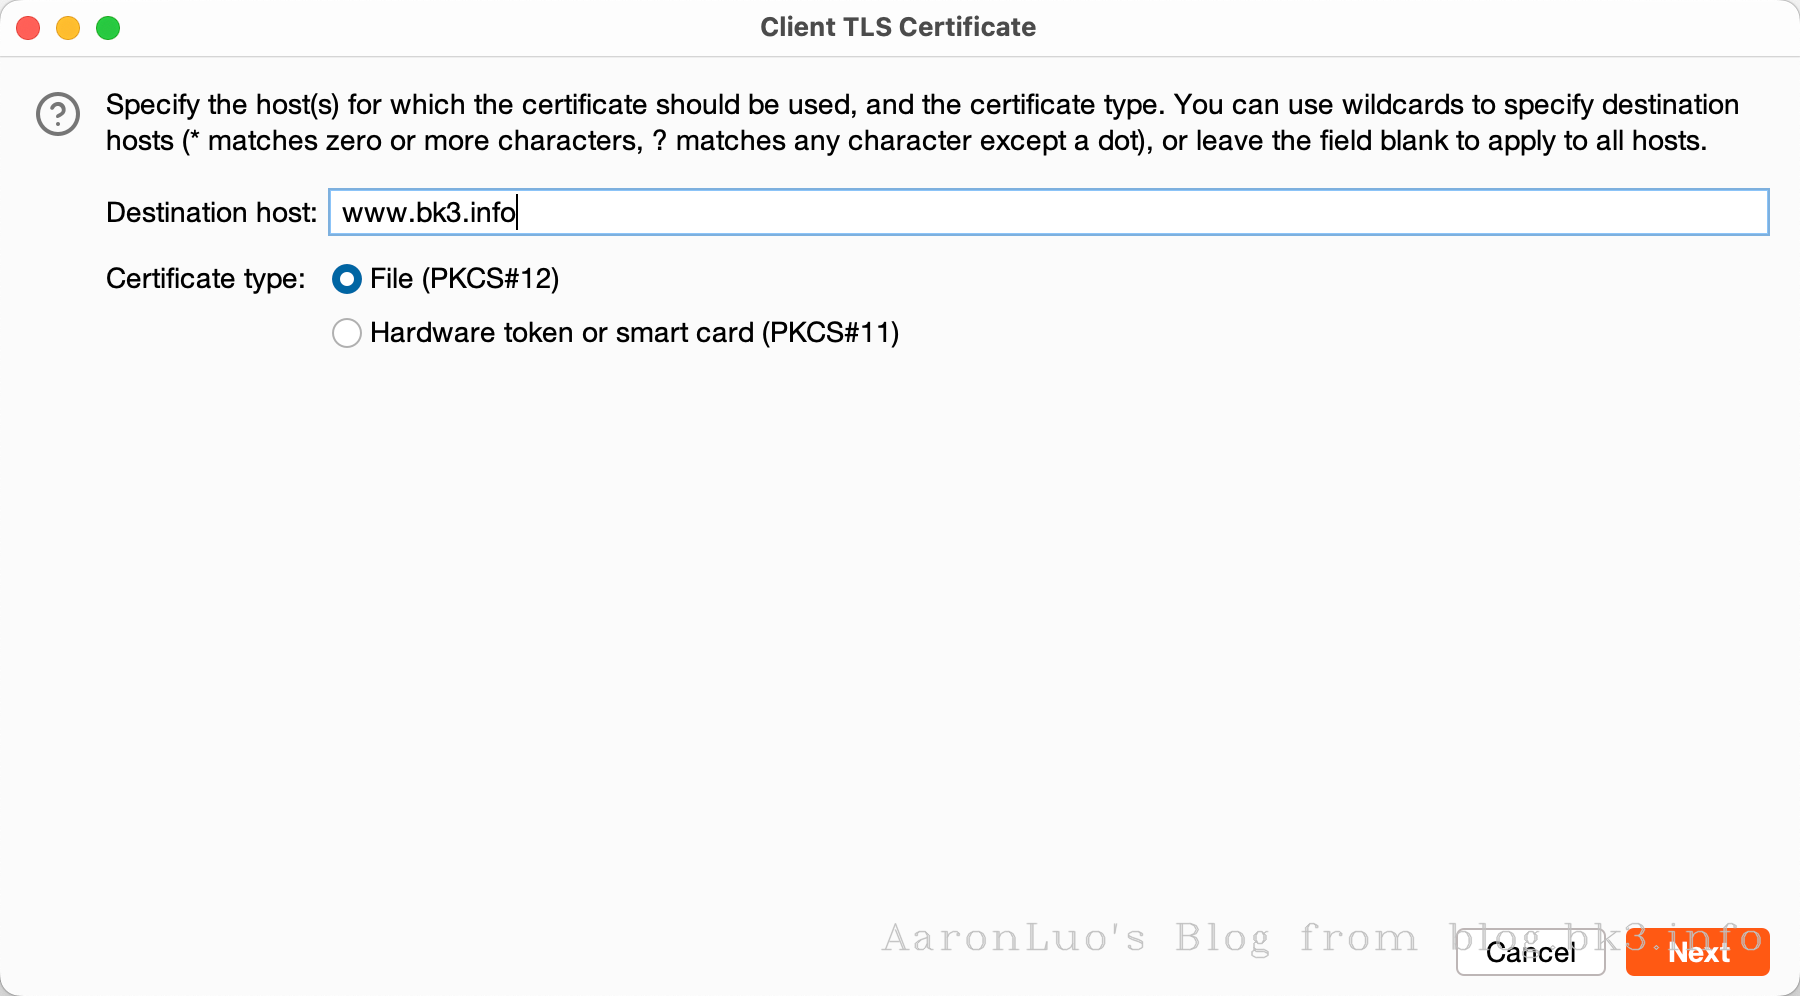
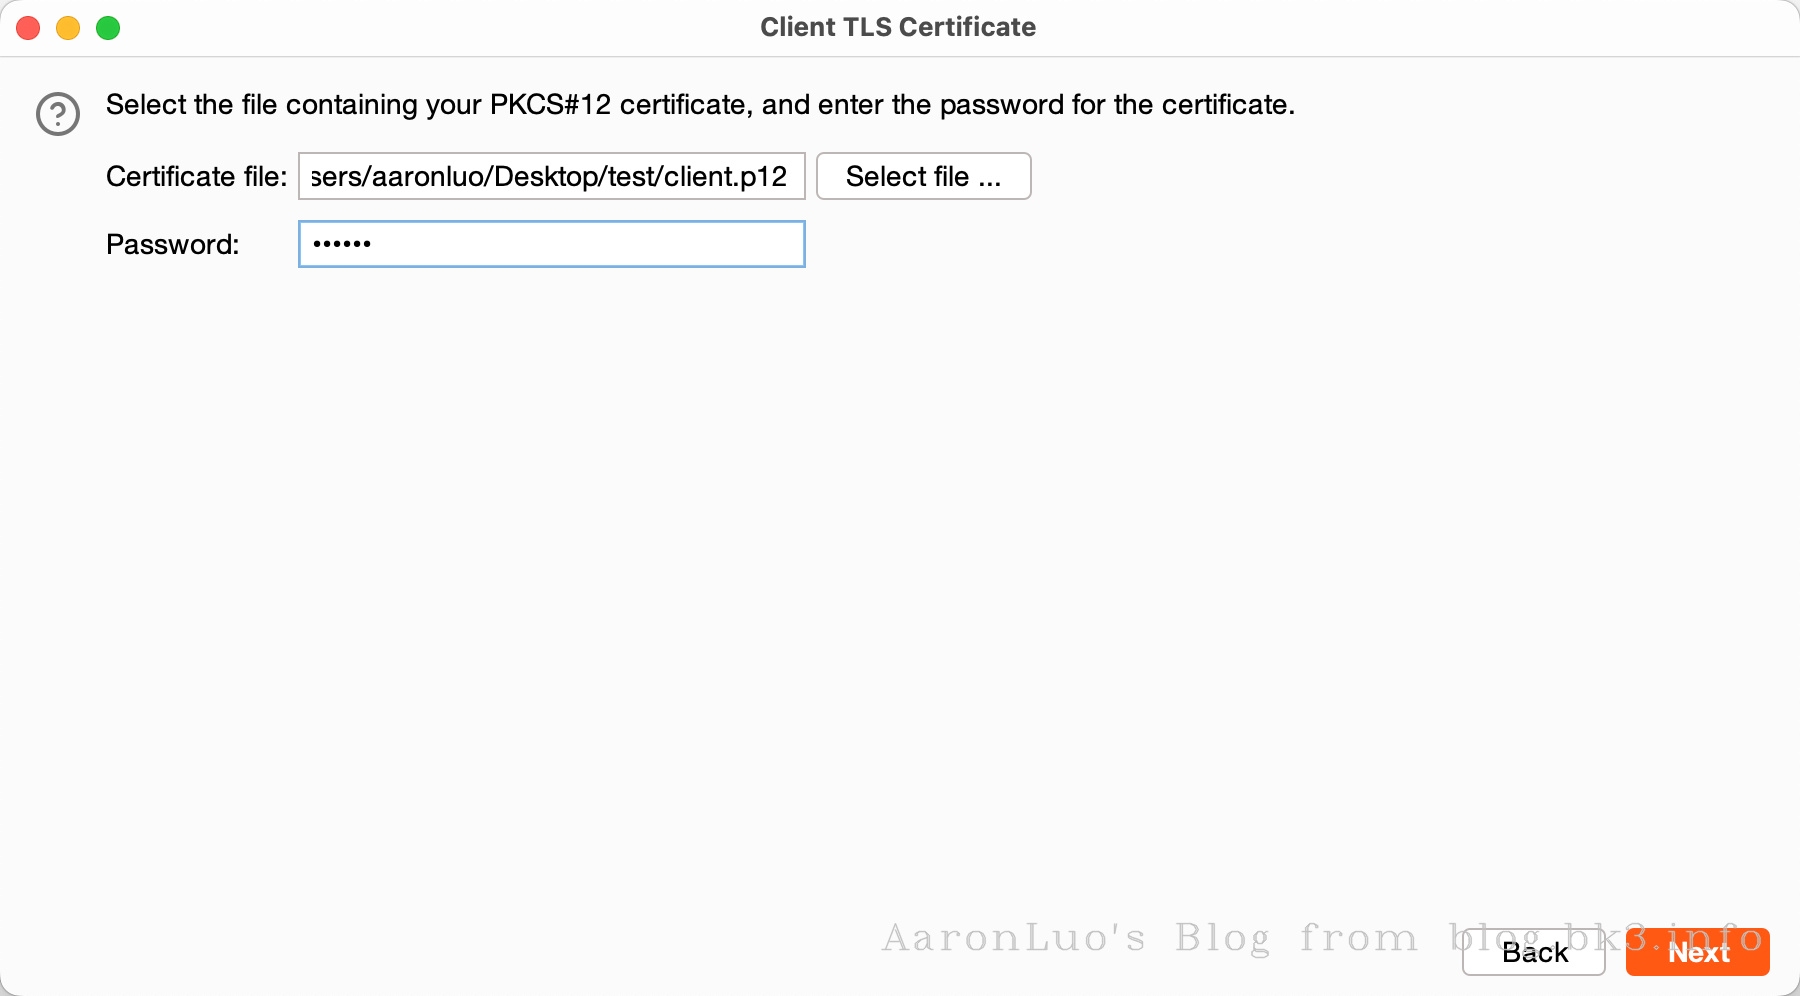
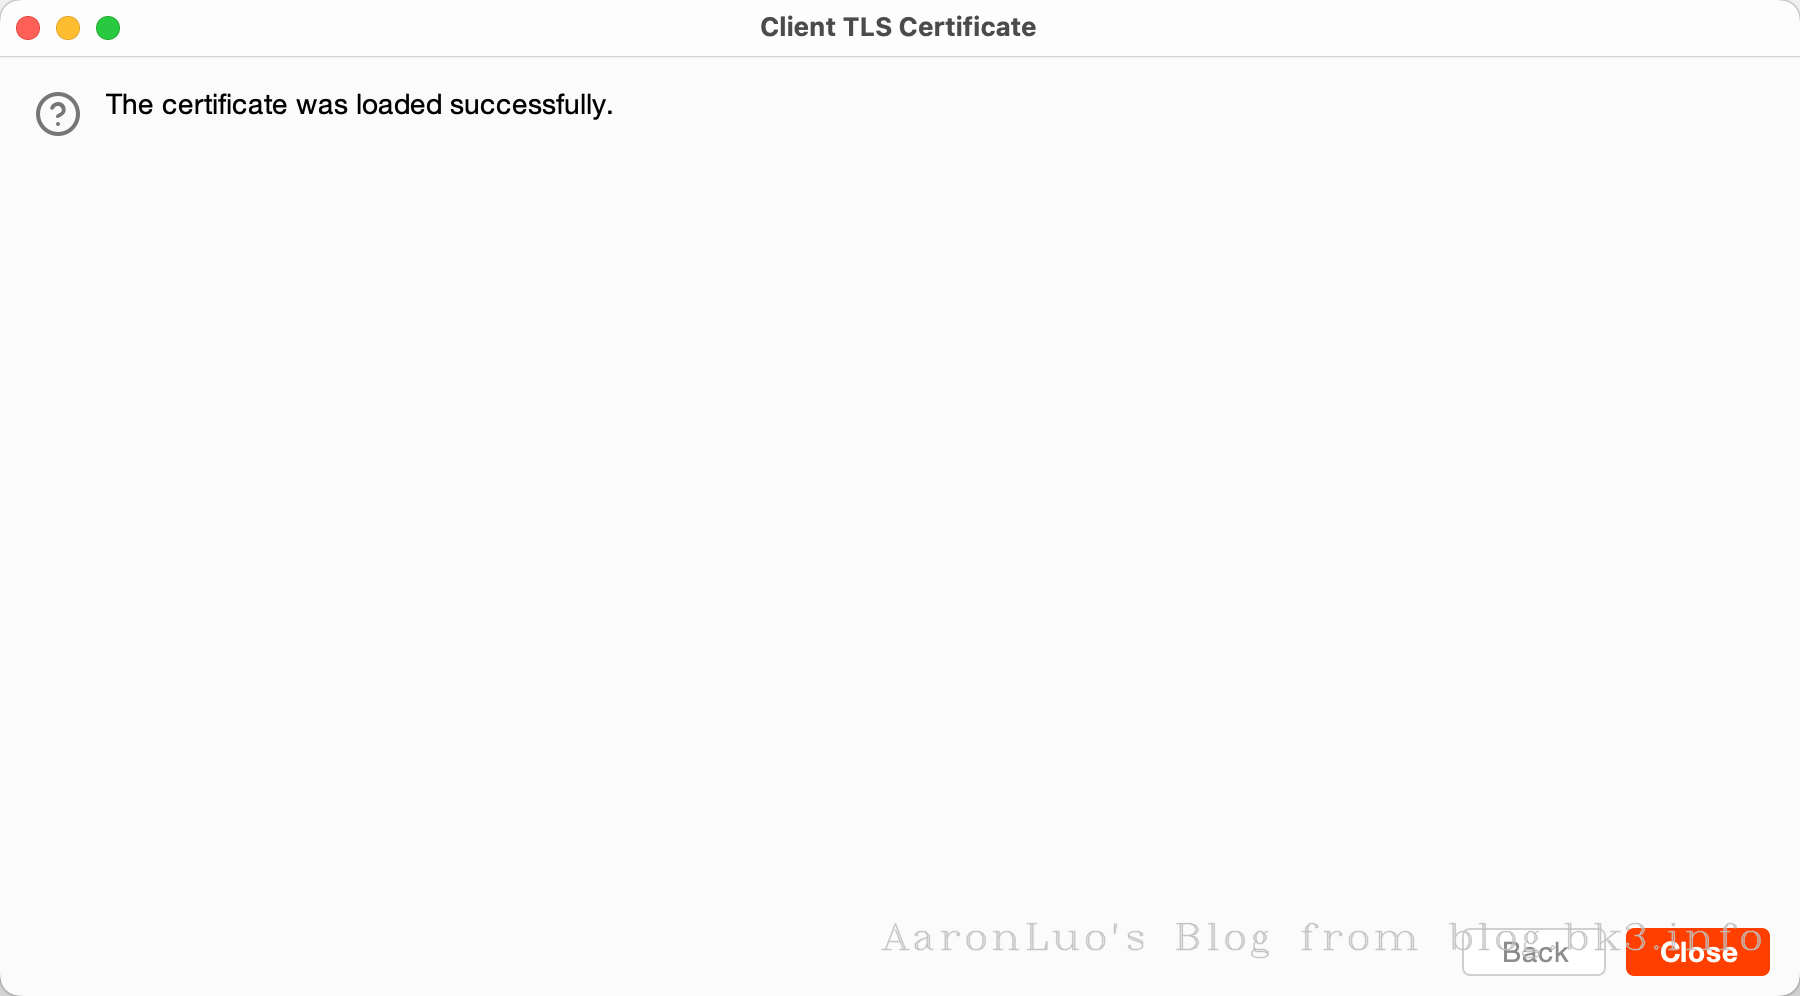
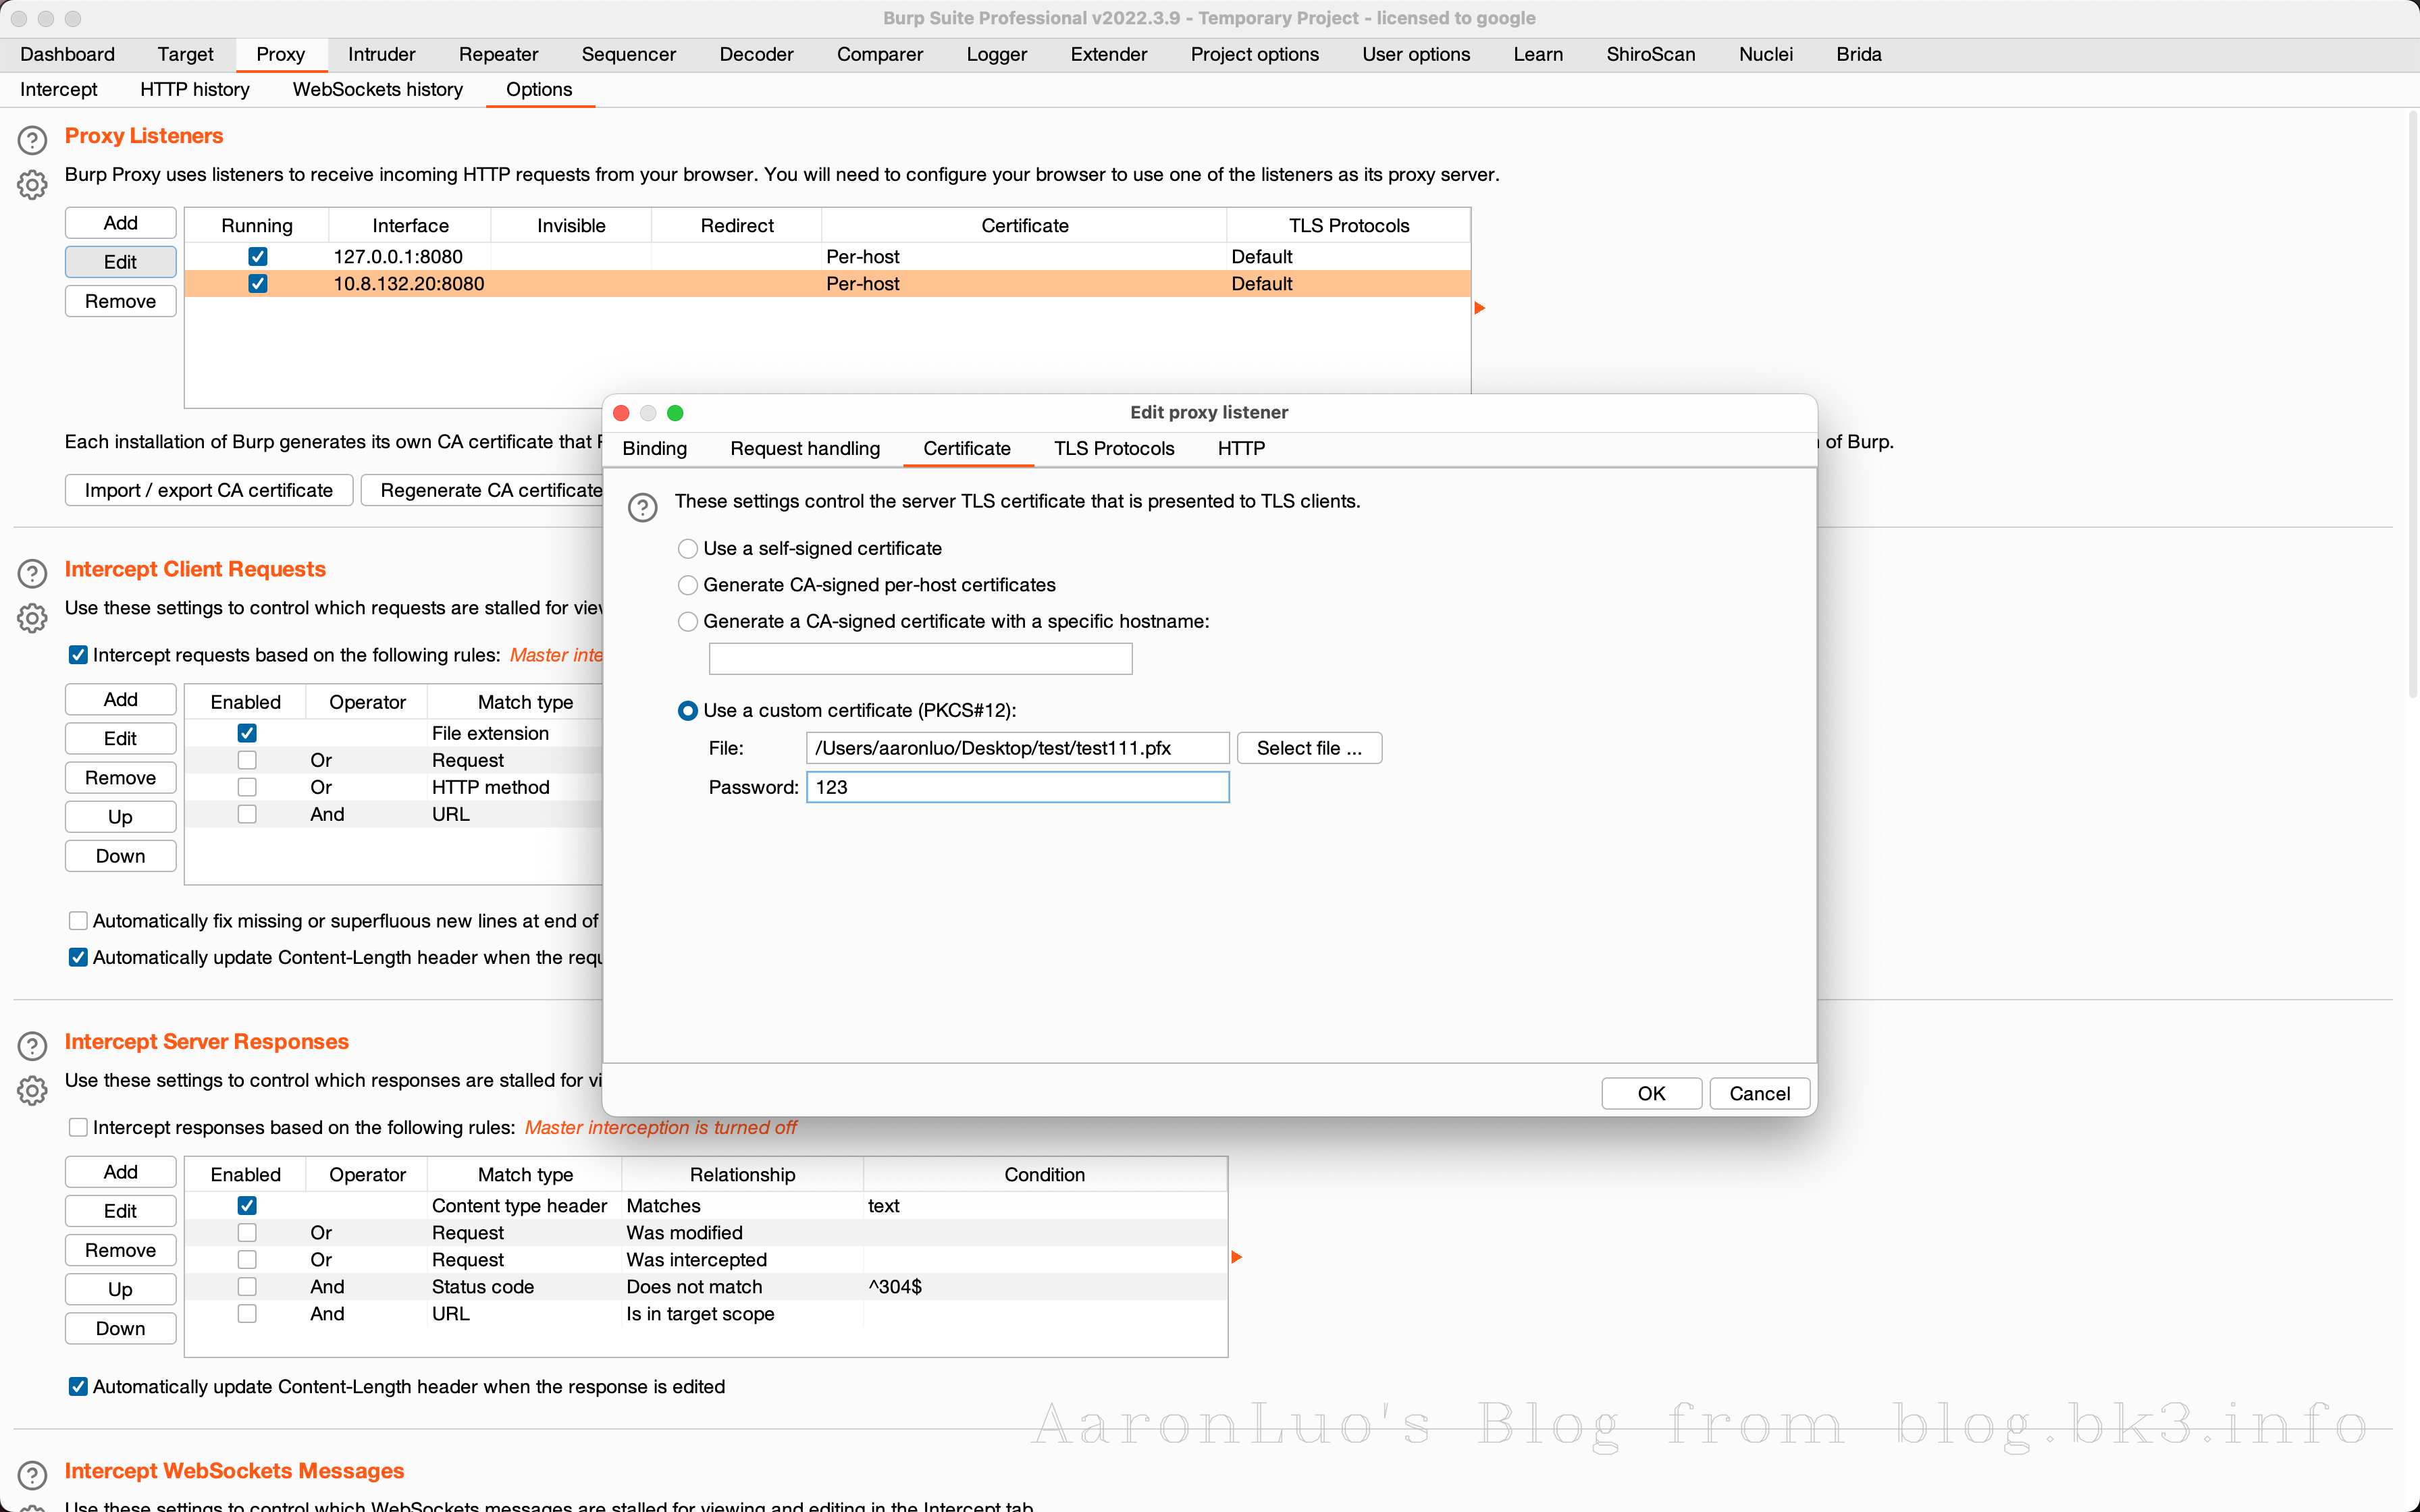
当通过其他手段获取到服务端证书、服务端证书私钥,将其做成能导入的burpsuite的pkcs#12格式的keyStore(证书交换文件)
openssl pkcs12 -export -out certificate.pfx -inkey server.key -in server.crt
Enter Export Password:
Verifying - Enter Export Password:
不推荐使用替换burp的根证书,下面还有其他方法,这一步只是解决困扰我两个晚上的问题,导入CA证书到底是什么意思
可以再这里点击下载我们导入的server证书,通过openssl命令来校验证书是否是导入的证书

openssl x509 -in cacert.der -text -noout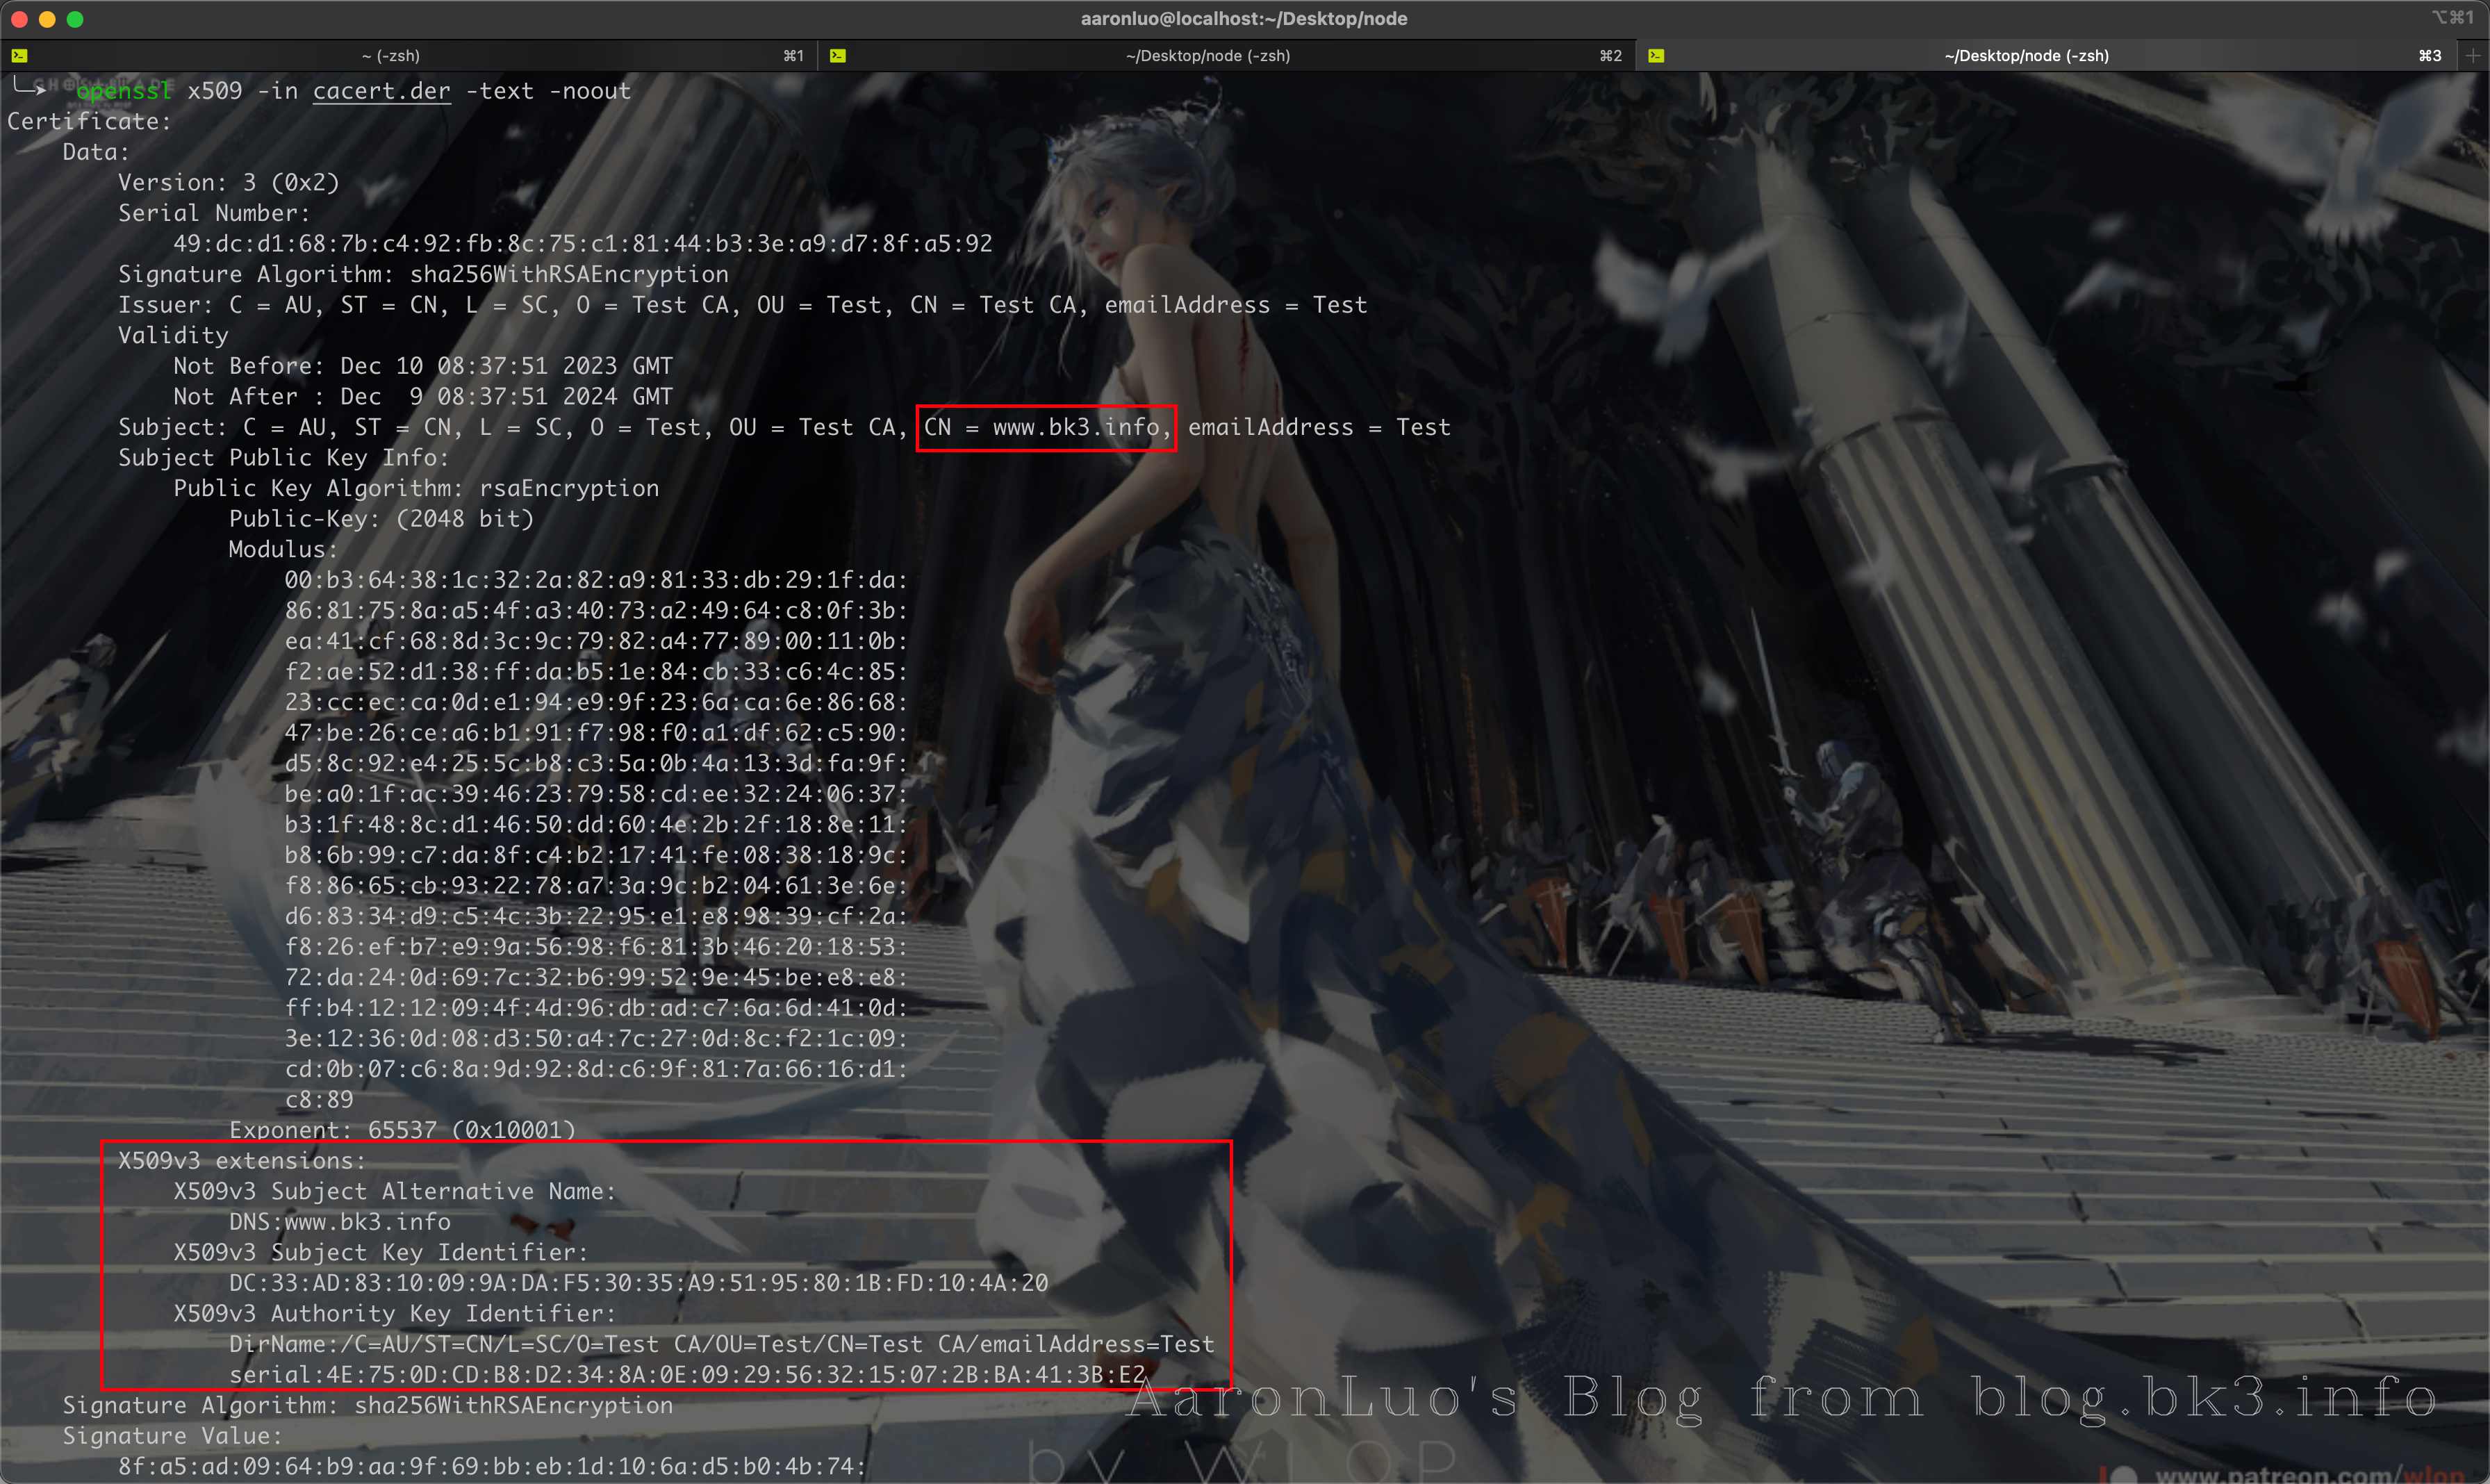
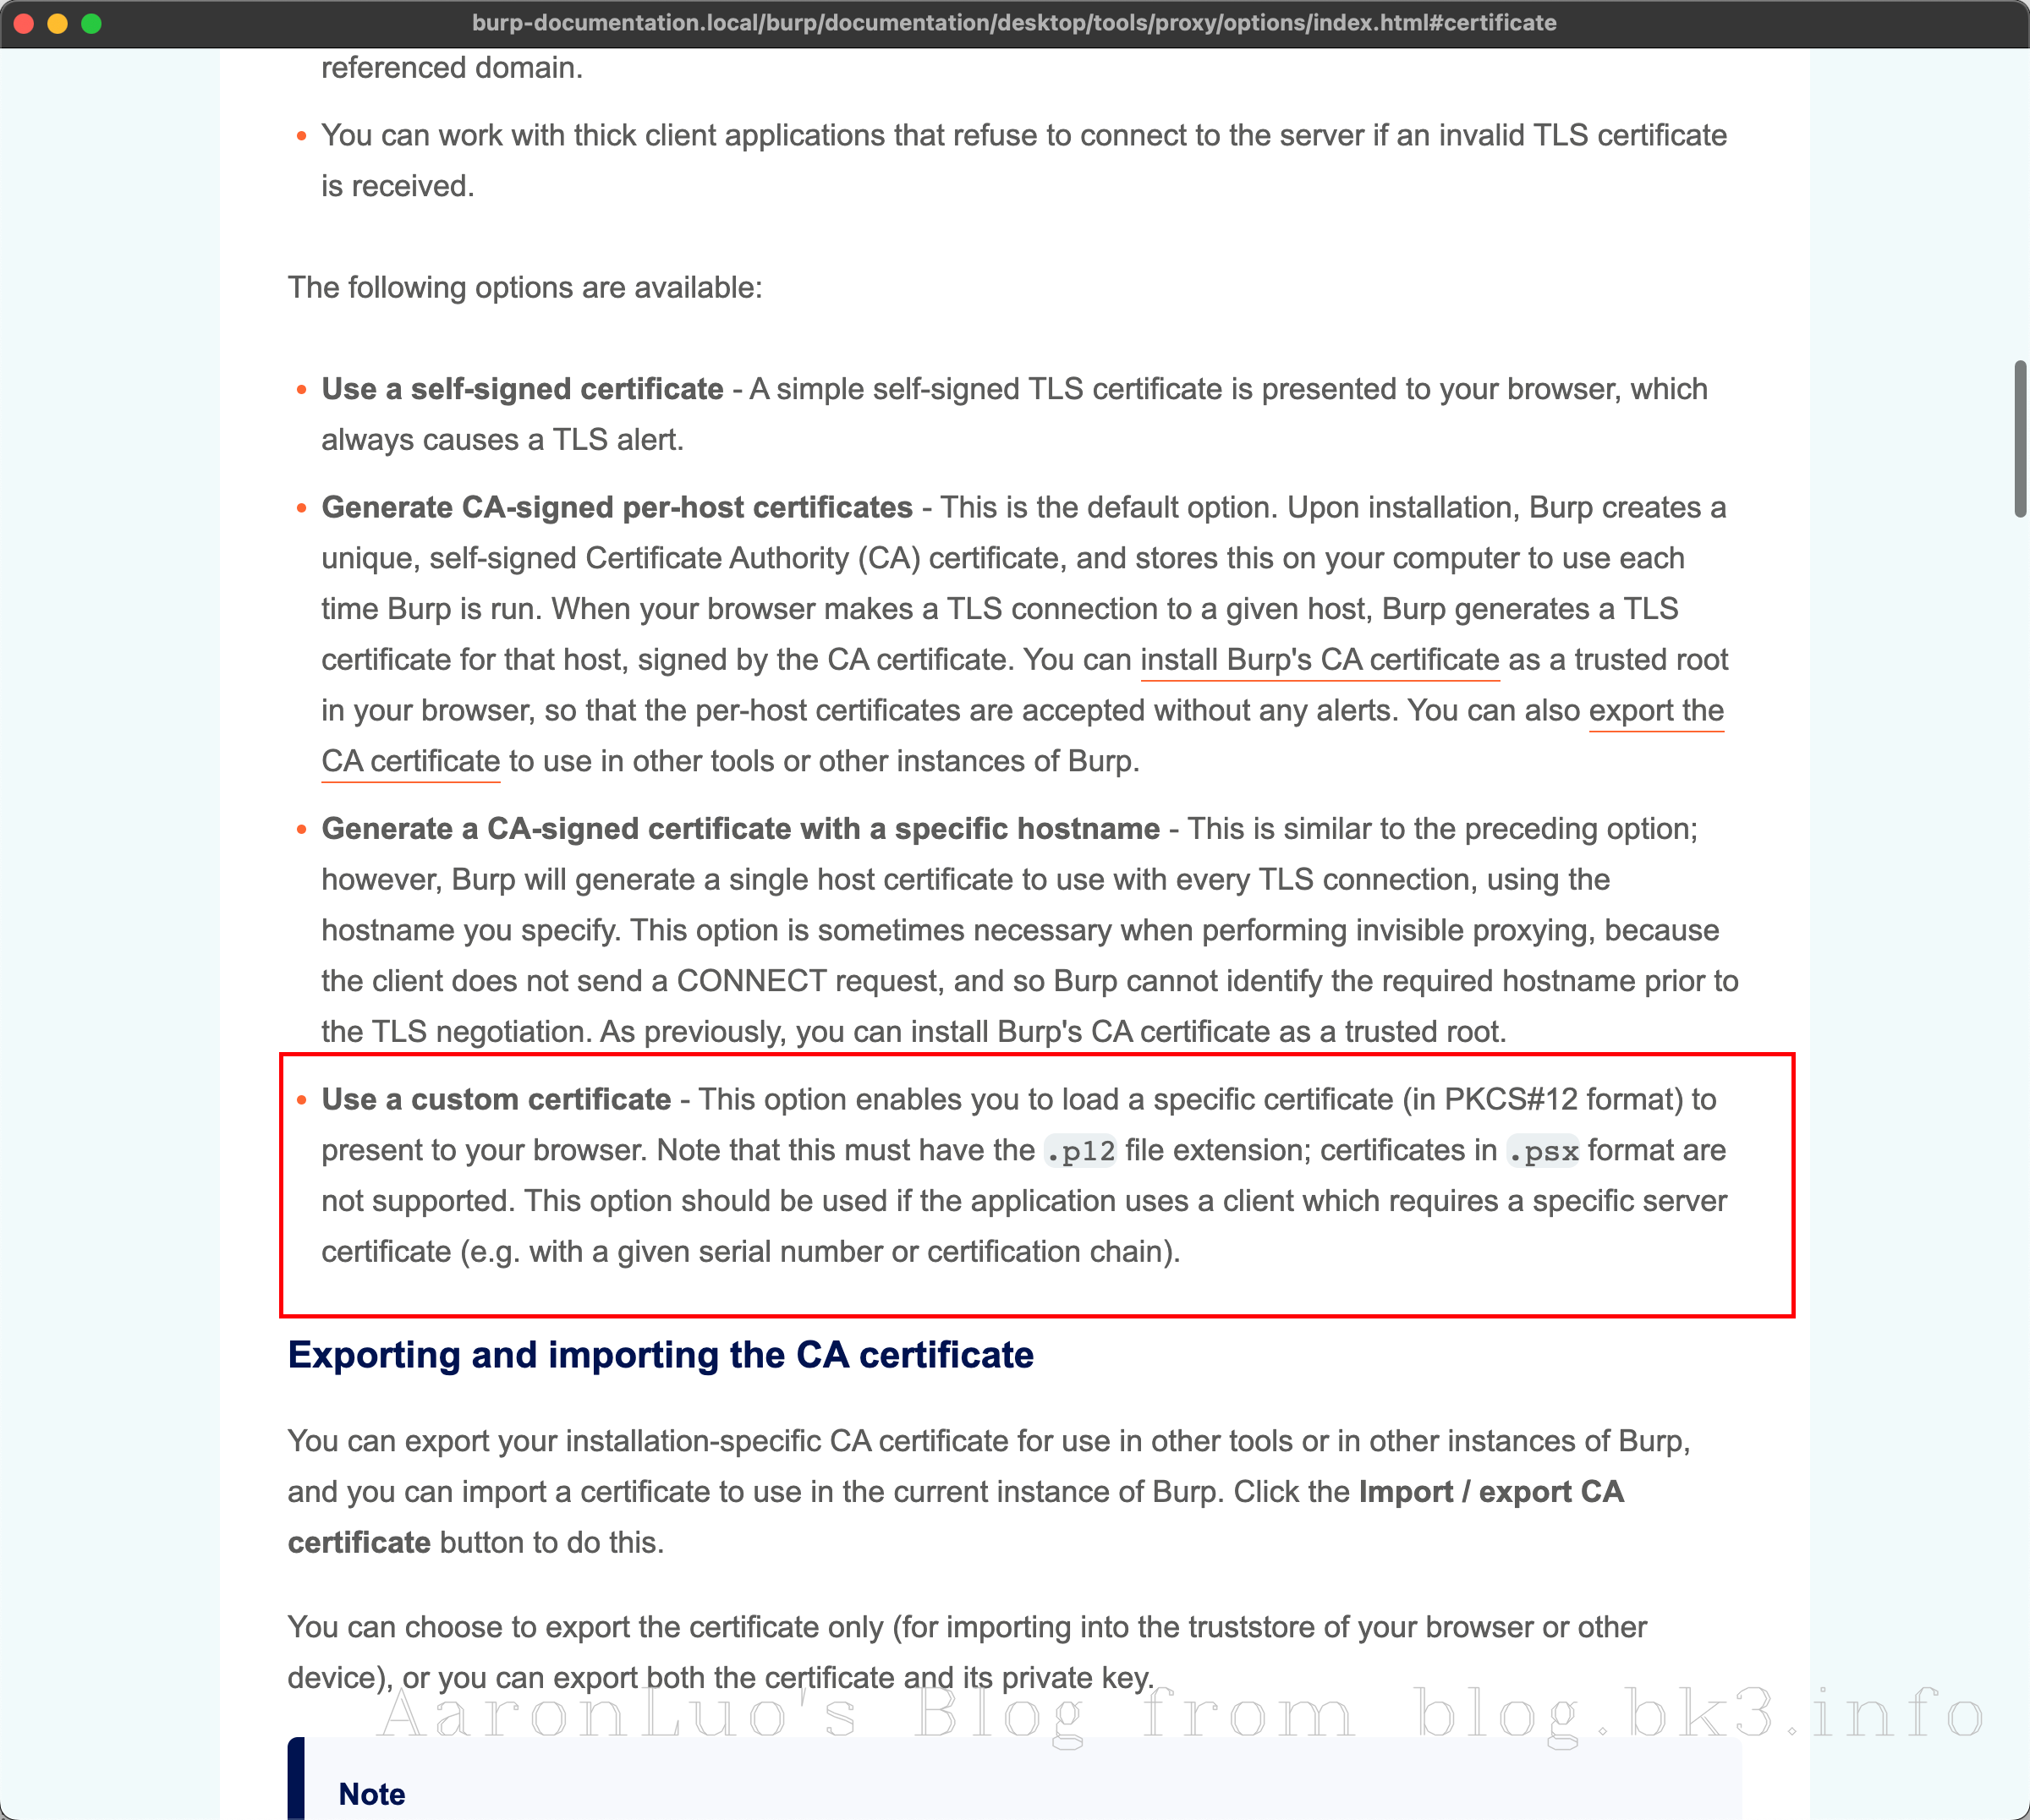
或者如果不愿意直接修改BurpSuite的根证书,也可以在此处添加证书文件,如果应用程序使用的客户端需要特定的服务器证书(也就是客户端需要校验服务端证书 == 客户端存在服务端证书校验 == SSL Pinning)
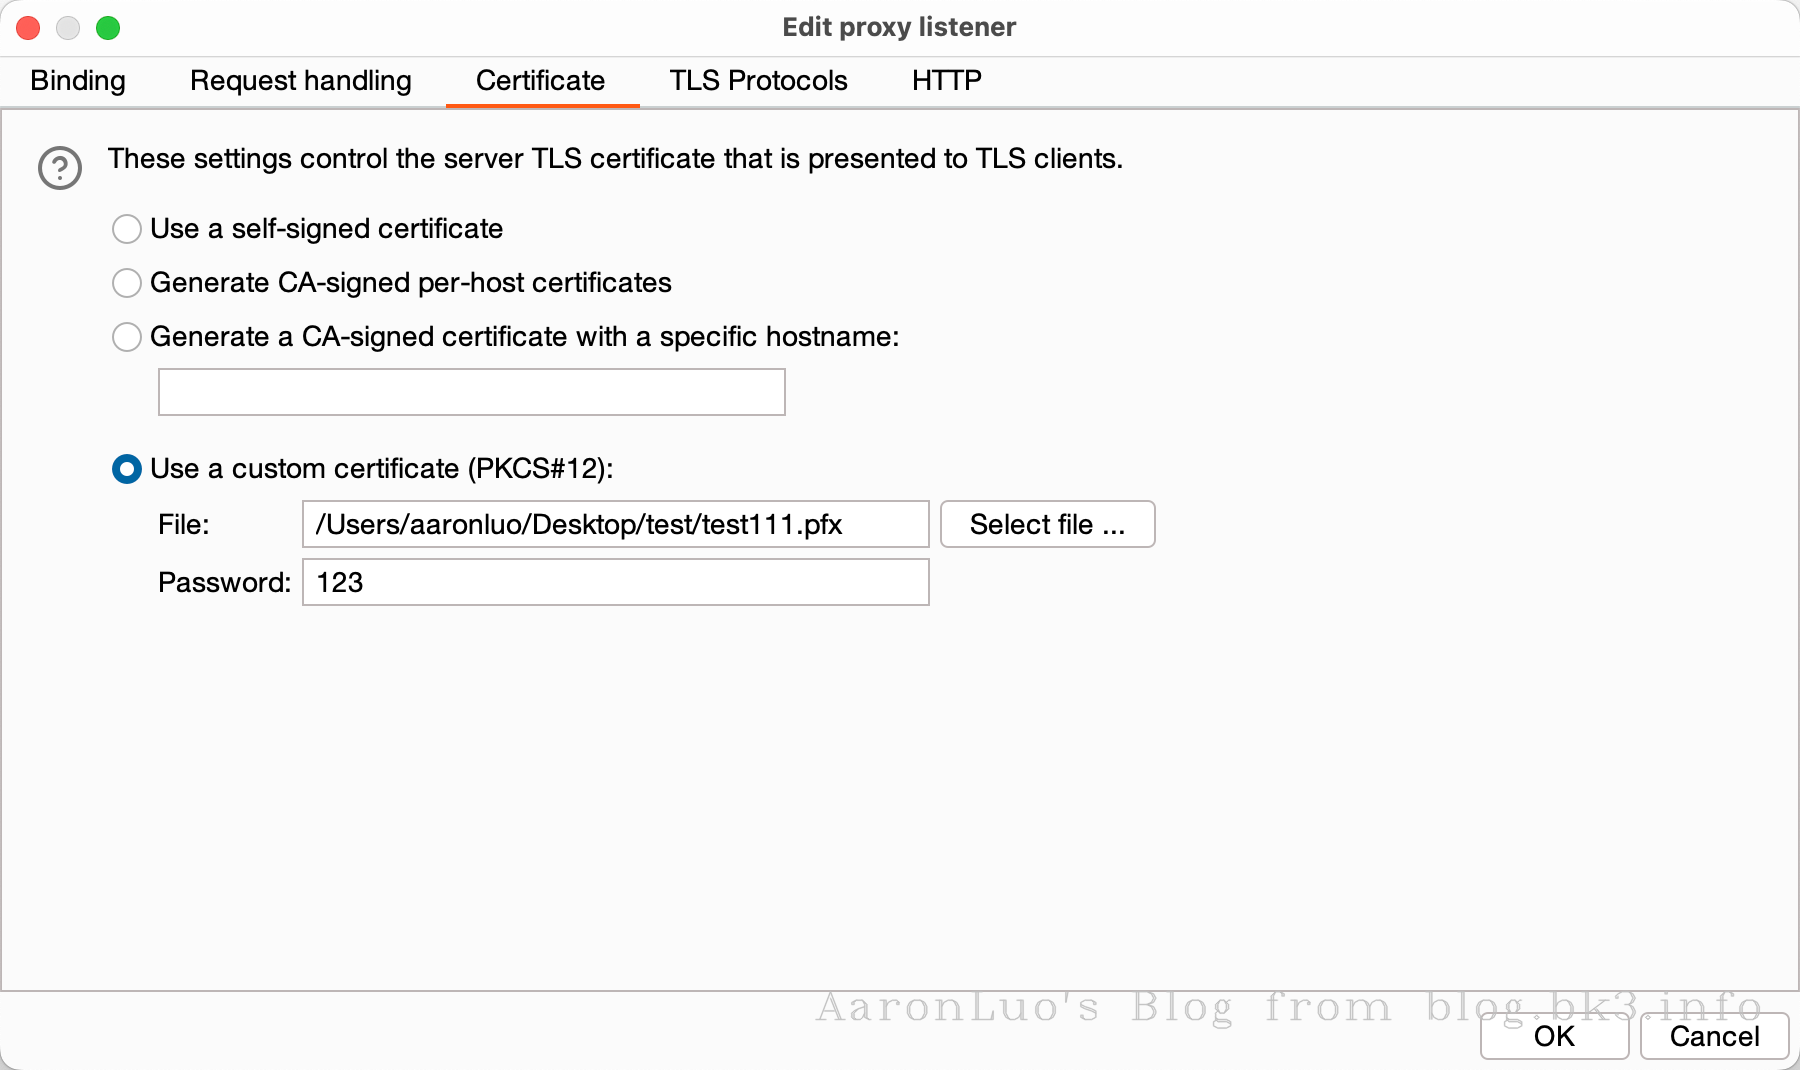
此时我们已经将burp的CA证书变成服务端自签名证书,此时就可以抓包测试了,就可以完成中间人攻击
即使系统不信任自签的根证书一样可以抓包

双向认证
首先需要通过openssl获取自签名证书生成clientCA、clientCA_key、client.crt、client.key,然后将ClientCA证书放置到服务端,通过ClientCA证书来校验客户端证书的合法性
const express = require('express')
const https = require('https')
const fs = require('fs')
const app = new express()
var index = 0
// Middleware for handling client certificate validation
app.use((req, res, next) => {
const clientCert = req.connection.getPeerCertificate()
console.log('Received client certificate request')
if (!clientCert.subject) {
// 利用clientCA证书来校验client证书是否有效
return res.status(401).send('Client certificate not provided')
}
// Your custom validation logic here
// For example, you might check the client certificate's subject or issuer
// You can also perform additional checks like expiration date, etc.
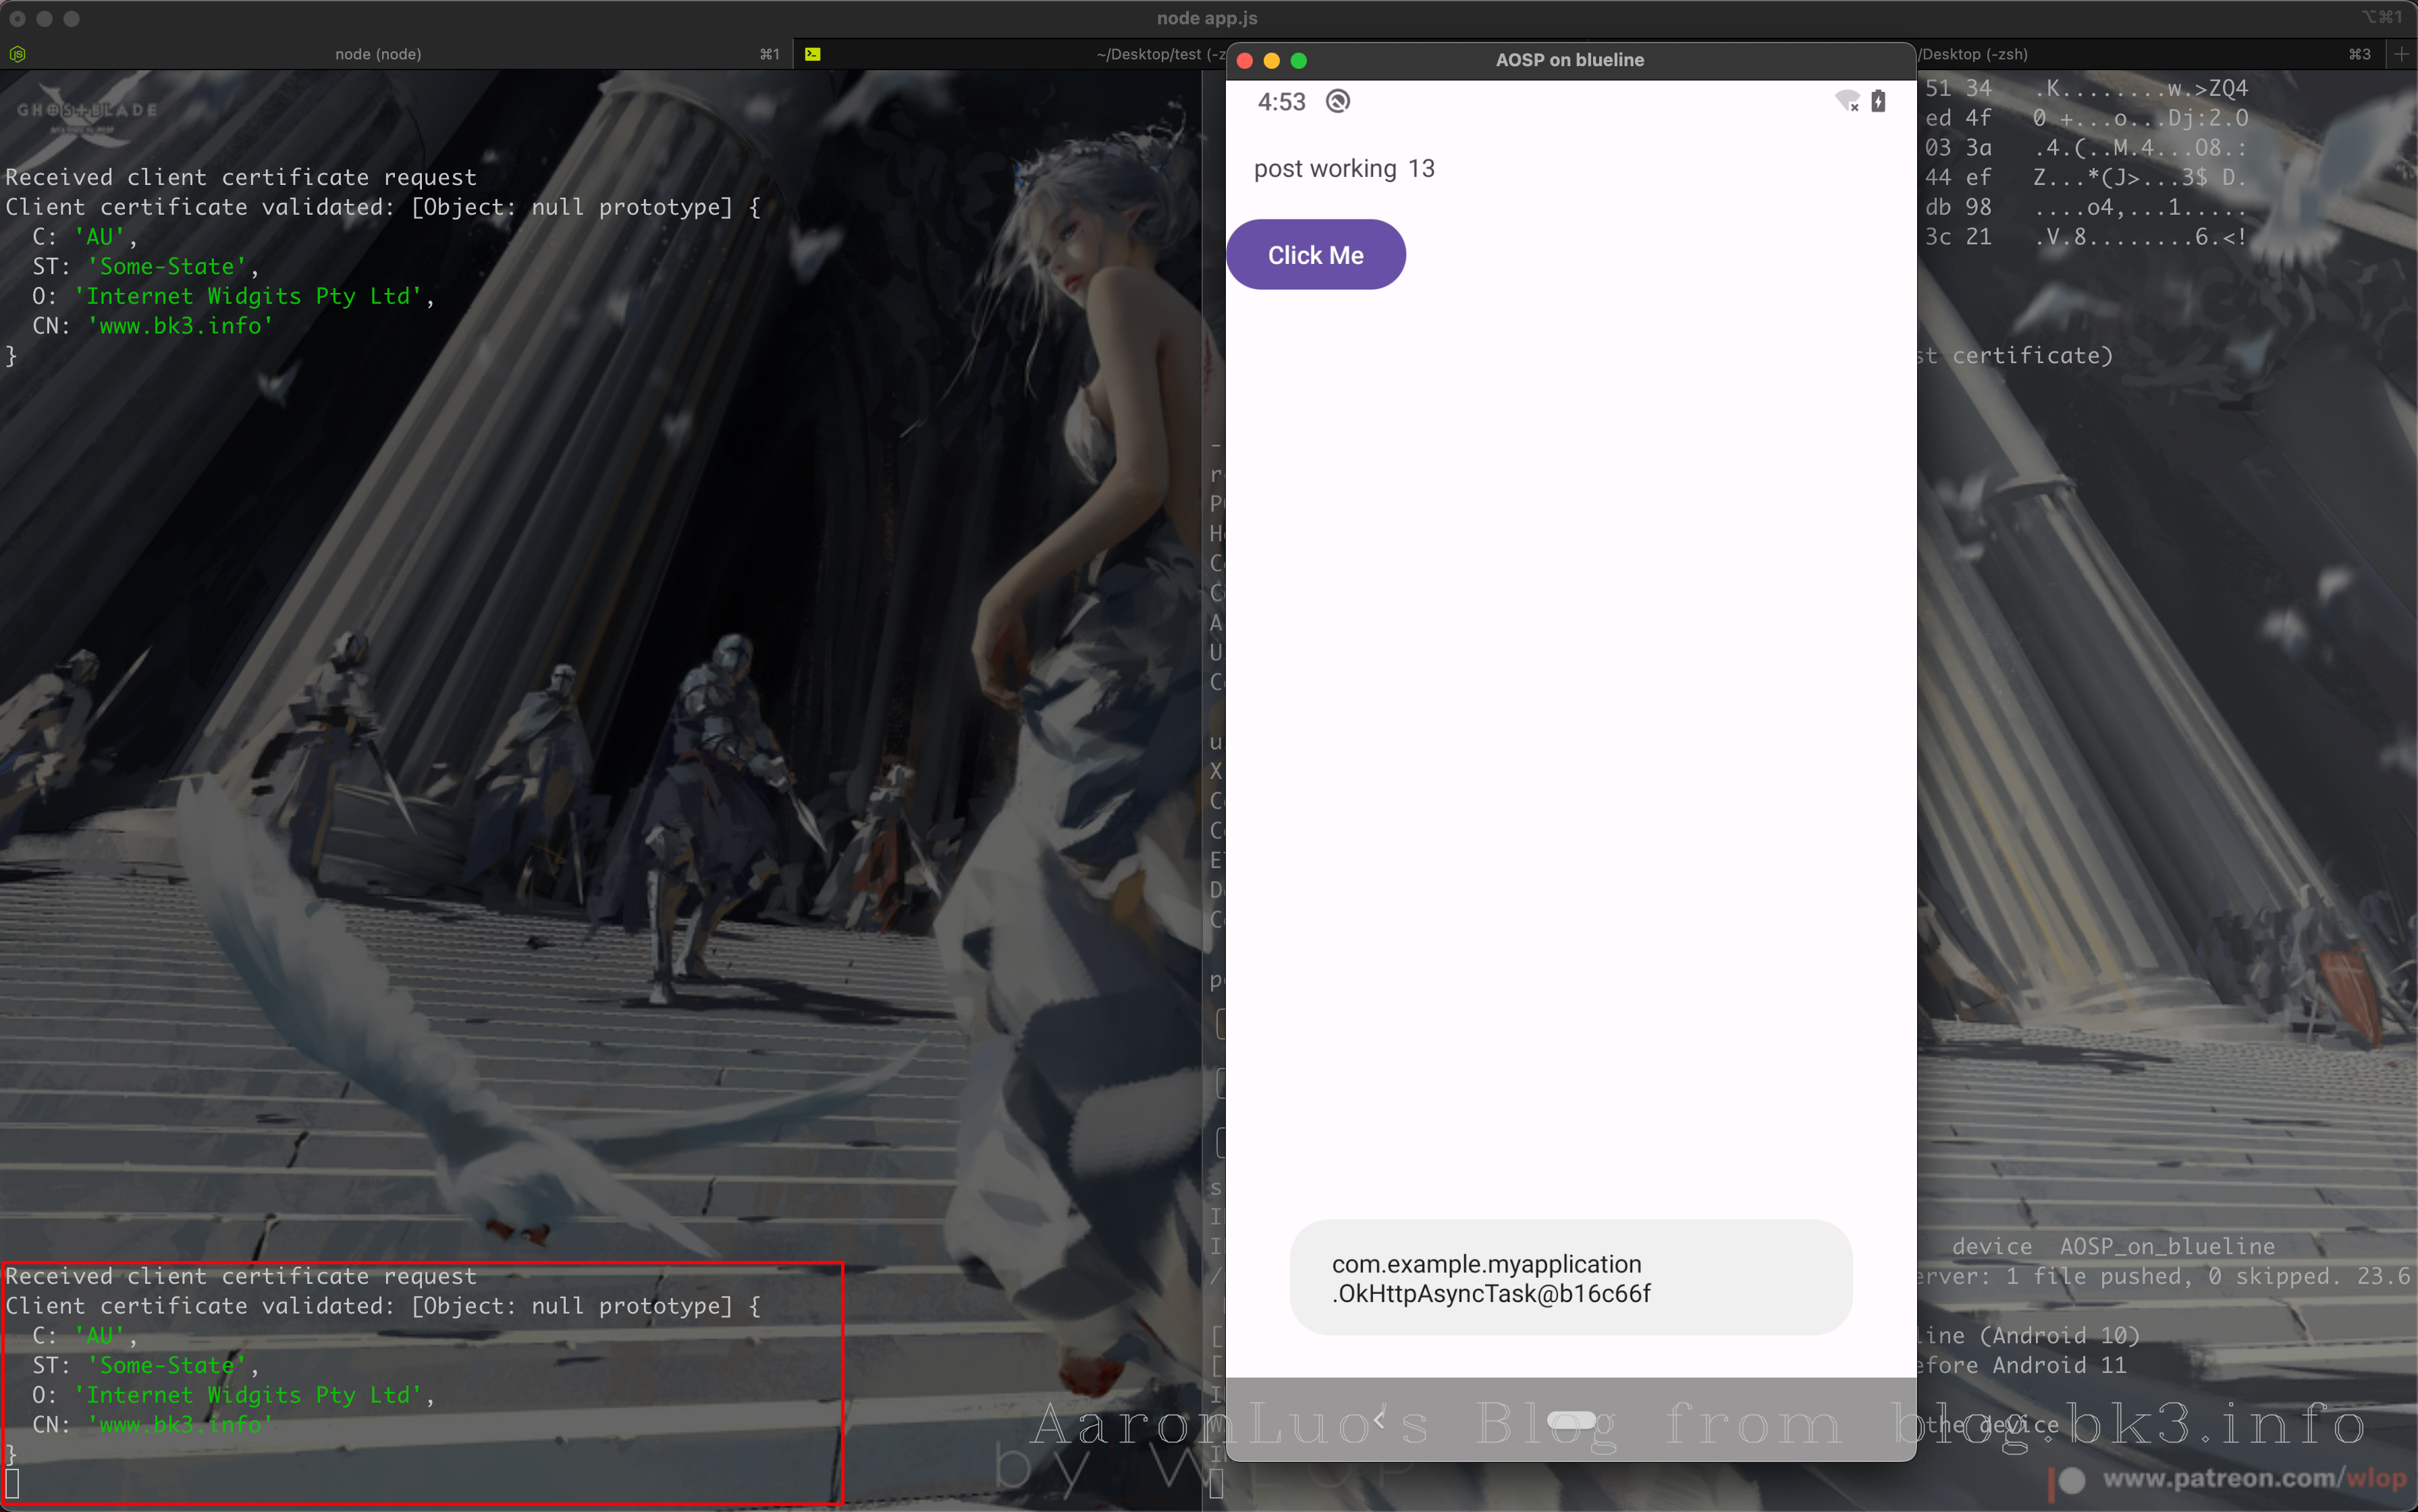
console.log('Client certificate validated:', clientCert.subject)
next()
})
app.get('/', (req, res) => {
res.send('its working')
})
app.post('/testPost', (req, res) => {
index++
res.send('post working\t' + index)
})
var options = {
key: fs.readFileSync('./server.key'),
cert: fs.readFileSync('./server.crt'),
ca: fs.readFileSync('./client_ca.crt'), // Optional: Specify CA certificate for client verification
requestCert: true,
rejectUnauthorized: true
}
const httpsServer = https.createServer(options, app)
httpsServer.listen(8088, () => {
console.log('https running!')
})
然后我们可以查看服务端,未提供client证书,导致无法访问
使用client.crt、client.keyopenssl生成burp可识别的pkcs#12文件,导入到burp中


最后我们挂上burp代理,就可以发现可以访问需要校验客户端证书的web服务,这个时候burp因为加载了我们的客户端证书,所以就是我们的客户端

再看客户端校验服务端的证书,这时就需要服务端的CA证书
[!TIP]
为了安全起见,客户端CA和服务端CA不是同一个,可用于基础校验,通过各自的CA证书来校验传递到(客户端/服务端)证书的合法性,当然还可以校验除合法性之外的其他证书内容
由于我不知道怎么让客户端识别我自己生成的pkcs#12证书、所以我就用client.crt、client.key 在代码层重新生成keyStore
android 客户端使用client.crt、client.key、CA.crt(服务端CA证书)来完成将证书客户端证书信息发送给服务端,以及利用服务端CA证书来完成对服务端证书的校验,以此来完成客户端对服务端的校验
package com.example.myapplication;
import android.app.Activity;
import android.content.Context;
import android.os.AsyncTask;
import android.widget.TextView;
import java.io.BufferedReader;
import java.io.InputStream;
import java.io.InputStreamReader;
import java.security.KeyFactory;
import java.security.SecureRandom;
import java.security.cert.Certificate;
import java.security.cert.CertificateException;
import java.security.cert.CertificateFactory;
import java.security.KeyStore;
import java.security.cert.X509Certificate;
import java.security.spec.PKCS8EncodedKeySpec;
import java.util.Base64;
import javax.net.ssl.KeyManagerFactory;
import javax.net.ssl.SSLContext;
import javax.net.ssl.SSLSocketFactory;
import javax.net.ssl.TrustManager;
import javax.net.ssl.TrustManagerFactory;
import javax.net.ssl.X509TrustManager;
import okhttp3.*;
public class OkHttpAsyncTask extends AsyncTask<String, Void, String> {
private Context mContext;
public OkHttpAsyncTask(Context mContext){
this.mContext = mContext;
}
@Override
protected String doInBackground(String... params) {
OkHttpClient client = createOkHttpClient();
// 检查 OkHttpClient 是否为 null
if (client == null) {
return "Error: OkHttpClient is null";
}
RequestBody formBody = new FormBody.Builder().add("username",params[1]).add("password",params[2]).build();
Request request = new Request.Builder()
.url(params[0]) // 使用一个示例API
.post(formBody)
.build();
try{
Response response = client.newCall(request).execute();
if (response.isSuccessful()) {
return response.body().string();
} else {
return "Error: " + response.code() + " " + response.message();
}
}catch (Exception e){
e.printStackTrace();
return "Error: " + e.getMessage();
}
}
@Override
protected void onPostExecute(String result) {
TextView textView = ((Activity)mContext).findViewById(R.id.MainTextView);
textView.setText(result);
}
private OkHttpClient createOkHttpClient() {
try{
InputStream clientCertInputStream = ((Activity)mContext).getResources().openRawResource(R.raw.clienttest);
InputStream clientKeyInputStream = ((Activity)mContext).getResources().openRawResource(R.raw.client);
InputStream caCertInputStream = ((Activity)mContext).getResources().openRawResource(R.raw.ca);
KeyStore keyStore = KeyStore.getInstance("PKCS12");
keyStore.load(null, null); // Initialize empty keystore
keyStore.setCertificateEntry("ca", loadCertificate(caCertInputStream));
keyStore.setKeyEntry("client", loadPrivateKey(clientKeyInputStream), "your_protected_password".toCharArray(), new java.security.cert.Certificate[]{loadCertificate(clientCertInputStream)});
// 创建 TrustManager,用于验证服务器证书
TrustManager[] trustManagers = {new X509TrustManager() {
@Override
public void checkClientTrusted(X509Certificate[] chain, String authType) throws CertificateException {
// Client authentication is not needed in this context
}
@Override
public void checkServerTrusted(X509Certificate[] chain, String authType) throws CertificateException {
// Implement server certificate validation logic here
try {
checkServerCertificate(chain);
} catch (Exception e) {
throw new RuntimeException(e);
}
}
@Override
public X509Certificate[] getAcceptedIssuers() {
return new X509Certificate[0];
}
}};
// 初始化 KeyManagerFactory
KeyManagerFactory keyManagerFactory = KeyManagerFactory.getInstance(KeyManagerFactory.getDefaultAlgorithm());
keyManagerFactory.init(keyStore, "your_protected_password".toCharArray());
// 初始化 SSLContext
SSLContext sslContext = SSLContext.getInstance("TLS");
sslContext.init(keyManagerFactory.getKeyManagers(), trustManagers, new SecureRandom());
// 获取 SSLSocketFactory
SSLSocketFactory sslSocketFactory = sslContext.getSocketFactory();
// 配置 OkHttpClient
OkHttpClient okHttpClient = new OkHttpClient.Builder()
.sslSocketFactory(sslSocketFactory, (X509TrustManager) trustManagers[0])
.build();
return okHttpClient;
}catch (Exception e){
e.printStackTrace();
return null;
}
}
private X509Certificate loadCertificate(InputStream inputStream) throws Exception {
CertificateFactory certificateFactory = CertificateFactory.getInstance("X.509");
return (X509Certificate) certificateFactory.generateCertificate(inputStream);
}
private java.security.PrivateKey loadPrivateKey(InputStream inputStream) throws Exception {
// Implement logic to load private key from inputStream (e.g., using KeyFactory)
// ...
try (BufferedReader reader = new BufferedReader(new InputStreamReader(inputStream))) {
StringBuilder keyLines = new StringBuilder();
String line;
while ((line = reader.readLine()) != null) {
if (!line.startsWith("-----") && !line.isEmpty()) {
keyLines.append(line);
}
}
// Base64解码
byte[] encoded = Base64.getDecoder().decode(keyLines.toString());
// 生成私钥对象
KeyFactory keyFactory = KeyFactory.getInstance("RSA");
return keyFactory.generatePrivate(new PKCS8EncodedKeySpec(encoded));
} catch (Exception e) {
e.printStackTrace();
return null;
}
}
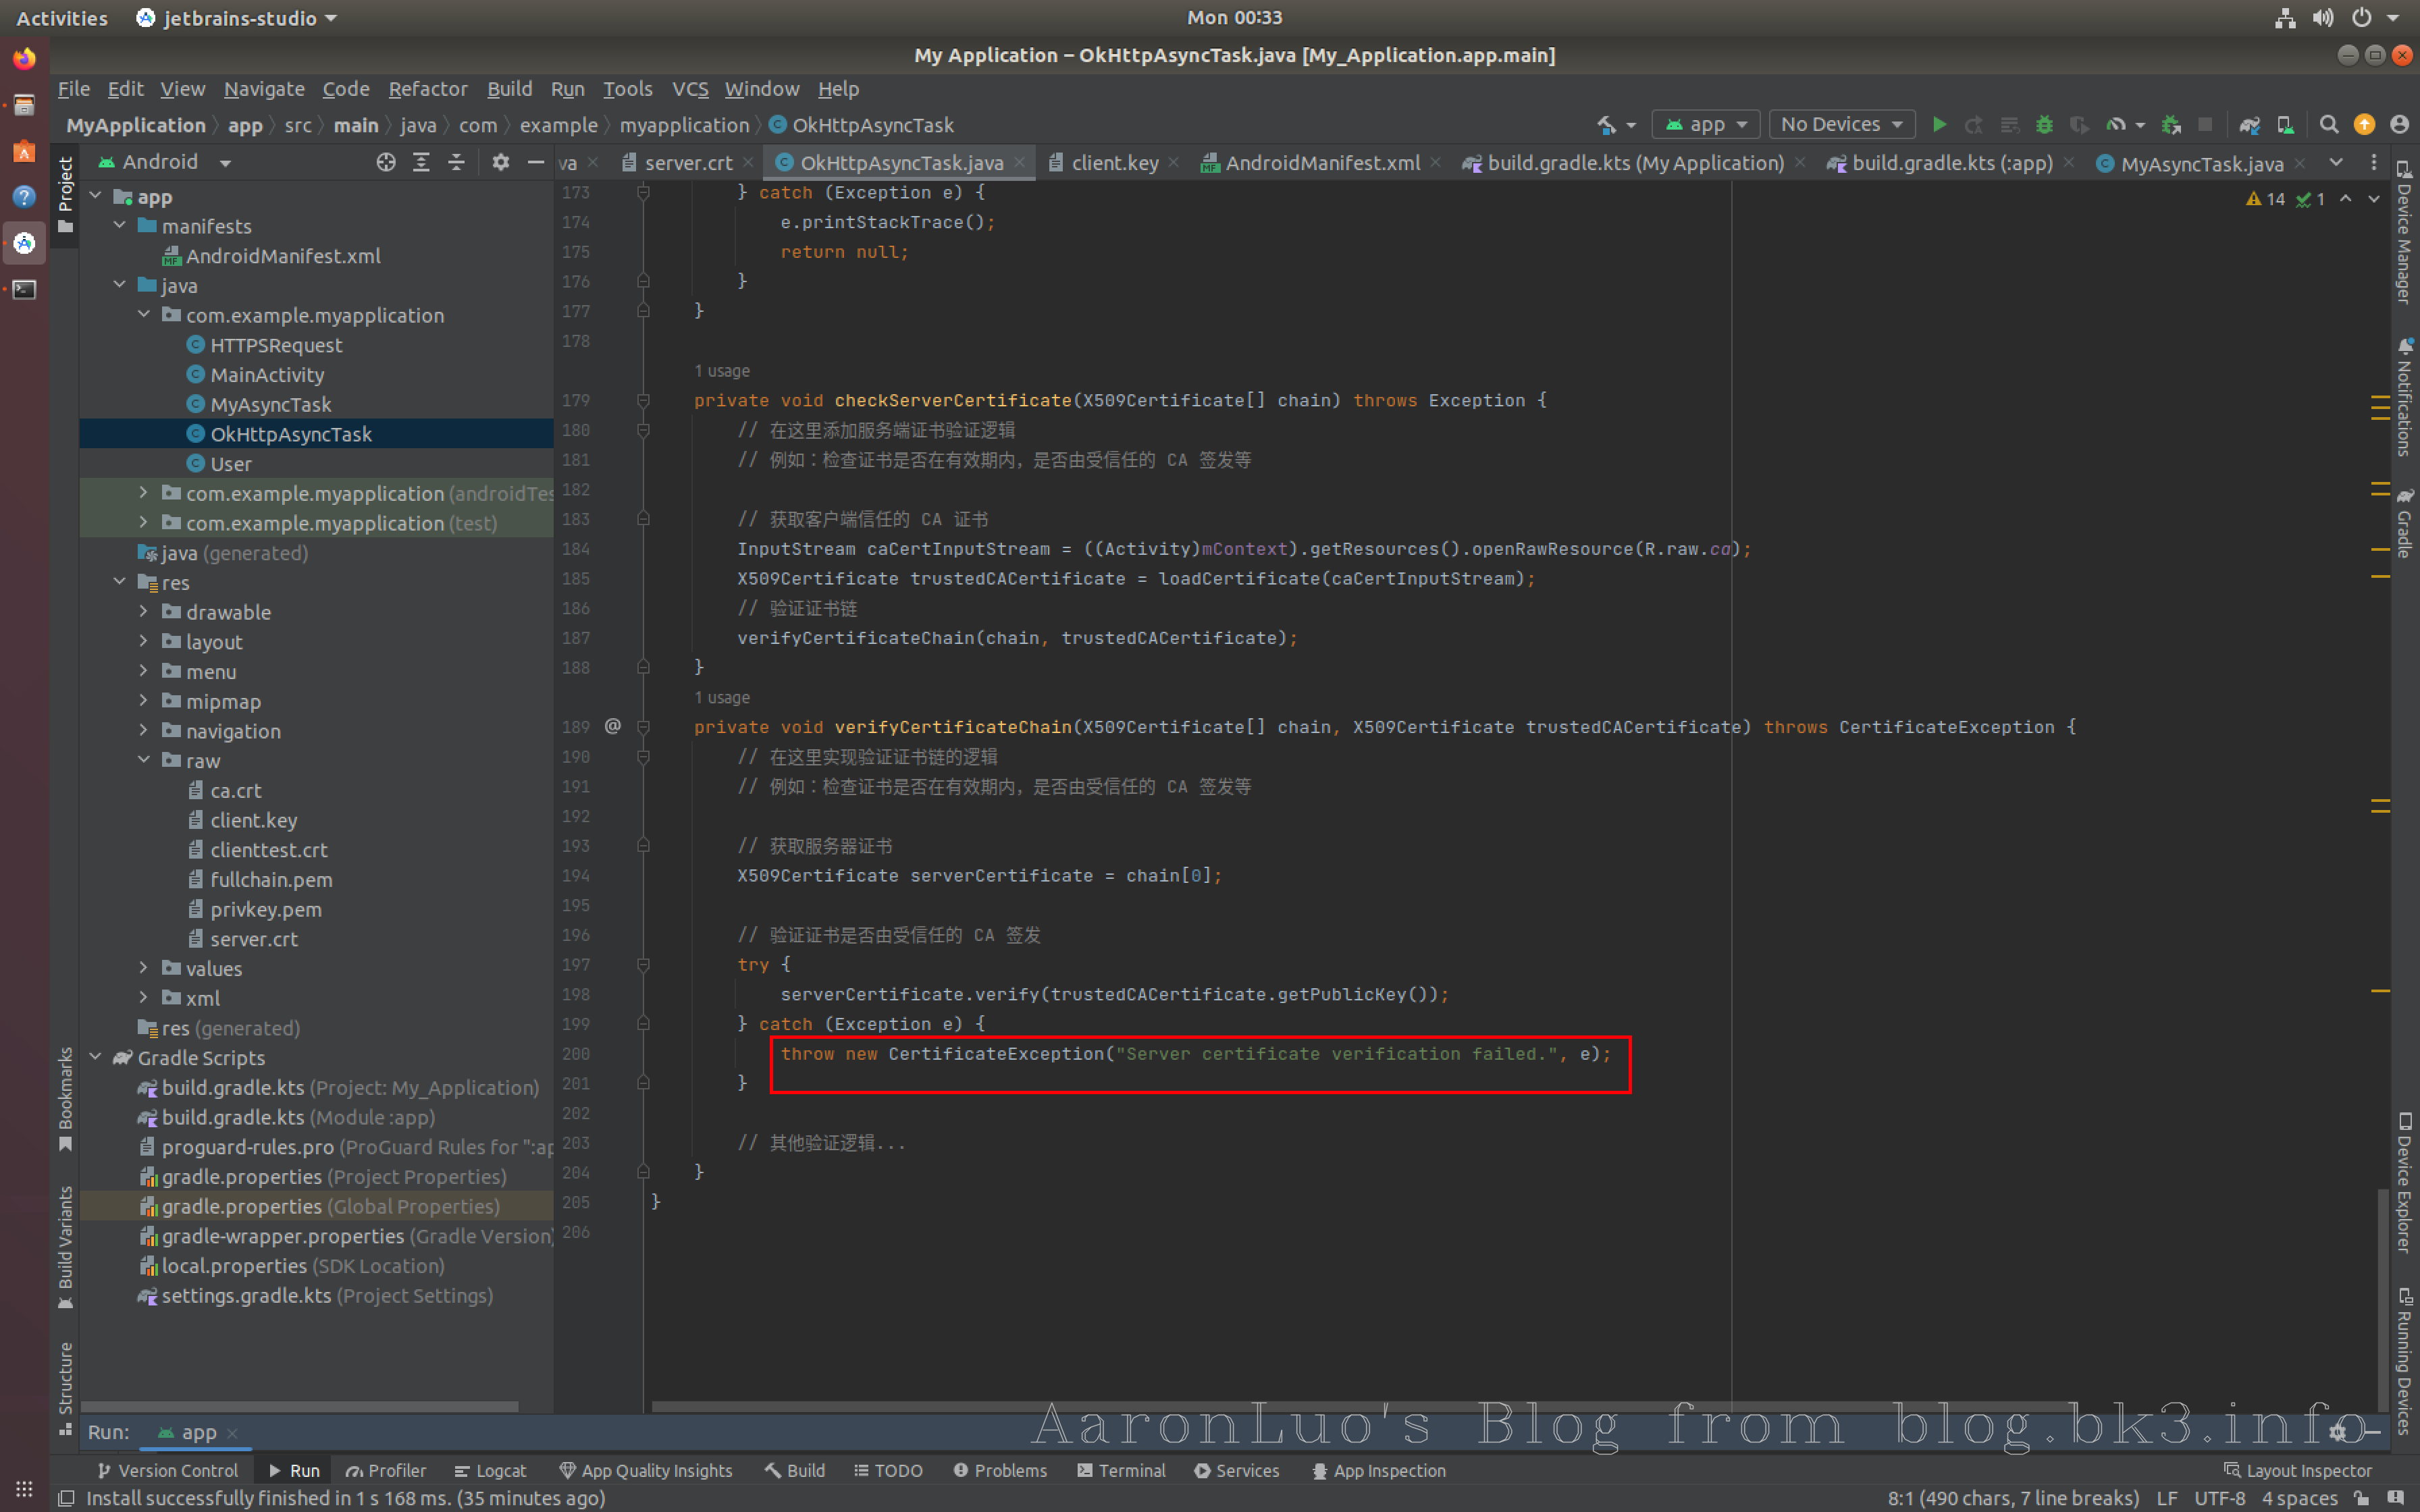
private void checkServerCertificate(X509Certificate[] chain) throws Exception {
// 在这里添加服务端证书验证逻辑
// 例如:检查证书是否在有效期内,是否由受信任的 CA 签发等
// 获取客户端信任的 CA 证书
InputStream caCertInputStream = ((Activity)mContext).getResources().openRawResource(R.raw.ca);
X509Certificate trustedCACertificate = loadCertificate(caCertInputStream);
// 验证证书链
verifyCertificateChain(chain, trustedCACertificate);
}
private void verifyCertificateChain(X509Certificate[] chain, X509Certificate trustedCACertificate) throws CertificateException {
// 在这里实现验证证书链的逻辑
// 例如:检查证书是否在有效期内,是否由受信任的 CA 签发等
// 获取服务器证书
X509Certificate serverCertificate = chain[0];
// 验证证书是否由受信任的 CA 签发
try {
serverCertificate.verify(trustedCACertificate.getPublicKey());
} catch (Exception e) {
throw new CertificateException("Server certificate verification failed.", e);
}
// 其他验证逻辑...
}
}
当我们启动app之后,代理到burp中可以看到服务端证书不被信任(也就是app校验burp的证书失败)
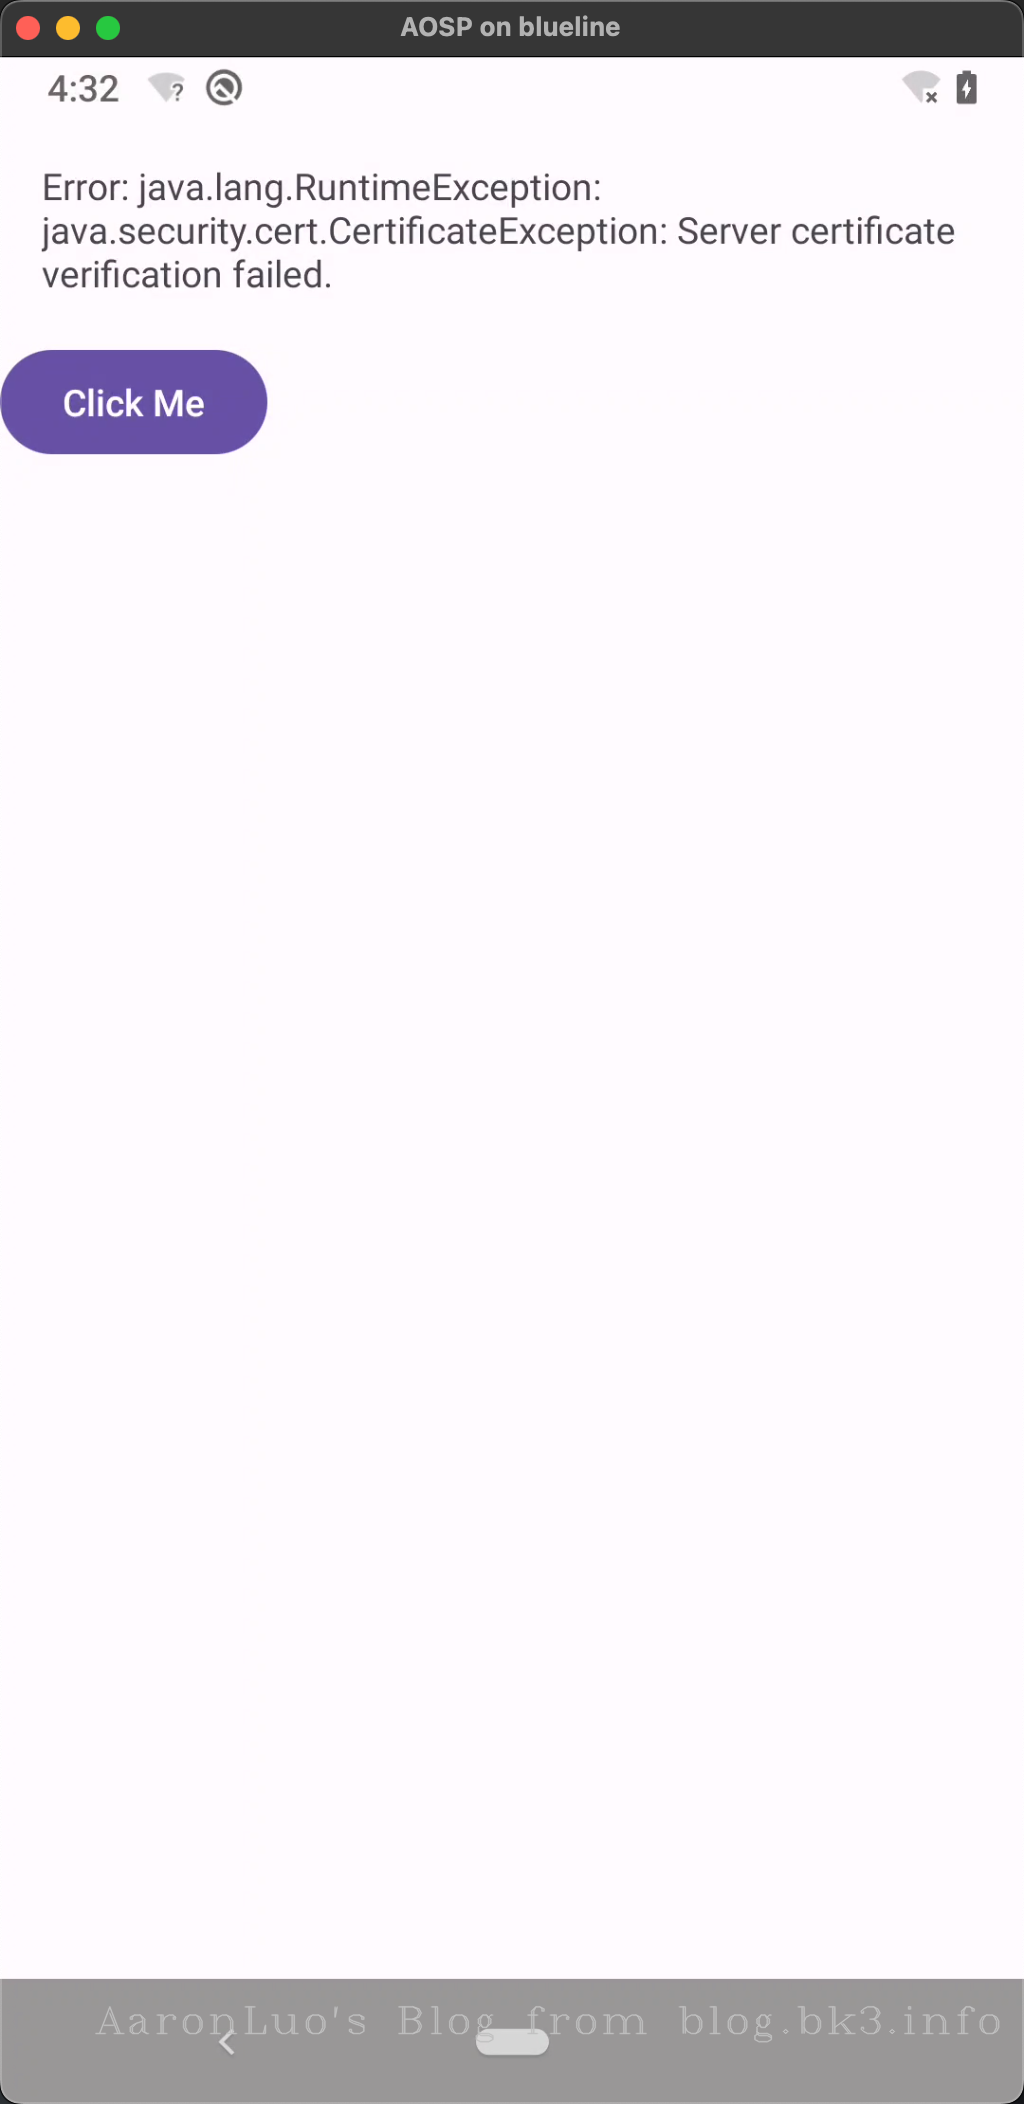
可以看到这个时候我们的app和服务端已经完全开启双向认证了
此时我们需要对apk进行反编译,获取到${app_home}/res/raw/client.crt、${app_home}/res/raw/client.key或者${app_home}/res/raw/client.p12,如果是p12格式的文件,需要去获取到密钥,如果是证书文件,可以先试用openssl命令尝试是否能通过校验
[!TIP]
我这里只是为了方便使用android的R方法直接获取在这个目录下的证书文件
查阅部分资料,发现大部分是放在这个文件里的(纯java android),还有其他放在assets目录下,目前暂未遇到
openssl s_client -connect www.bk3.info:8088 -cert client.crt -key client.key
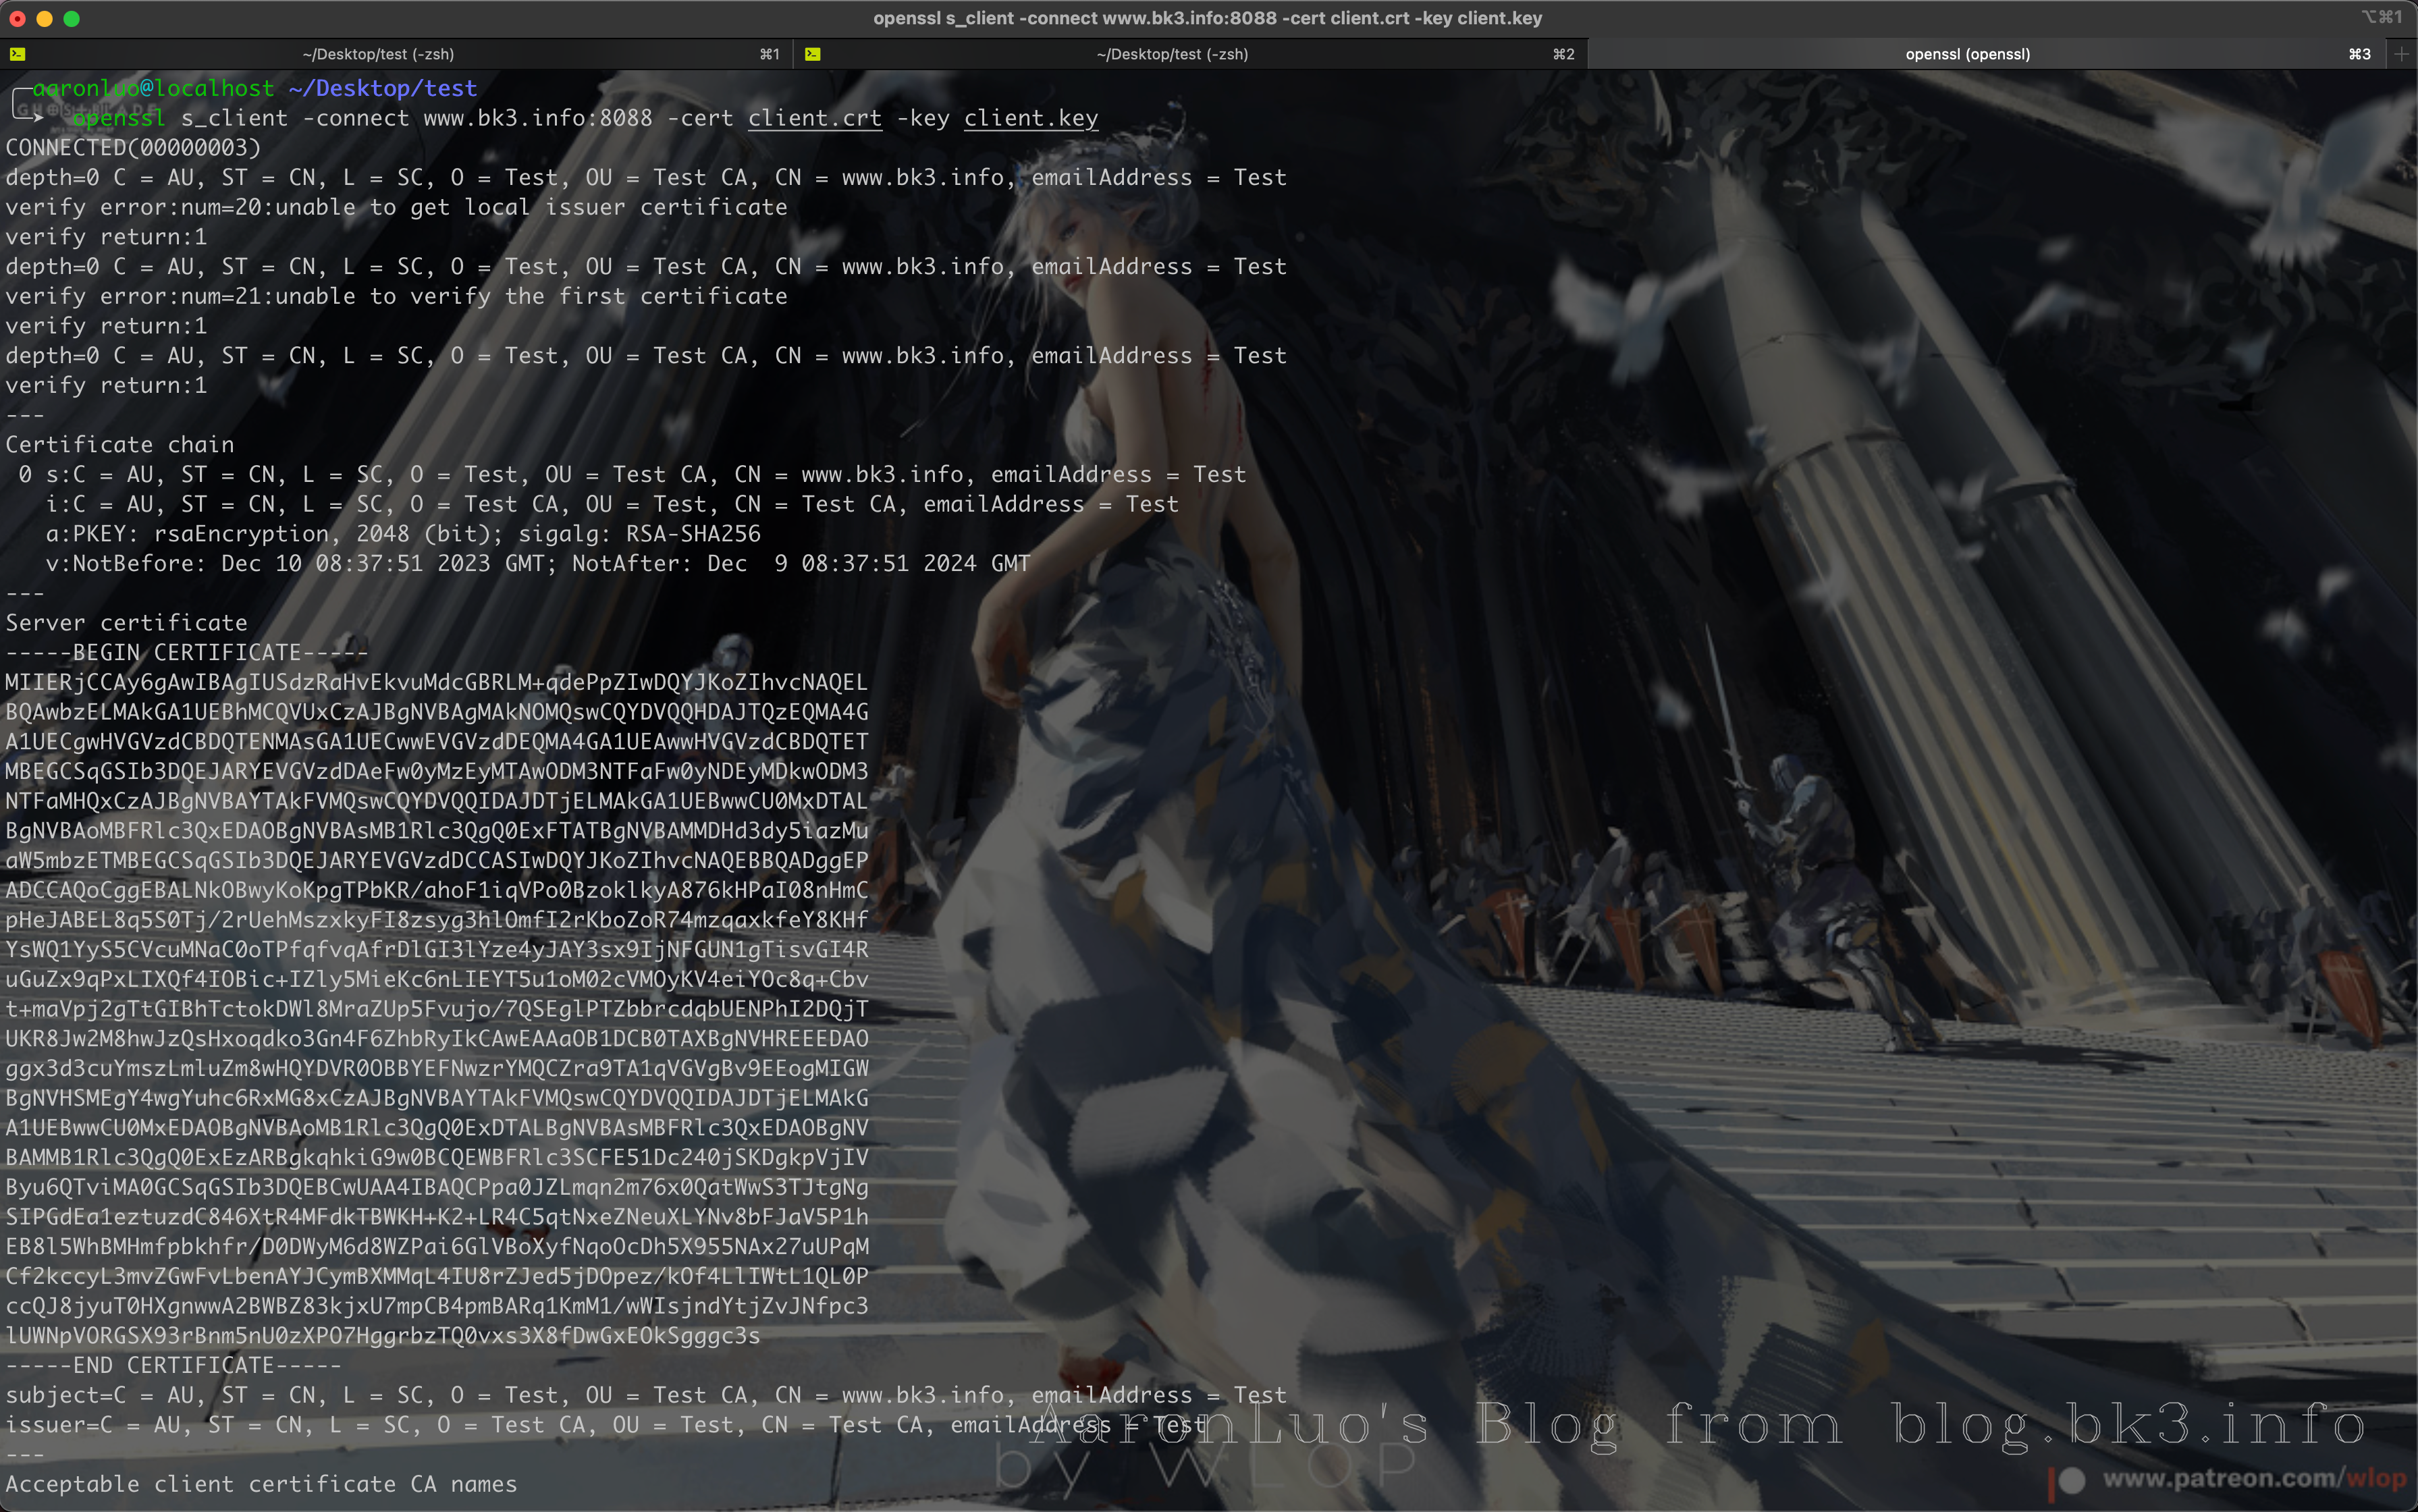
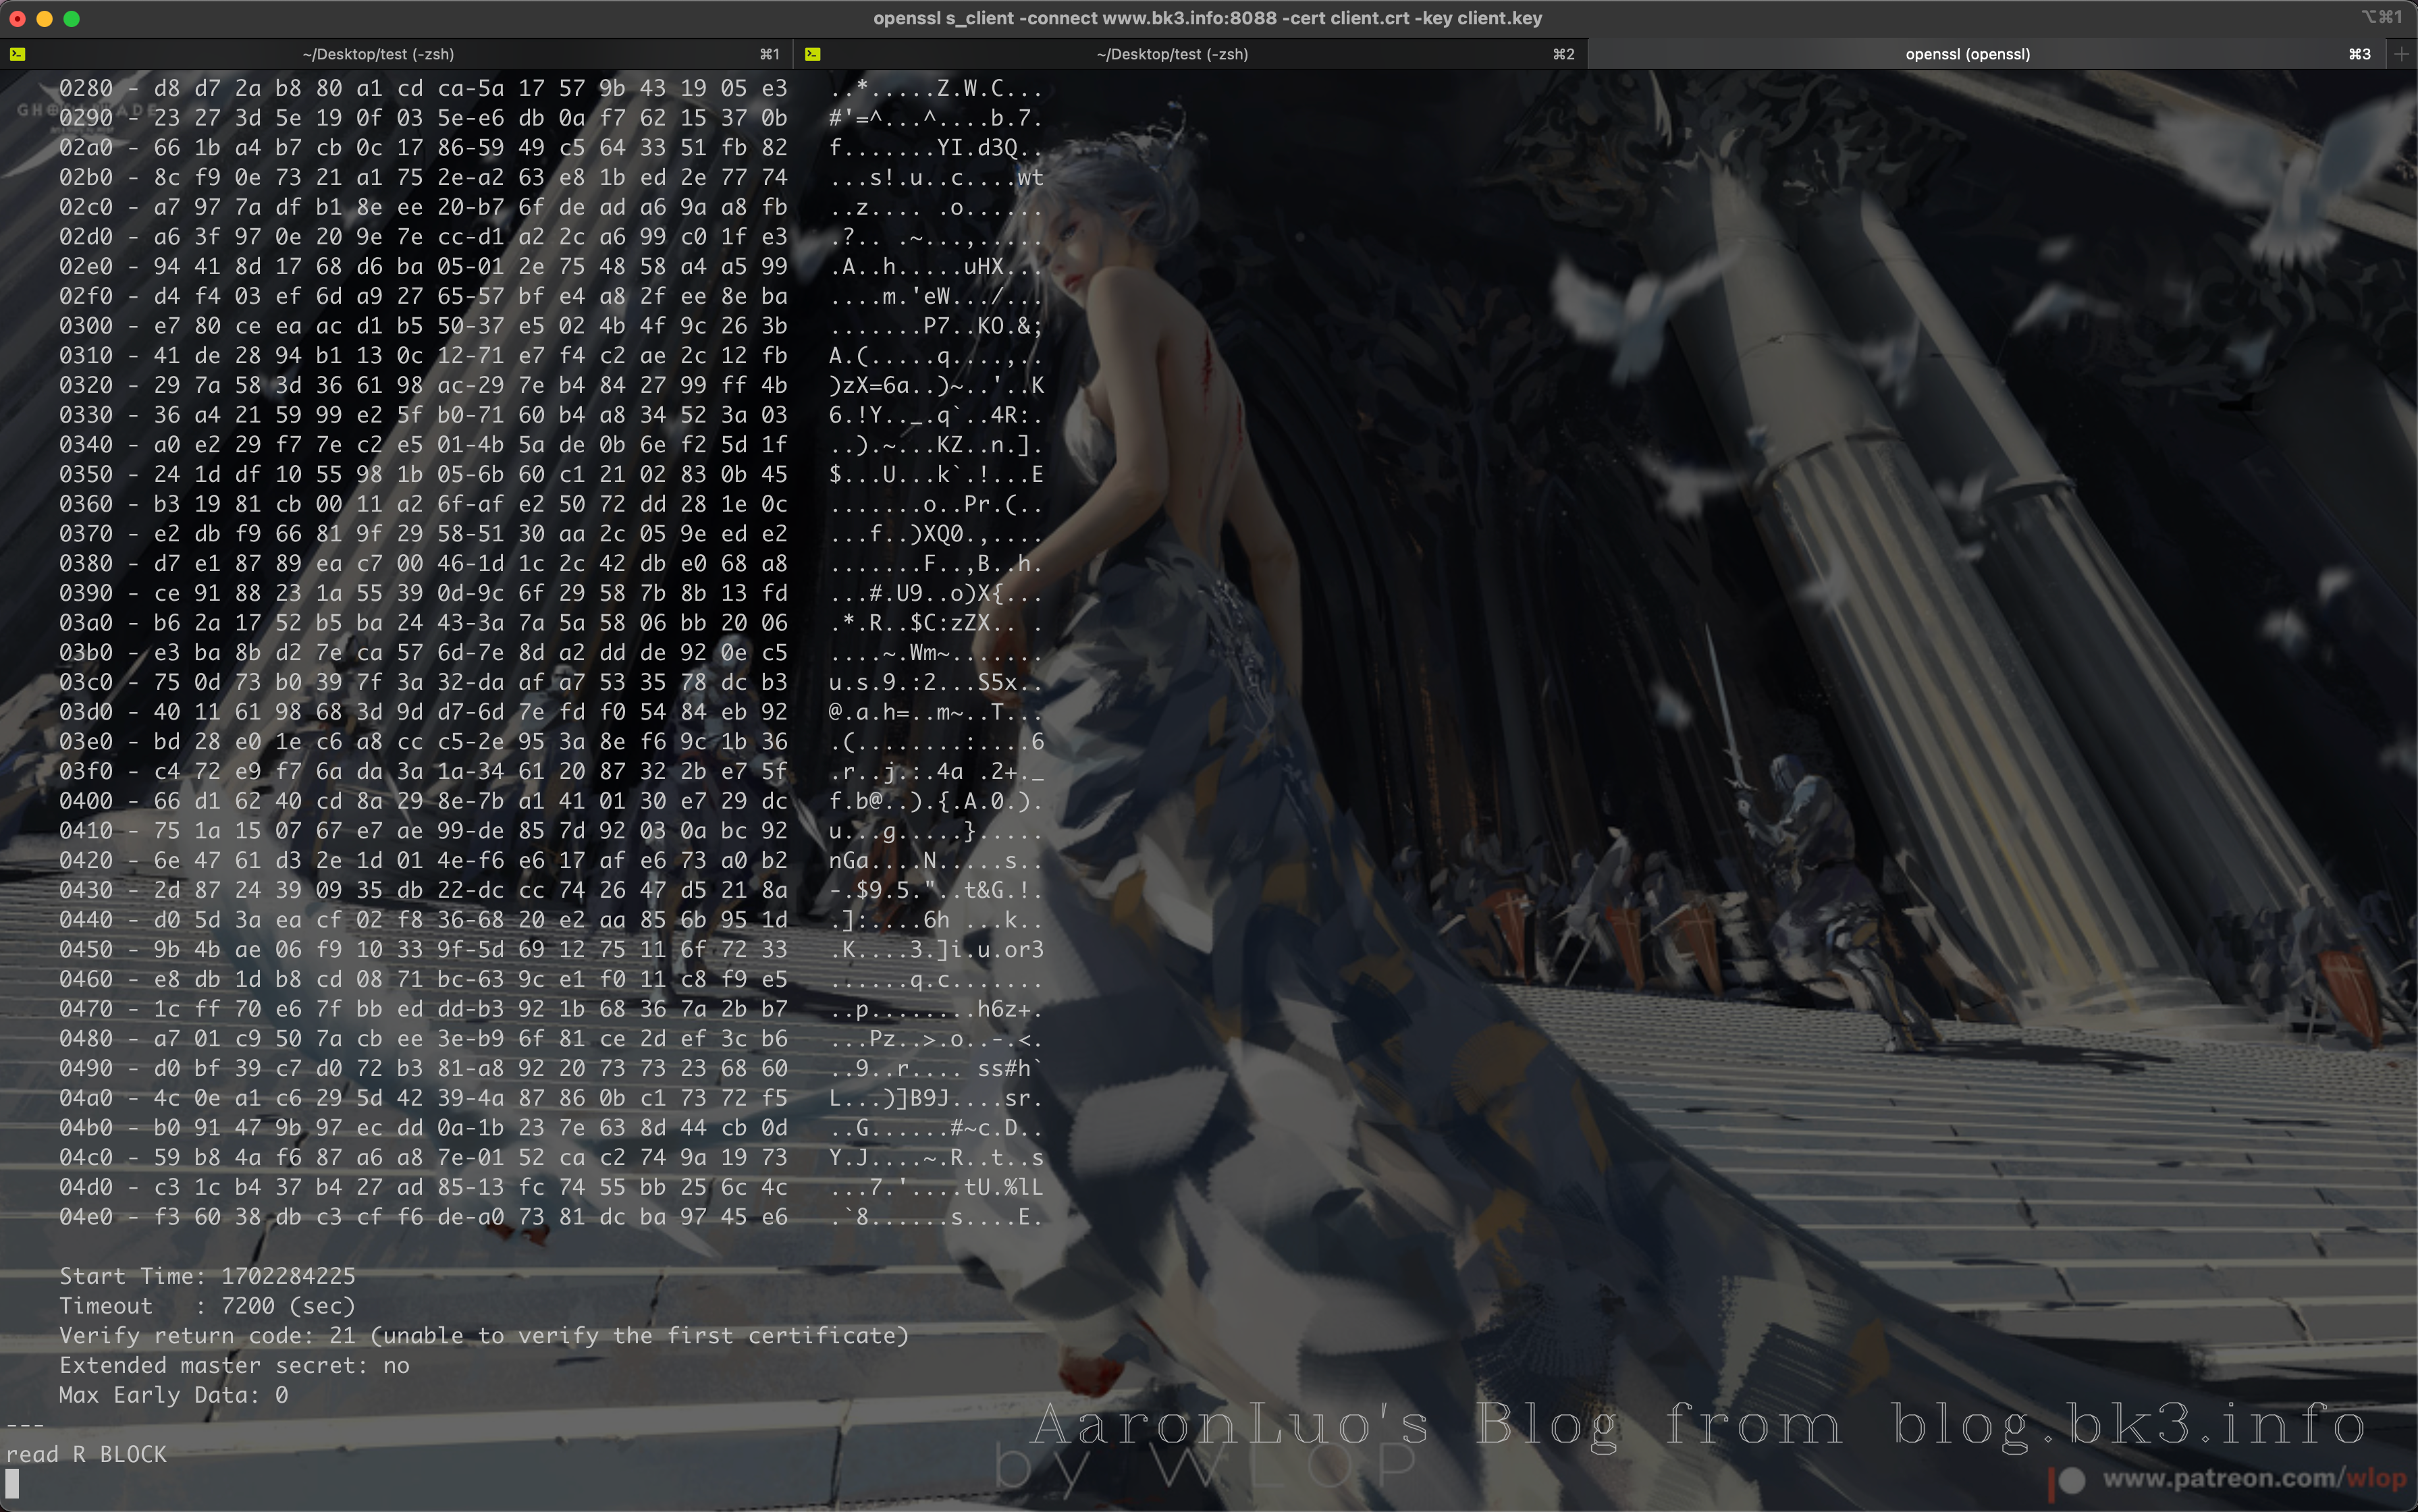
当证书校验通过之后,那么在read BLOCK处就可以发送request请求
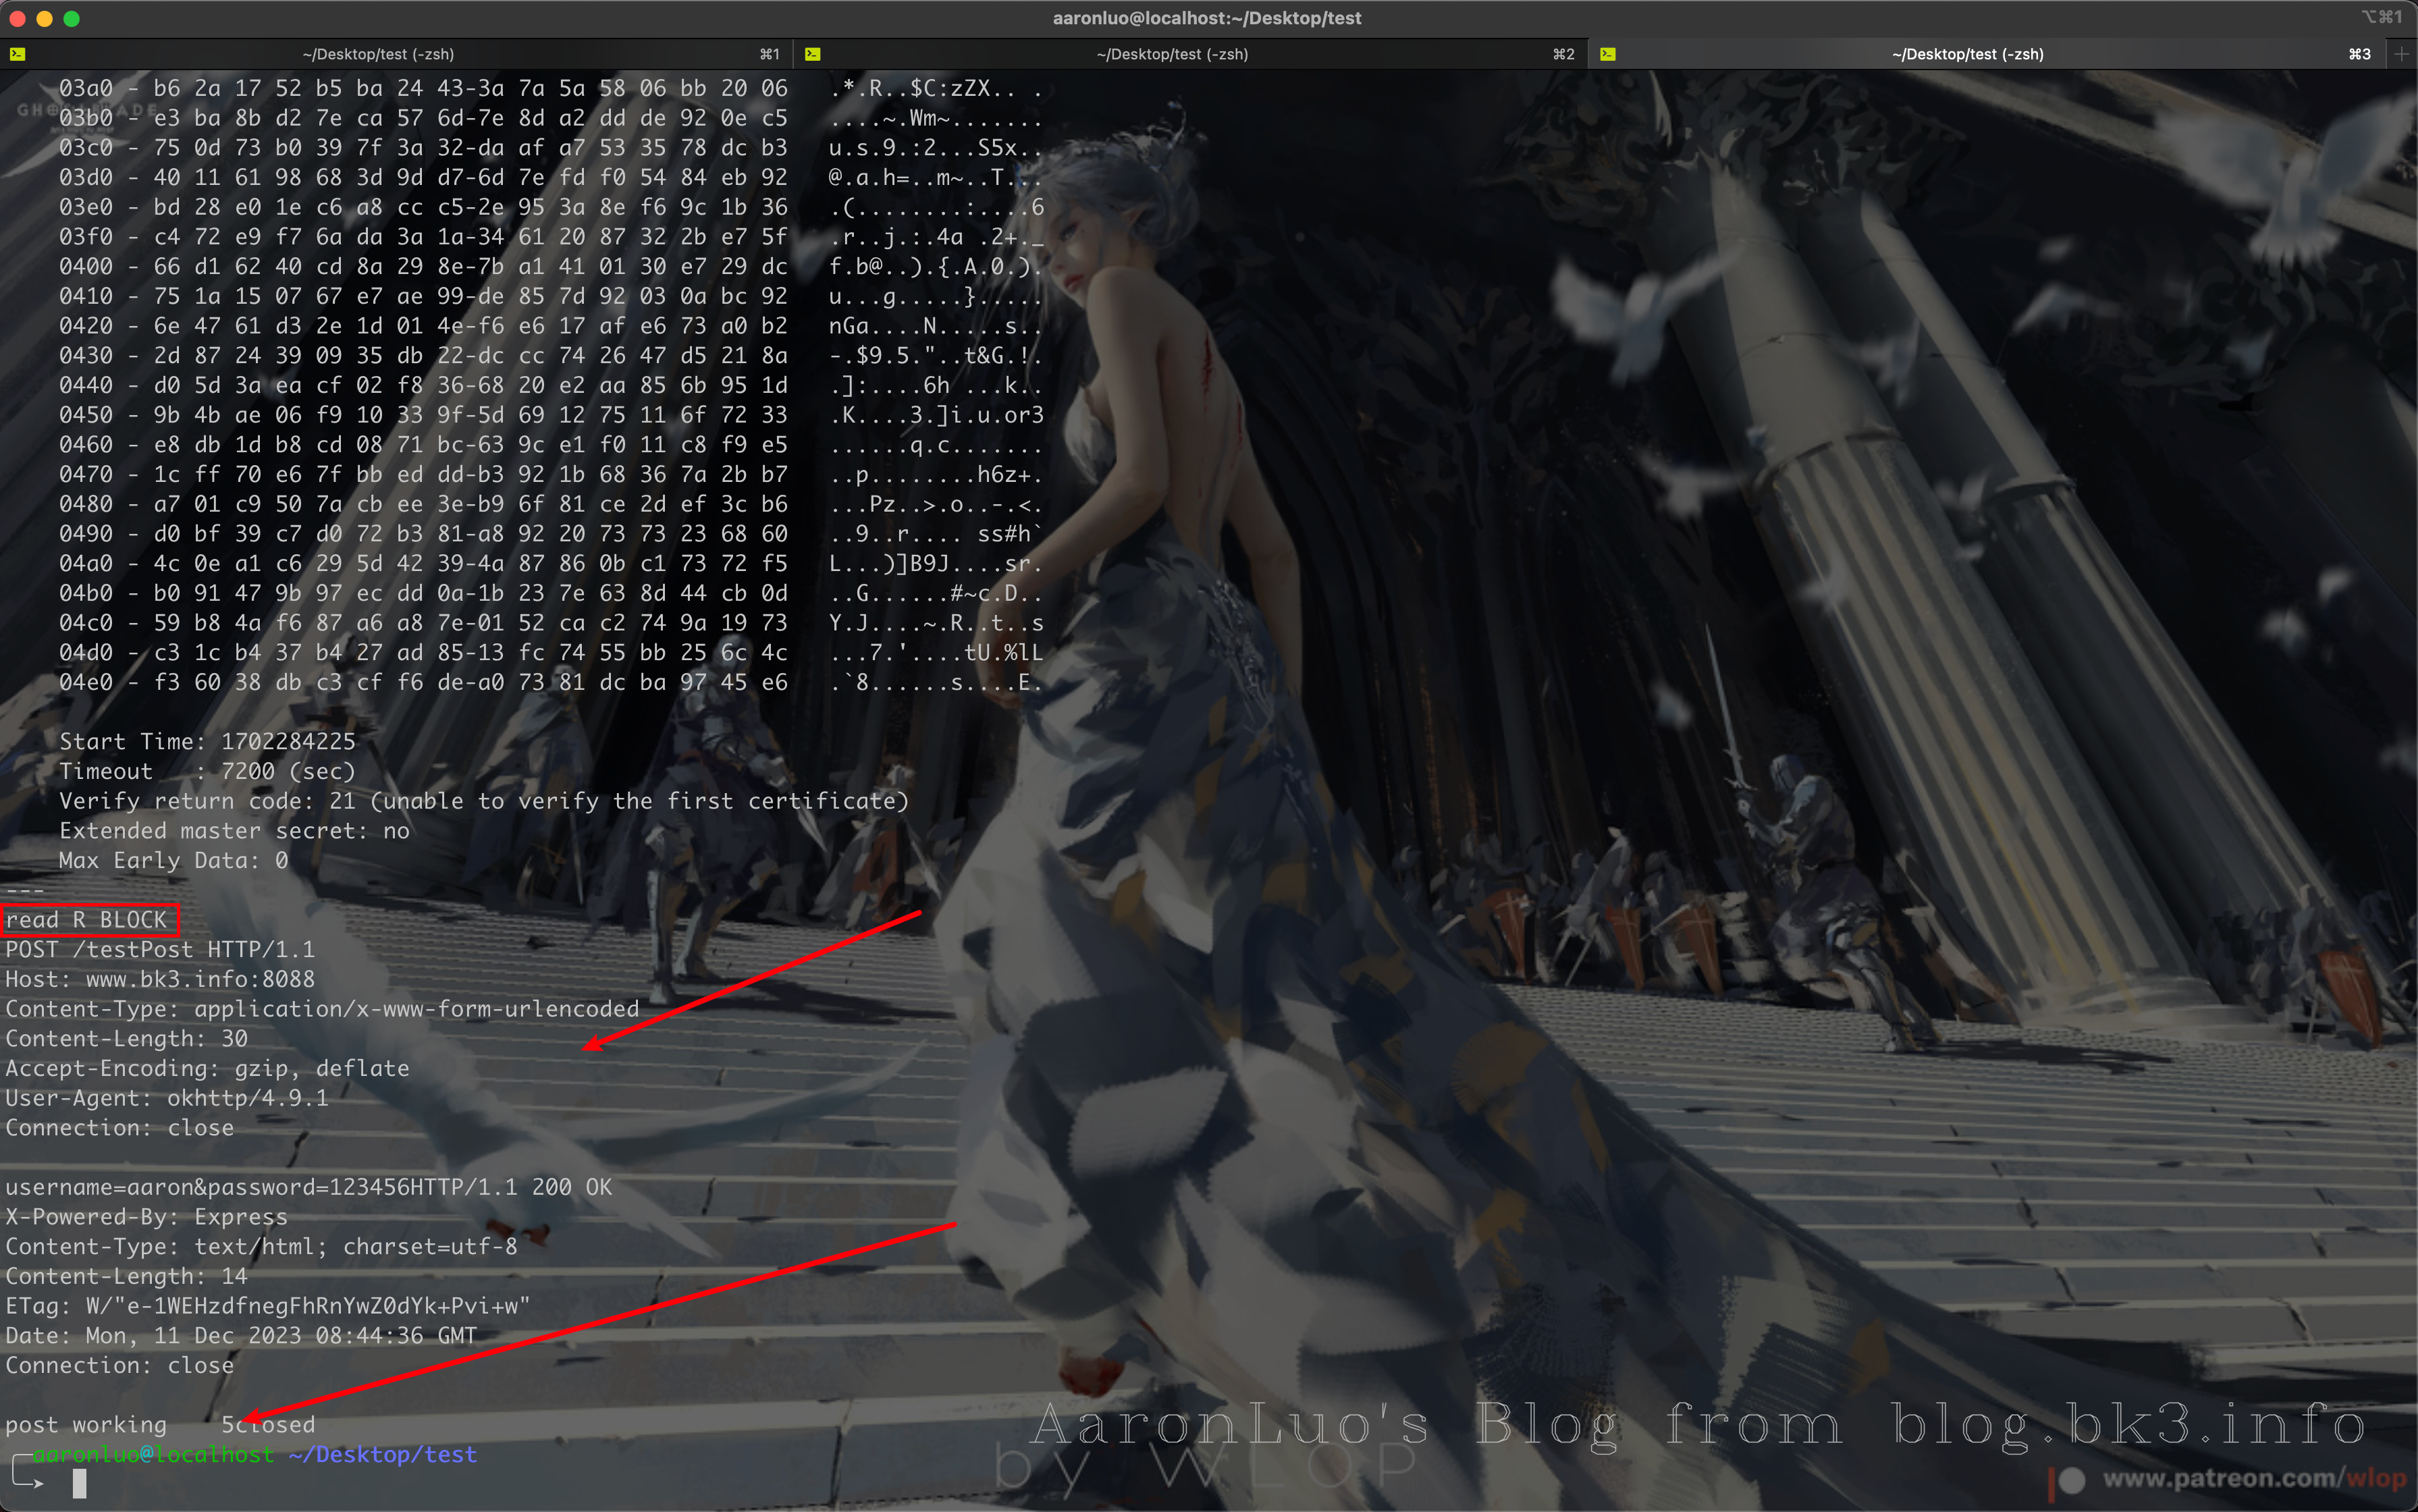
如果证书校验不通过是如下状态

当明白证书的双向校验逻辑之后,那么将burpsuite当作客户端,导入客户端证书,那么就只需要解决客户端对服务端证书的校验,那么和SSL Pinning 方法同理
root过的机器,通过frida hook 可以直接绕过SSL Pinning 检测,直接抓包

root过的机器,通过Xposed + JustTruestMe(足够强的hook 脚本 ),可以绕过SSL Pinning检测,直接抓包

非root的机器,通过VirtualXposed + JustTrustMe,可以绕过SSL Pinning检测,直接抓包
自签证书,get shell之后拿到服务器Server.key,Server.crt,生成PK12格式证书,导入到BurpSuite,此时在中间人攻击的时候app与burp通信的时候就是app对自签服务端证书进行校验,通过之后,burp在与服务端进行通信最后再转发至app
当然也可以导入由server.crt、和server.key 生成的p12格式证书,替换burpsuite格式的证书,但是不推荐,SSL Pining章节只是为了完成之前一个项目的纠结点
一些小TIPS
Q:如果我们能拿到受信任的证书颁发机构的根证书(CA.crt)以及证书颁发机构的根证书私钥(CA.key),将burpsuite证书替换,是否可以实现客户端不用导入证书抓包
A: 理论上应该是的,通过对中间人攻击的梳理,应该是可以的。
受信任的证书颁发机构的根证书(CA.crt)以及证书颁发机构的根证书密钥(CA.key),是肯定不可能泄漏给任何个人及组织,如果泄漏了,那么可以使用根证书和根证书私钥任意签发受信任的证书,那么受信任的根证书机构就变得不受信任了。所以burpsuite的CA证书,也是自签名的,必须要导入到系统根证书目录下,且默认信任才能实现中间人攻击
Q:根证书校验服务器/客户端证书的流程
A:CA证书中包含了CA机构的信息,以及CA机构的公钥。在验证服务端/客户端证书时,客户端/服务端需要使用CA证书来验证服务端/客户端证书的合法性。如果CA证书无效或者未通过验证,客户端/服务端将无法信任任何由该CA机构颁发的证书